Create an uDeploy application process
What is Applications Process?
Application processes, like component processes, are created with the process editor. You use application processes to deploy or to roll back components. These tasks are called processes. However, at the application level, processes are concerned only with the components and resources that are necessary for deployment, and related tasks. By contrast, component processes are concerned with running commands and related tasks.).
- Application processes can run manually, automatically on some trigger condition, or on a user-defined schedule.
- When a component has several processes, the application determines which ones run and in which order.
- An application process is always associated with a target environment.
- At least one environment must be associated with the application before the process can run.
How to create Application process?
- Click the Applications tab, and then click hello Application.
- Click Processes, and then click Create Process.
- In the Create an Application Process window, name the new application process something like hello App Process.
- Accept the default values for the other fields, and click Save.
- To open the new process in the process editor, click the new process.
- Add a step that deploys the helloWorld component:
- From the list of steps, add an Install Component step to the design area, and then on the process step click the Edit icon
 .
.
- In the Edit Properties window, name the step something like Deploy helloWorld.
- In the Component list, select the helloWorld component. All components that are associated with an application are available.
- In the Component Process list, select the helloProcess component process. If multiple processes were defined for the helloWorld component, they are listed.
- In the Limit to Tag list, select the blueCycle tag that you defined earlier. After you select blueCycle, the application deploys only components with this tag.
- Accept the default values for the other fields, and click OK.
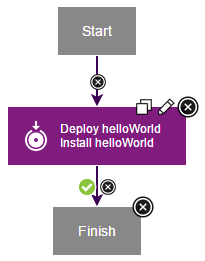
- Verify that the Start step is connected to the Deploy helloWorld step.
- Verify that the Deploy helloWorld step is connected to the Finish step.
- Save the process by clicking Save.
The complete application process looks like the following figure:
How to create Application process in details?
- Display the Create an Application Process dialog box (Applications > select application > Processes > Create Process), and enter the following information:

| Field |
Description |
| Name andDescription |
Typically the name and description correspond to the application you plan on deploying.
Note
You must specify a unique name. Your application process name cannot contain the same sequence of alphanumeric characters with different capitalization as an existing application process.
|
| Inventory Management |
If you want to handle inventory manually, select Advanced. To have inventory that is handled automatically, leave the default value, Automatic, selected. See Inventories. |
| Offline Agent Handling |
Specify how the process reacts if expected agents are offline:
- Check Before Execution: checks to see whether expected agents are online before you start the process. If agents are offline, the process does not run.
- Use All Available; Report Failure: process runs while at least one agent is online; reports any failed deployments because of offline agents. Useful for rollbacks or configuration deployments.
- Always Report Success: process runs while at least one agent is online; reports successful deployments.
|
| Required Role |
Use this list to select the role that a user must have to run the application. For information about creating application roles, see Roles and permissions. The default value is None. |
- Save your work.