Puppet 4: Server and Puppet Enterprise
WHAT IS THE PUPPET SERVER
About Me !

 |
 |
 |
Module Overview
- Lab Environment
- Installing CentOS 7
- Course Contents
- Puppet Server vs Puppet Enterprise
Lab Environment
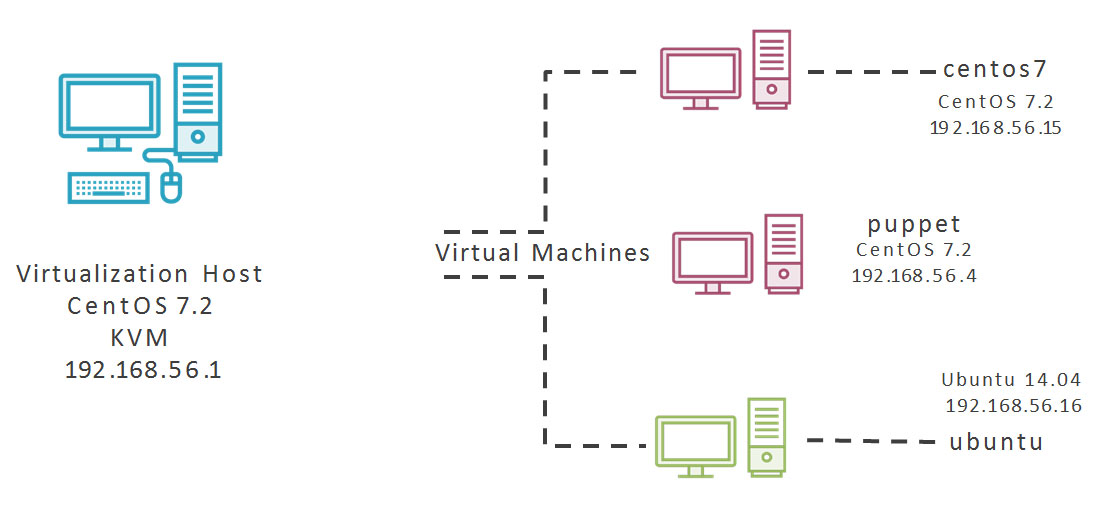
Installing CentOS 7 for Puppet Server
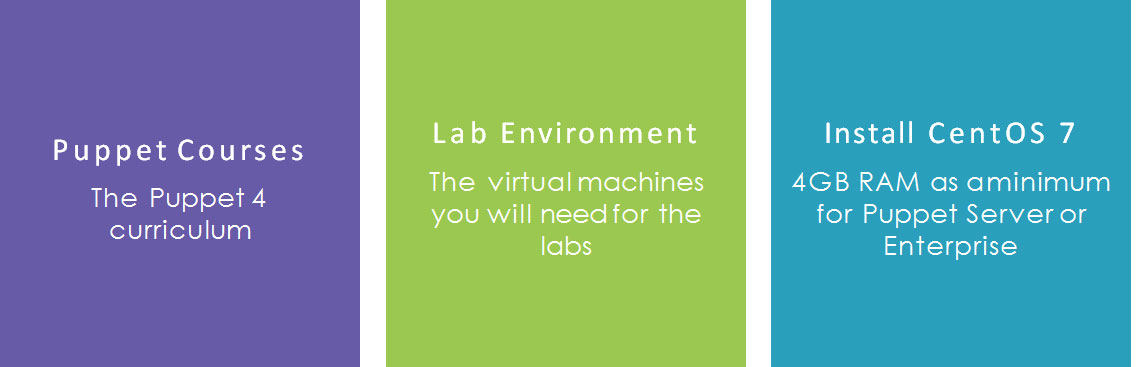
Puppet 4 and the latest Puppet Enterprise are based on Java. As such there is a requirement of a minimum of 4GB RAM. We will run though the Virtual Machine Setup.
- Puppet 4: Language Essentials
- Puppet 4: Working with Modules and Classes
- Puppet 4: Working with Files and Templates
- Puppet 4: Hiera the Single Source of Truth
- Puppet 4: Server and Puppet Enterprise
Puppet 4: Server and Puppet Enterprise
Server vs Enterprise
Summary
Installing Puppet Enterprise
Objectives
- Configuring NTP.
- Configuring Puppet Server Hostname.
- Accessing the Installer.
- Installing Puppet Enterprise.
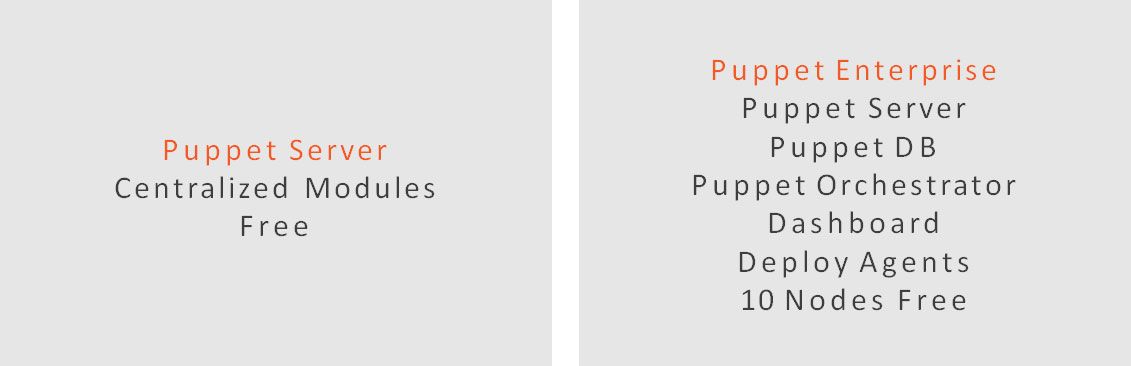
Puppet Enterprise
Puppet Enterprise is free for 10 nodes and includes Puppet Server, Puppet DB and the Dashboard.
The Puppet Server 4 can be installed independently from the Puppet Labs Repository.
$ sudo yum install ntp
$ sudo systemctl start ntpd
$ sudo systemctl enable ntpd
$ sudo ntpq -pThe Puppet Server will also act as a certificate server to provide agent authentication. For this, as well as other reasons, time should be accurate. We will start by installing the NTP time server.
sudo hostnamectl set-hostname puppet.example.vm
ip addr show
sudo vim /etc/hostsWe also need to make sure the correct hostname will be stored on the server’s certificate and that the server can resolve this name. This can be with DNS or the local hosts file.
Configuring NTP and Hostname
Puppet Enterprise can be downloaded for 64 bit versions of Red Hat, SUSE and Ubuntu systems from: https://puppet.com/download-puppet-enterprise
#tar -xzvf puppet-enterprise-2016.2.1-el7-x86_64.tar.gz
#cd puppet-enterprise-2016.2.1-el7-x86_64
#./puppet-enterprise-installer You will need to expand the downloaded archive file and the installation program executed. The installer will prompt for a guided install or text install. The guided install will start the web installation on port 3000.
In this module we have configured the hostname of the Puppet Server and NTP before downloading and installing Puppet Enterprise
Installation is for 64 bit versions of SUSE, Ubuntu or Red Hat
The guided install uses HTTPS and port 3000
Next up: Investigating the Dashboard
Investigating the Dashboard
Objectives
- Accessing the Dashboard or Puppet Enterprise Console
- Licensing PE
- Managing Access Rights and Users
- Accessing the Configuration Area
- Managing Nodes
Puppet Enterprise Console
The Puppet Enterprise Console or what is often just referred to as the Dashboard allows for web based administration of Puppet without the need of third party tools like Foreman.
From the License Node you may see what licenses are in use
After the install you will see that you have 9 licenses available as 1 is in use by the server itself
Purchased licenses can be added here
When you first login you will need to use the Admin account created during the install
Moving to the Access Control Node you can manage users and connect to external directories
You may consider adding an additional user account that also belongs to the Administrators group and possible change the Admin account name
From the Configuration Node you can view the state of the nodes on your Network
Moving to Reports area we can see a history of events for a given node
This makes use of the Puppet DB which is part of Puppet Enterprise
From the Nodes area can view each node
Moving to the Inventory sub-node we can see a history of events for a given node and facts from the node.
From the top of this page we can run the Puppet Agent on the remote node using Puppet Orchestrator
The Certificate Server can be managed from the sub-node Unsigned Certificates
Investigate the Dashboard
Puppet Enterprise Console
In this module we have reviewed the Dashboard or Enterprise Console at a high-level. We will be using this more as we progress through the course.
Next up : Installing the Agent
Installing the Agent
Objectives
- Configuring Time and Name Resolution on the Agent Systems
- Installing the Agent on CentOS 7
- Signing the Certificate in the Dashboard
- Adding the Ubuntu Puppet Agent to the Server and Installing on the Agent
- Signing the Certificate from the Command Line
Puppet Enterprise
We now have our Puppet Server running and functional. We have a CentOS 7 and Ubuntu 14.04 host that we need to install the agent on. The agent can be installed directly from the Server without the need of adding in the Puppet 4 repositories to the clients.
The agent systems need the same accurate time as the Puppet Server and they too, need to be able to resolve the server’s host name
sudo apt-get install ntpInstalling on Ubuntu will start the time service and enable the service
sudo yum install ntp
sudo systemctl start ntpd
sudo systemctl enable ntpd
Installing the NTP Service on CentOS we have to start and enable the service
#<IP>	<FQDN>	<ALIAS>
192.168.56.4 puppet.example.vm puppet The format of the hosts file allows for the Fully Qualified Domain Name and, optionally, one or more aliases. The FQDN follows the IP Address but before any aliases.
Configure Time and Name Resolution on the Agent Systems
curl -k \
https://puppet.example.vm:8140/packages/current/install.bash \
| sudo bashAs the Puppet Server is also CentOS 7, in our case, we already have the agent available to install on the CentOS 7 client.
When we start the Puppet Agent on the client system the client send its public key to be signed
This allows for agents to be authorized to collect configuration settings
Using the Dashboard we can sign client requests from the Nodes tab
Install and Sign Agent on CentOS 7
For other agent system such as the Ubuntu client, we need to add the agent to the Puppet Server
Using the Dashboard we assign a Puppet Classes to the Puppet Master group for this.
pe_repo::platform::ubuntu_1404_amd64
sudo puppet cert list
sudo puppet cert sign centos7We can sign request from the Command Line of the Puppet Server
Install and Sign Agent on Ubuntu 14.04
- Configured NTP on Ubuntu and CentOS 7 Agent Systems
- Configured /etc/hosts on both systems using FQDN and Alias
- Assigned Puppet Class to the Server Node
- Installed Agent on both Client Systems
- Sign Certificate Requests from the Dashboard and Command Line
Configuring Hiera on the Server
Objectives
- Configure the Hiera YAML
- Configure Hiera Backends
- Test Hiera
The hiera configuration file is hiera.yaml and we can locate it on the server with the following command:
sudo puppet config print hiera_config---
:backends: yaml
:hierarchy:
- "nodes/%{facts.networking.hostname}“
- "%{facts.os.family}"
- common
:yaml:
:datadir: /etc/puppetlabs/code/environments/hieradataData Backends
The data backend YAML files need to be located within the value set by the datadir key
---
motd::message: 'Pluralsight system‘
ntp::ntp_regional_server:
 - 'uk.pool.ntp.org‘
 - 'us.pool.ntp.org‘
ntp::monitor: true
ntp::ntp_local_server: '192.168.0.3'
cd /etc/puppetlabs/code/environments/production/manifests
sudo vi site.pp
node default {
 notify { hiera(motd::message): }
 }
sudo puppet agent -t #on agent nodes
We can use the puppet agent command on remote systems to test this rather than puppet apply as we have been used to. To assign a resource to a node we can use the site.pp
Configure and Test Hiera
- Editing the hiera.yaml
- Added data backend data sources for the OSFamily and Common
- Edited the servers site.pp to assign resource to nodes using node default
- Tested hiera with puppet agent -t
Deploying Modules to Agents
Objectives
- Working with Node Definitions in the site.pp
- Assigning Modules using the Dashboard
Puppet Open Source
Using the Puppet Server without the Enterprise add-ons makes the Dashboard unavailable. Node classification, or simply assigning modules and other code to nodes has to be maintained via the site.pp.
Puppet Enterprise
The site.pp becomes optional with the Puppet Enterprise Server as we can classify nodes using the Dashboard. As we have already seen, we can use the site.pp if we prefer.
File { backup => false, }If there are no node definitions in the site.pp the configuartion applies to all nodes
File { backup => false, }
node default {
notify { ‘From default’,
}If node names are used in the site.pp then all nodes must have a definition. The default node applies to all nodes. In the above configuration all nodes can still use the File resource setting.
File { backup => false, }
node default {
 notify { ‘From default’, }
}
node ‘centos7’ {
 notify { ‘From centos 7’, }
}Individual nodes can have their own configuration in which case they do not use the node default but still use the global settings.
File { backup => false, }
node default {
 notify { ‘From default’, }
}
node /example\.vm$/{
 notify { ‘Example’, }
}Regular expressions can be used to match the certificate name. These are not quoted but delimited using the forward slash
Using the Dashboard
Navigating through to Nodes and Classification we can see nodes groups. We can assign classes to node groups. The modules containing the classes need to be installed on the Puppet Server.
Assign Modules Using the Dashboard
/etc/puppetlabs/code/environments/production/manifests
/etc/puppetlabs/code/environments/production/modules
/etc/puppetlabs/code/environments/production/hieradataWe saw three directories in this module.
Global Settings affect all nodes if no node definitions exist. If node definitions do exist, global settings will affect all defined nodes.
File { backup => false }
Use the default node as a catch-all node definition if you need to define nodes.
node default { include puppet_vim }
Individual node definitions use the certificate name in quotes.
node ‘centos7’ { … }
Regular expressions can group node definitions.
node /example\.vm$/
- Nodes/Classification
- Add Group
- hostname ~
- Assign motd class to group
- Parameters can be set in Dashboard or with Hiera
Puppet Roles and Profiles
Objectives
Organising Puppet Modules for Efficient Assignment
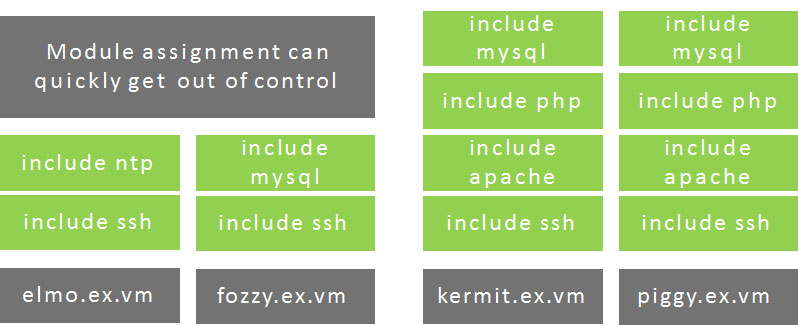
The Problem
Profiles
Profile Classes- Comprised of small modular element
- Breaking applications down into Puppet Modules
- Database, Web, Dynamic_Web, CMS
Roles
Role Classes
- Implement profiles
- Should not contain any logic
- Assigned to nodes
- How the business describes the server
cd /etc/puppetlabs/code/environments/production
sudo mkdir -p modules/{profile,role}/manifests
sudo vim modules/profile/manifests/base.pp
include profile::baseRoles and Profiles are just classes that appear as sub-classes to the Profile or Role module. They are created as normal but we do not need the init.pp as we never implement just the Role or Profile class.
class profile::base {
  include tree
  include rubygems
  include lint
  include puppet_vim
}
Roles
The role is the business implementation. For example a Content Management System Server may be assigned the cms role. Roles include profile definitions and nodes include a single role
class role::cms {
  include profile::ntp
  include profile::base
  include profile::apache
  include profile::php
  include profile::mysql
  include profile::wordpress
}
Modules
We still need our base modules. For use we installed these from the Puppet Forge:
- puppet module install puppetlabs-apache
- puppet module install puppetlabs-mysql
- puppet module install mayflower-php
Profiles are used to group modules together based on implementation. We would have a profile that represents each element of a server application. We also can ensure that the complexity of the underlying module is simplified with the Profile:
class profile::mysql {
  class { ‘mysql::server’:
   root_password => ‘Password1’,
}
 include mysql::client
}
Roles are used as the Business Implementation of profiles. Using the profiles we have created we can further create a LAMP role. That role can be assigned to one or more nodes.
Questions !!