zabbix Container do not accept config changes while running. Any changes you want to make in the containers of zabbix, must be passed during “docker run” itself. Check Docker hub for list of supported env variable.
https://hub.docker.com/r/zabbix/zabbix-server-mysql
Quick Guide
$ docker run --name zabbix-mysql -e MYSQL_ROOT_PASSWORD=password -d mysql
# Get a IP address of zabbix-mysql
$ docker inspect zabbix-mysql
# Replace DB_SERVER_HOST & MYSQL_USER & MYSQL_PASSWORD
$ docker run --name zabbix-server-mysql -p 10051:10051 -e DB_SERVER_HOST="172.17.0.2" -e MYSQL_USER="root" -e MYSQL_PASSWORD="password" -d zabbix/zabbix-server-mysql
# Get a IP address of zabbix-server-mysql
$ docker inspect zabbix-server-mysql
# Replace DB_SERVER_HOST & MYSQL_USER & MYSQL_PASSWORD
$ docker run --name zabbix-web-apache-mysql -p 80:8080 -e DB_SERVER_HOST="172.17.0.2" -e MYSQL_USER="root" -e MYSQL_PASSWORD="password" -e ZBX_SERVER_HOST="172.17.0.3" -e PHP_TZ="Asia/Kolkata" -d zabbix/zabbix-web-apache-mysql
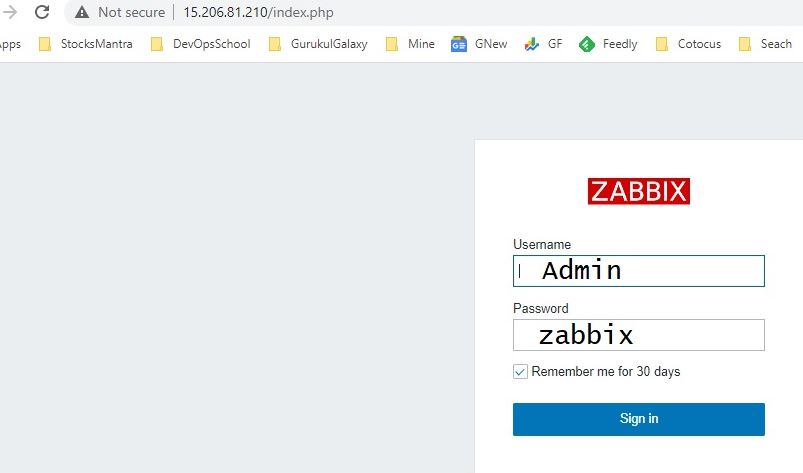
# Open a site at IP Address of Node http://15.206.XX.XX/
# Default Username and Password
Admin
zabbix Code language: PHP (php)
Note – If you want to enable JAVA GATEWAY in the Container of Zabbix Server, do following
ZBX_JAVAGATEWAY=65.0.122.17(Gate IP ADDRESS)
ZBX_JAVAGATEWAYPORT=10052
ZBX_STARTJAVAPOLLERS=5
ZBX_JAVAGATEWAY_ENABLE=true

docker run --name zabbix-server-mysql-1 -p 10051:10051 -e DB_SERVER_HOST="172.17.0.2" -e MYSQL_USER="root" -e MYSQL_PASSWORD="password" -e ZBX_JAVAGATEWAY=65.0.122.17 -e ZBX_JAVAGATEWAYPORT=10052 -e ZBX_STARTJAVAPOLLERS=5 -e ZBX_JAVAGATEWAY_ENABLE=true -d zabbix/zabbix-server-mysqlCode language: JavaScript (javascript)
Detailed Guide – Method: 1
The example demonstrates how to run Zabbix server with MySQL database support, Zabbix web interface based on the Nginx web server and Zabbix Java gateway.
1. Create network dedicated for Zabbix component containers:
# docker network create --subnet 172.20.0.0/16 --ip-range 172.20.240.0/20 zabbix-netCode language: PHP (php)2. Start empty MySQL server instance
# docker run --name mysql-server -t \
      -e MYSQL_DATABASE="zabbix" \
      -e MYSQL_USER="zabbix" \
      -e MYSQL_PASSWORD="zabbix_pwd" \
      -e MYSQL_ROOT_PASSWORD="root_pwd" \
      --network=zabbix-net \
      -d mysql:8.0 \
      --restart unless-stopped \
      --character-set-server=utf8 --collation-server=utf8_bin \
      --default-authentication-plugin=mysql_native_passwordCode language: PHP (php)
3. Start Zabbix Java gateway instance
# docker run --name zabbix-java-gateway -t \
      --network=zabbix-net \
      --restart unless-stopped \
      -d zabbix/zabbix-java-gateway:alpine-5.4-latestCode language: PHP (php)
4. Start Zabbix server instance and link the instance with created MySQL server instance
# docker run --name zabbix-server-mysql -t \
      -e DB_SERVER_HOST="mysql-server" \
      -e MYSQL_DATABASE="zabbix" \
      -e MYSQL_USER="zabbix" \
      -e MYSQL_PASSWORD="zabbix_pwd" \
      -e MYSQL_ROOT_PASSWORD="root_pwd" \
      -e ZBX_JAVAGATEWAY="zabbix-java-gateway" \
      --network=zabbix-net \
      -p 10051:10051 \
      --restart unless-stopped \
      -d zabbix/zabbix-server-mysql:alpine-5.4-latestCode language: PHP (php)
5. Start Zabbix web interface and link the instance with created MySQL server and Zabbix server instances
# docker run --name zabbix-web-nginx-mysql -t \
      -e ZBX_SERVER_HOST="zabbix-server-mysql" \
      -e DB_SERVER_HOST="mysql-server" \
      -e MYSQL_DATABASE="zabbix" \
      -e MYSQL_USER="zabbix" \
      -e MYSQL_PASSWORD="zabbix_pwd" \
      -e MYSQL_ROOT_PASSWORD="root_pwd" \
      --network=zabbix-net \
      -p 80:8080 \
      --restart unless-stopped \
      -d zabbix/zabbix-web-nginx-mysql:alpine-5.4-latestCode language: PHP (php)
Zabbix web interface instance exposes 80/TCP port (HTTP) to host machine.
Detailed Guide – Method: 2
The example demonstrates how to run Zabbix server with PostgreSQL database support, Zabbix web interface based on the Nginx web server and SNMP trap feature.
1. Create network dedicated for Zabbix component containers:
# docker network create --subnet 172.20.0.0/16 --ip-range 172.20.240.0/20 zabbix-netCode language: PHP (php)2. Start empty PostgreSQL server instance
# docker run --name postgres-server -t \
      -e POSTGRES_USER="zabbix" \
      -e POSTGRES_PASSWORD="zabbix_pwd" \
      -e POSTGRES_DB="zabbix" \
      --network=zabbix-net \
      --restart unless-stopped \
      -d postgres:latestCode language: PHP (php)
3. Start Zabbix snmptraps instance
# docker run --name zabbix-snmptraps -t \
      -v /zbx_instance/snmptraps:/var/lib/zabbix/snmptraps:rw \
      -v /var/lib/zabbix/mibs:/usr/share/snmp/mibs:ro \
      --network=zabbix-net \
      -p 162:1162/udp \
      --restart unless-stopped \
      -d zabbix/zabbix-snmptraps:alpine-5.4-latestCode language: PHP (php)
4. Start Zabbix server instance and link the instance with created PostgreSQL server instance
# docker run --name zabbix-server-pgsql -t \
      -e DB_SERVER_HOST="postgres-server" \
      -e POSTGRES_USER="zabbix" \
      -e POSTGRES_PASSWORD="zabbix_pwd" \
      -e POSTGRES_DB="zabbix" \
      -e ZBX_ENABLE_SNMP_TRAPS="true" \
      --network=zabbix-net \
      -p 10051:10051 \
      --volumes-from zabbix-snmptraps \
      --restart unless-stopped \
      -d zabbix/zabbix-server-pgsql:alpine-5.4-latestCode language: PHP (php)
5. Start Zabbix web interface and link the instance with created PostgreSQL server and Zabbix server instances
# docker run --name zabbix-web-nginx-pgsql -t \
      -e ZBX_SERVER_HOST="zabbix-server-pgsql" \
      -e DB_SERVER_HOST="postgres-server" \
      -e POSTGRES_USER="zabbix" \
      -e POSTGRES_PASSWORD="zabbix_pwd" \
      -e POSTGRES_DB="zabbix" \
      --network=zabbix-net \
      -p 443:8443 \
      -p 80:8080 \
      -v /etc/ssl/nginx:/etc/ssl/nginx:ro \
      --restart unless-stopped \
      -d zabbix/zabbix-web-nginx-pgsql:alpine-5.4-latestCode language: PHP (php)
Detailed Guide – Method: 3
The example demonstrates how to run Zabbix server with MySQL database support, Zabbix web interface based on the Nginx web server and Zabbix Java gateway using podman on Red Hat 8.
1. Create new pod with name zabbix and exposed ports (web-interface, Zabbix server trapper):
podman pod create --name zabbix -p 80:8080 -p 10051:10051Code language: CSS (css)2. (optional) Start Zabbix agent container in zabbix pod location:
podman run --name zabbix-agent \
    -eZBX_SERVER_HOST="127.0.0.1,localhost" \
    --restart=always \
    --pod=zabbix \
    -d registry.connect.redhat.com/zabbix/zabbix-agent-50:latestCode language: JavaScript (javascript)
3. Create ./mysql/ directory on host and start Oracle MySQL server 8.0:
podman run --name mysql-server -t \
      -e MYSQL_DATABASE="zabbix" \
      -e MYSQL_USER="zabbix" \
      -e MYSQL_PASSWORD="zabbix_pwd" \
      -e MYSQL_ROOT_PASSWORD="root_pwd" \
      -v ./mysql/:/var/lib/mysql/:Z \
      --restart=always \
      --pod=zabbix \
      -d mysql:8.0 \
      --character-set-server=utf8 --collation-server=utf8_bin \
      --default-authentication-plugin=mysql_native_passwordCode language: JavaScript (javascript)
4. Start Zabbix server container:
podman run --name zabbix-server-mysql -t \
                  -e DB_SERVER_HOST="127.0.0.1" \
                  -e MYSQL_DATABASE="zabbix" \
                  -e MYSQL_USER="zabbix" \
                  -e MYSQL_PASSWORD="zabbix_pwd" \
                  -e MYSQL_ROOT_PASSWORD="root_pwd" \
                  -e ZBX_JAVAGATEWAY="127.0.0.1" \
                  --restart=always \
                  --pod=zabbix \
                  -d registry.connect.redhat.com/zabbix/zabbix-server-mysql-50Code language: JavaScript (javascript)
5. Start Zabbix Java Gateway container:
podman run --name zabbix-java-gateway -t \
      --restart=always \
      --pod=zabbix \
      -d registry.connect.redhat.com/zabbix/zabbix-java-gateway-50
6. Start Zabbix web-interface container:
podman run --name zabbix-web-mysql -t \
                  -e ZBX_SERVER_HOST="127.0.0.1" \
                  -e DB_SERVER_HOST="127.0.0.1" \
                  -e MYSQL_DATABASE="zabbix" \
                  -e MYSQL_USER="zabbix" \
                  -e MYSQL_PASSWORD="zabbix_pwd" \
                  -e MYSQL_ROOT_PASSWORD="root_pwd" \
                  --restart=always \
                  --pod=zabbix \
                  -d registry.connect.redhat.com/zabbix/zabbix-web-mysql-50Code language: JavaScript (javascript)
Reference:
- https://www.zabbix.com/documentation/current/manual/installation/containers
Docker Tutorials Fundamental To Advanced-2021 Crash Course:- https://bit.ly/3hOIbTB
I’m Rajesh Kumar, a DevOps, SRE, DevSecOps, Cloud, and Platform Engineering expert passionate about sharing practical knowledge, real-world experiences, and industry best practices. I have worked at Cotocus and regularly write about technology, travel, investing, health, product reviews, and digital marketing through my various platforms.
I publish technical articles at DevOps School, travel stories at Holiday Landmark, stock market insights at Stocks Mantra, health and fitness guidance at My Medic Plus, product reviews at TrueReviewNow, and SEO and digital marketing strategies at Wizbrand.
Find Trusted Cardiac Hospitals
Compare heart hospitals by city and services — all in one place.
Explore Hospitals