What is AWS Session Manager?
AWS Session Manager is a managed service provided by Amazon Web Services (AWS) that enables secure and seamless access to instances in the cloud. It allows users to manage and interact with their Amazon Elastic Compute Cloud (EC2) instances or on-premises instances through a web-based console or the AWS Command Line Interface (CLI), without the need for a bastion host or a public IP address.
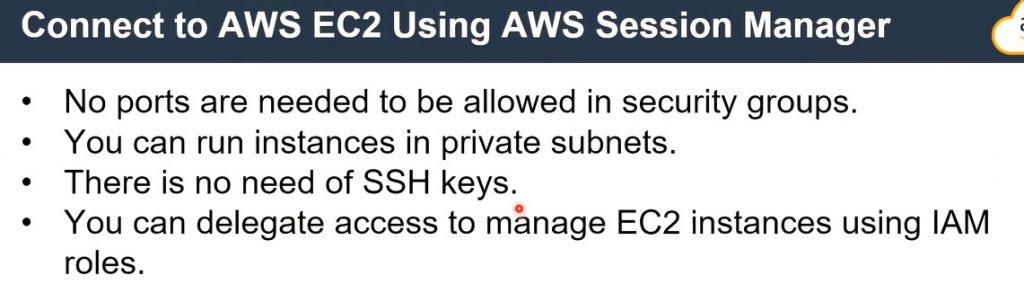
AWS Session Manager provides a secure way to access instances without exposing them to the internet, and it allows users to control access to instances using AWS Identity and Access Management (IAM) policies. It also provides an audit trail of all session activity, including user access, command history, and output.
With AWS Session Manager, users can securely manage instances and perform administrative tasks, such as installing software, running scripts, and troubleshooting issues, without the need for a VPN or SSH tunnel. It simplifies the management of instances and reduces the attack surface, making it a valuable tool for managing instances at scale.
How to install AWS Systems Manager Agent (SSM Agent) and the Session Manager plugin using user data in ubuntu
#!/bin/bash
sudo snap install amazon-ssm-agent --classic
sudo systemctl enable snap.amazon-ssm-agent.amazon-ssm-agent
sudo systemctl start snap.amazon-ssm-agent.amazon-ssm-agent
sudo snap install session-manager-plugin --classic
Code language: JavaScript (javascript)
To activate AWS EC2 Session Manager, you need to follow these steps:

To activate AWS EC2 Session Manager, you need to follow these steps:
- Ensure that you have the required permissions: In order to activate AWS EC2 Session Manager, you should have the following IAM permissions:
AmazonEC2RoleforSSMor a custom policy that includes the necessary permissions. - Launch an Amazon EC2 instance: Launch an Amazon EC2 instance or use an existing one on which you want to activate Session Manager.
- Install the Session Manager plugin: To activate AWS EC2 Session Manager, you need to have the Session Manager plugin installed on your local machine. You can download the plugin from here. Install the plugin according to your operating system.
- Attach an IAM role to the instance: Attach an IAM role to the EC2 instance with the
AmazonEC2RoleforSSMpolicy. If you have created a custom policy, then attach that policy to the instance. - Enable the Session Manager access: In order to enable Session Manager access to the EC2 instance, you need to add the following policy to the instance’s security group:
{
  "Version": "2012-10-17",
  "Statement": [
    {
      "Effect": "Allow",
      "Action": [
        "ssmmessages:CreateControlChannel",
        "ssmmessages:CreateDataChannel",
        "ssmmessages:OpenControlChannel",
        "ssmmessages:OpenDataChannel"
      ],
      "Resource": "*"
    },
    {
      "Effect": "Allow",
      "Action": [
        "ssm:UpdateInstanceInformation",
        "ssm:ListInstanceAssociations"
      ],
      "Resource": "*"
    }
  ]
}
Code language: JSON / JSON with Comments (json)- Activate Session Manager: Open the AWS Management Console, navigate to the EC2 console and select the instance on which you want to activate Session Manager. Click on the “Connect” button and select “Session Manager”. This will open a new tab in your browser and establish a secure connection to the instance. You can now use the AWS Systems Manager Session Manager to securely manage and access the instance.
I’m Rajesh Kumar, a DevOps, SRE, DevSecOps, Cloud, and Platform Engineering expert passionate about sharing practical knowledge, real-world experiences, and industry best practices. I have worked at Cotocus and regularly write about technology, travel, investing, health, product reviews, and digital marketing through my various platforms.
I publish technical articles at DevOps School, travel stories at Holiday Landmark, stock market insights at Stocks Mantra, health and fitness guidance at My Medic Plus, product reviews at TrueReviewNow, and SEO and digital marketing strategies at Wizbrand.
Find Trusted Cardiac Hospitals
Compare heart hospitals by city and services — all in one place.
Explore Hospitals