Basic Work Cycle in Subversion (SVN)
Subversion has numerous features, options, bells, and whistles, but on a day-to-day basis, odds are that you will use only a few of them. In this artile, we’ll run through the most common things that you might find yourself doing with Subversion in the course of a day’s work.
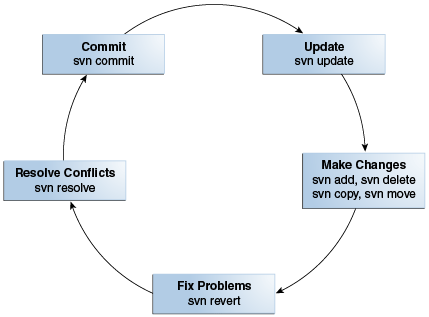
The typical work cycle looks like this:
- Update your working copy.
- svn update
- Make changes.
- svn add
- svn delete
- svn copy
- svn move
- Examine your changes.
- svn status
- svn diff
- Possibly undo some changes.
- svn revert
- Resolve conflicts (merge others’ changes).
- svn update
- svn resolve
- Commit your changes.
- svn commit


Installing the SVN client
Install the svn client to start collaborating on a project that is using Subversion as its version control system.
To install the client program, you can build it yourself from a source code release or download a binary package. The list of sites where you can obtain a pre-built Subversion client is available at the official binary packages page. If you want to compile the software for yourself, grab the source at the Source Code page.
Right after you install the client you should be able to test it by issuing the svn command. You should see the following output:
$ svn
Type 'svn help' for usage.
Now you can start using the command line client to interact with the remote repository.
If you are not familiar with Subversion, you may be better served by a graphical client. We do not maintain a list of such clients; instead, we recommend you do a Web search for Subversion GUI client.
Terminology
What is a Repository?
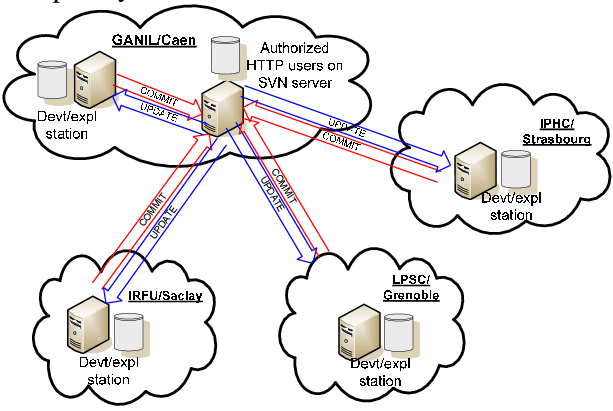
The repository is a version control database that often resides on a server and is usually exposed either by an Apache HTTP Server (through the mod_dav_svn module) or by an svnserve server. The repository acts as a single source of truth and — as a central storage — it contains the complete history of changes of the versioned data in form of revisions.
Repository URL examples:
- Apache HTTP Server: https://svn.example.com/repos/MyRepo/MyProject/trunk
- svnserve: svn://svn.example.com/repos/MyRepo/MyProject/branches/MyBranch
- Direct access (Unix-style): file:///var/svn/repos/MyRepo/MyProject/tags/1.1.0
- Direct access (Windows-style): file:///C:/Repositories/MyRepo/trunk/MyProject
What is a Working Copy?
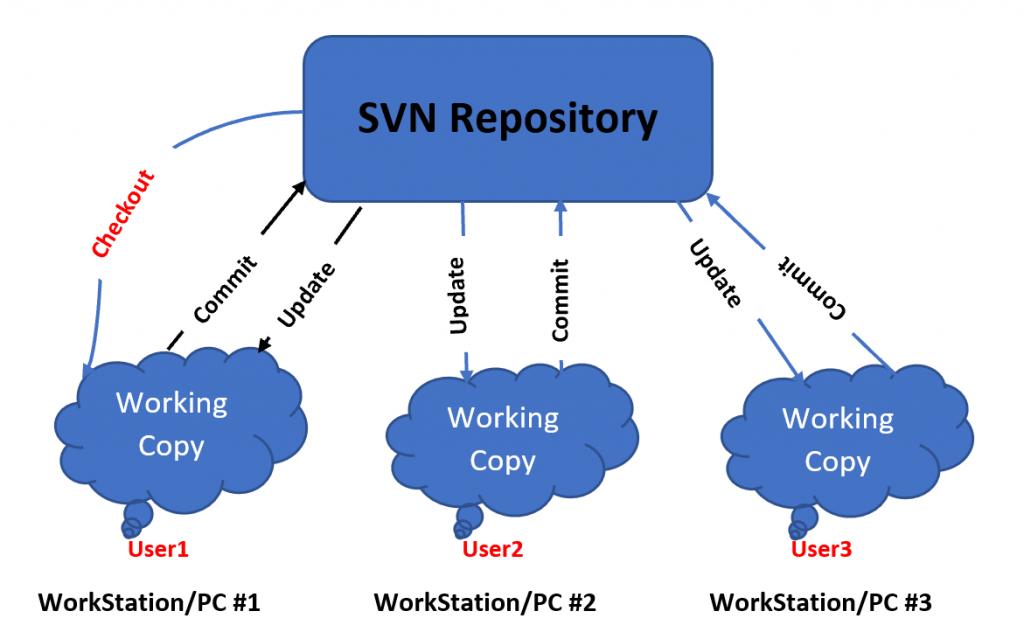
The working copy is your local and private workspace that you use to interact with the central Subversion repository. You use the working copy to modify the contents of your project and fetch changes committed by others.
The working copy contains your project’s data and looks and acts like a regular directory on your local file system, but with one major difference – the working copy tracks the status and changes of files and directories within. You can think of the working copy as of a regular directory with version-control capabilities. A working copy has an administrative directory named .svn at its root. The administrative directory contains metadata necessary for Subversion to manage the version-control capabilities.
There can be as much working copies from the same repository or project as you want with any combination of local modifications.
Basic tasks
Importing data into the repository
In case you want to import existing non-versioned data into an SVN repository, you should run the svn import command. Here is an example:
$ svn import https://svn.example.com/repos/MyRepo/MyProject/trunk -m "Initial project import"
Checking out a working copy
To begin making modifications to your project’s data, you have to create a local copy of the versioned project. You can use the command line svn client or any GUI-based client that you prefer. Your local copy of the project is called a working copy and you create it by issuing the svn checkout command. Here is an example:
$ svn checkout https://svn.example.com/repos/MyRepo/MyProject/trunk MyWorkingCopy
As a result, you will get a working copy of the trunk of a project called MyProject that resides in MyRepo repository. The working copy will be located in MyWorkingCopy directory on your computer. Note that instead of checking out the trunk, you can check out some branch or a tag (assuming they already exist in the repository).
You can get the working copy of the whole repository MyRepo, too. But you should refrain from doing so. Generally speaking, you do not need to have a working copy of the whole repository for your work because your working copy can be instantly switched to another development branch. Moreover, Subversion repository can contain a number of unrelated projects and it is better to have a dedicated working copy for each of them, not a single working copy for all of the projects.
Updating a working copy
You are not the only person working on the project, right? This means that your colleagues are also making modifications to the project’s data. To stay up to date and to fetch the modifications committed by others, you should run the svn update command in your working copy. As a result, your working copy will sync with the repository and download the changes made by your colleagues.
It is a good practice to update your working copy before committing local modifications to the repository.
Making changes in your local working copy
Most of the time, you are going to perform modifications to the project’s data by modifying the contents of the working copy. As soon as you are satisfied with the modifications and you’ve reviewed them thoroughly, you are ready to commit them to the central repository.
Modifying existing files
Modify the files as you usually do using your favorite text processor, graphics editor, audio editing software, IDE, etc. As soon as you save the changes to disk, Subversion will recognize them automatically.
Committing your changes to the repository
In order to publish the changes you made in your working copy, you should run the svn commit command.
Review your changes before committing them! Use the svn status and svn diff commands to review the changes.
Here is an example of the commit command:
$ svn commit -m "My Descriptive Log Message"
Note the -m (–message) option. You should always include a descriptive commit log message. It should help others including yourself understand the reason why you made this commit. It is a good idea to include a summary of your changes in the log message, too.
Performing file and directory operations
You can perform any actions with your project’s data within the working copy, but operations that involve copying, moving, renaming and deleting must be performed using the corresponding svn commands.
Subversion does not use heurisic-tracking for tree changes in a working copy. Subversion requires explicit tracking of tree changes. If you perform a tree changes such as move or copy with regular filesystem commands, Subversion will not know about this operation. To track tree changes Subversion should be made aware of them.
Adding new files and directories
Put new files or directories to the working copy and Subversion will see them as “unversioned”. It will not automatically start tracking the new files unless you run the svn add command:
$ svn add foo.cs
Moving and renaming files and directories
Move and rename files and directories using the svn move or svn rename command:
$ svn move foo.cs bar.cs
The command svn rename is an alias for the svn move.
Copying files and directories
Copy files and directories using the svn copy command:
$ svn copy foo.cs bar.cs
Deleting files and directories
Delete files and directories using the svn delete svn delete command:
$ svn delete foo.cs
Reverting or discarding local changes
Discard your local uncommitted changes using the svn revert command:
$ svn revert foo.cs
Discarded uncommitted changes will be lost forever. You will not be able to recover the reverted changes. Use svn revert with caution!
Branching and tagging
You should use the svn copy command to create branches and tags. This is the same command that is used to copy items in your working copy and in the repository when you want them to be historically related.
The command svn copy is used for branching because branch is technically a copy of the source you copy from. However, it is not an ordinary copy that you are familiar with when copying files on your local file system. Branches in Subversion repositories are so called “Cheap Copies” that are similar to symlinks. Therefore, creating a new branch takes minimal time to complete and takes practically no space in the Subversion repository. You can create branches and use them for any change you want regardless of the change’s size and scope.
Creating a branch using direct URL to URL copy
Branching in Subversion is simple. In the simplest form, creating a new branch requires you to run the command against the remote repository’s URLs. For example, let’s create a new branch out of the mainline trunk:
$ svn copy https://example.com/MyRepo/trunk https://example.com/MyRepo/branches/MyNewBranch -m "Creating a new branch"
Setting up a local repository
You can create a Subversion repository on your computer and use file:// scheme to interact with it locally. This approach can help you use Subversion locally to track personal files and single-person projects.
The following procedure creates a minimal environment for an existing project. It converts a directory with a project into a working copy of a newly-created local Subversion repository. As result you can modify the files in the working copy and track the changes in your local repository.
On Unix:
- Create a parent directory .svnrepos where you will place your SVN repositories:$ mkdir -p $HOME/.svnrepos/
- Create a new repository MyRepo under .svnrepos:$ svnadmin create ~/.svnrepos/MyRepo
- Create a recommended project layout in the new repository:$ svn mkdir -m “Create directory structure.” \ file://$HOME/.svnrepos/MyRepo/trunk \ file://$HOME/.svnrepos/MyRepo/branches \ file://$HOME/.svnrepos/MyRepo/tags
- Change directory to ./MyProject where your unversioned project is located:$ cd $HOME/MyProject
- Convert the current directory into a working copy of the trunk/ in the repository:$ svn checkout file://$HOME/.svnrepos/MyRepo/trunk ./
- Schedule your project’s files to be added to the repository:$ svn add –force ./
- Commit the project’s files:$ svn commit -m “Initial import.”
- Update your working copy:$ svn update
On Windows:
- Create a parent directory C:\Repositories where you will place your SVN repositories:mkdir C:\Repositories
- Create a new repository MyRepo under C:\Repositories:svnadmin create C:\Repositories\MyRepo
- Create a recommended project layout in the new repository:svn mkdir -m “Create directory structure.” ^ file:///C:/Repositories/MyRepo/trunk ^ file:///C:/Repositories/MyRepo/branches ^ file:///C:/Repositories/MyRepo/tags
- Change directory to C:\MyProject where your unversioned project is located:cd C:\MyProject
- Convert the current directory into a working copy of the trunk/ in the repository:svn checkout file:///C:/Repositories/MyRepo/trunk .
- Schedule your project’s files to be added to the repository:svn add –force ./
- Commit the project’s files:svn commit -m “Initial import.”
- Update your working copy:svn update
See also the Quick Start instructions in The Subversion Book.
- How to remove sensitive warning from ms office powerpoint - July 14, 2024
- AIOps and DevOps: A Powerful Duo for Modern IT Operations - July 14, 2024
- Leveraging DevOps and AI Together: Benefits and Synergies - July 14, 2024

