Google Cloud DNS is a scalable, reliable, and managed authoritative Domain Name System (DNS) service running on the same infrastructure as Google. It provides a way for you to manage your DNS records using Google’s infrastructure for production-quality, high-volume DNS services. Google Cloud DNS is programmable, allowing you to easily publish and manage millions of DNS zones and records using Google’s API.
Here’s a detailed guide on how to get started with Google Cloud DNS and perform common DNS management tasks.
Setting Up Google Cloud DNS
- Create a project in the Google Cloud Console:
- If you don’t already have a Google Cloud account, you’ll need to sign up and create a project in the Google Cloud Console.
- Enable the Cloud DNS API for your project:
- Navigate to the “APIs & Services” dashboard and click on “Enable APIs and Services”.
- Search for “Cloud DNS” and enable it for your project.
- Set up billing:
- Google Cloud DNS requires an active billing account. Make sure you’ve set this up to proceed.
Creating a DNS Zone
- Navigate to the Cloud DNS section:
- In the Google Cloud Console, go to the “Network services” section and select “Cloud DNS”.
- Create a DNS zone:
- Click on “Create zone”. You will be prompted to enter details for the new DNS zone.
- Zone type: Choose “Public” for zones accessible from the internet, or “Private” for zones that can be resolved only by specific resources in your Google Cloud projects.
- Zone name: A unique name for your DNS zone.
- DNS name: The DNS name of your zone, typically your domain name.
- Fill in any other necessary information and click “Create”.
Managing DNS Records
- Add DNS records:
- Inside your newly created DNS zone, you can add DNS records by clicking on “Add record set”.
- Select the record type (A, AAAA, CNAME, MX, etc.), TTL (Time to Live), and enter the appropriate data for your record.
- Modify DNS records:
- To modify an existing record, click on the record set you wish to change. Make your modifications and save the changes.
- Delete DNS records:
- To delete a record, select the record set and click on the “Delete” button.
Configuring DNS Security
- DNSSEC (Domain Name System Security Extensions):
- Google Cloud DNS supports DNSSEC, which adds an additional layer of security by providing cryptographic signatures for DNS data.
- To enable DNSSEC, navigate to the details page of your DNS zone and click on “DNSSEC”.
- Follow the prompts to enable DNSSEC. Remember, you’ll also need to configure DNSSEC with your domain registrar.
Advanced Features
- Managing zones and records via the gcloud CLI:
- Google Cloud DNS can be managed using the
gcloudcommand-line tool, offering a way to script and automate DNS tasks. - For example, to create a DNS zone via the CLI:
gcloud dns managed-zones create --dns-name="example.com." --description="A description" my-zone - To add a DNS record:
gcloud dns record-sets transaction start --zone="my-zone"followed bygcloud dns record-sets transaction add --name="www.example.com." --type=A --ttl=300 "1.2.3.4" --zone="my-zone"andgcloud dns record-sets transaction execute --zone="my-zone"
- Google Cloud DNS can be managed using the
Here’s how to find detailed tutorials on Google Cloud DNS:
Official Google Documentation:
- Quickstart: Set up DNS records for a domain name with Cloud DNS: This guide provides a step-by-step process to create a managed public zone, configure records, and update your domain name servers https://cloud.google.com/dns
- Tutorial: Set up a domain by using Cloud DNS: This tutorial expands on the quickstart, demonstrating how to use Cloud DNS with a domain registered through a different provider https://cloud.google.com/dns/docs/zones
Additional Resources:
- Google Cloud DNS Cheat Sheet by Tutorials Dojo: This cheat sheet offers a concise overview of Cloud DNS features, record types, and functionalities https://tutorialsdojo.com/latest-news/
- How to Use Cloud DNS to Expose Your Web Page to Internet by GeeksforGeeks: This guide walks you through a practical example of setting up Cloud DNS to point your domain to a web server hosted on a Compute Engine virtual machine https://www.geeksforgeeks.org/google-cloud-dns/
- Setting up a domain using Cloud DNS [YouTube video]: This video tutorial demonstrates the process of creating a Cloud DNS zone and configuring records to point your domain to a website [YouTube video on setting up a domain using Cloud DNS]
Google Cloud DNS policies
Google Cloud DNS offers a specific policy type called DNS server policies. These policies manage how DNS queries are forwarded within your Virtual Private Cloud (VPC) network.
Here’s a breakdown of Cloud DNS server policies:
What they are:
- A configuration for a VPC network that specifies inbound or outbound DNS forwarding, or both.
Key Points:
- One policy applies to a single VPC network.
- Policies define how DNS queries are forwarded within the VPC.
- Two types exist:
- Inbound server policy: Allows incoming DNS queries from resources within the VPC to be forwarded to specific DNS servers.
- Outbound server policy: (One possible method for outbound forwarding) Specifies which DNS servers VMs in the VPC should use for resolving external DNS queries.
Benefits:
- Centralized control over DNS forwarding within your VPC.
- Improved security by directing queries to internal or approved external DNS servers.
Learning Resources:
- DNS server policies | Google Cloud: https://cloud.google.com/dns/docs/policies – This is the official Google Cloud documentation that provides a detailed explanation of server policies, including how to create and manage them.
Google Cloud DNS policies provide a powerful mechanism for managing how DNS queries are answered by your Google Cloud DNS managed zones. These policies allow you to configure various aspects of DNS behavior, such as load balancing, failover, geolocation-based routing, and more. By applying DNS policies, you can improve the reliability, performance, and relevance of the responses provided to your users based on their geographic location or other criteria.
Key Features of Google Cloud DNS Policies
- Load Balancing: Distribute traffic evenly across multiple resources, such as web servers in different geographic locations, to ensure high availability and reliability of your applications.
- Failover: Automatically reroute traffic from unhealthy resources to healthy ones in case of failure, minimizing downtime and maintaining service availability.
- Geolocation Routing: Route users to different resources based on their geographic location, which can help reduce latency by directing users to the closest available server.
- DNSSEC: Secure your DNS traffic with DNSSEC (DNS Security Extensions) to prevent attackers from tampering with DNS queries.
- Logging and Monitoring: Integration with Cloud Monitoring and Cloud Logging for insight into the operation of your DNS infrastructure and to track various metrics such as query volumes, response times, and DNSSEC validation outcomes.
Creating and Managing DNS Policies
- Access the Cloud DNS Page: In the Google Cloud Console, navigate to the “Network Services” section and select “Cloud DNS.”
- Create a DNS Policy: Click on “DNS policies” and then “Create policy.” You’ll be prompted to configure the policy settings, such as:
- Name: Provide a unique name for the policy.
- Networks: Select the VPC networks where the policy will apply.
- Alternative Name Server Config: Specify alternative name servers if you’re setting up a custom DNS architecture.
- Logging: Enable or disable query logging for the policy.
- DNSSEC: Configure DNSSEC settings if you want to secure your DNS queries.
- Configure Policy Rules: Depending on the features you want to use (e.g., geolocation routing), you may need to define specific rules within your policy. This could involve specifying the geographic locations and the corresponding resources to route traffic to.
- Apply the Policy: After configuring the policy and its rules, save and apply it to your selected networks. Changes can take a few minutes to propagate.
- Monitoring and Logging: With logging enabled, you can monitor the performance and health of your DNS configurations through Cloud Monitoring and Cloud Logging. This can provide valuable insights for troubleshooting and optimizing your DNS setup.
Guide to Google Cloud DNS policies for Add Weighted round robin routing policies

Overview
Weighted routing in DNS allows you to distribute traffic across multiple resources, such as servers or load balancers, based on assigned weights. This is particularly useful for load balancing, A/B testing, and gradual rollouts of new services or features.
Step-by-Step Guide for Configuring Weighted Round Robin in Google Cloud DNS
Step 1: Access Google Cloud DNS
- Sign in to your Google Cloud Console.
- Navigate to “Network Services” > “Cloud DNS”.
Step 2: Select Your DNS Zone
- Choose the DNS zone where you want to apply weighted round robin routing.
- If you haven’t created a DNS zone yet, click on “Create Zone” and follow the prompts to set one up.
Step 3: Add or Edit DNS Records
- To add a new DNS record, click on “Add record set”.
- To edit an existing record, click on the record set you wish to configure.
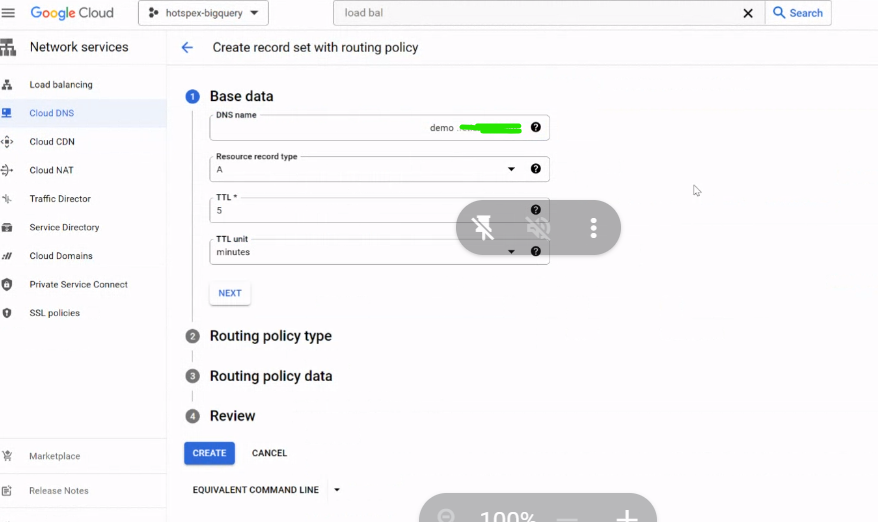
Step 4: Configure the Weighted Round Robin
- DNS Record Type: Choose the type of DNS record you’re configuring (e.g., A, AAAA, CNAME).
- DNS Name: Specify the DNS name for which you’re configuring the routing (e.g., www.example.com).
- Resource Record Data: Enter the IP address (for A or AAAA records) or hostname (for CNAME records) of the target resource.
- TTL (Time to Live): Specify the TTL value. This determines how long DNS resolvers are allowed to cache the record.
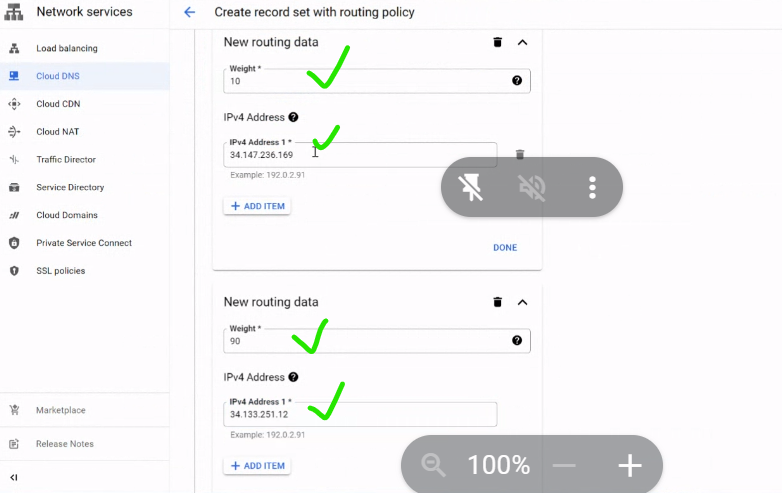
- Weight: Enter the weight for this resource record. The weight must be a non-negative number from 0.0 to 1000.0. The traffic routed to each target is calculated based on the ratio of an individual weight to the total sum of all weights for records under the same DNS name.
Step 5: Save the Record Set
- After configuring the weight and other settings for your record, save the record set.
- Repeat the process for each target resource you want to include in the weighted round robin configuration, ensuring each has its unique weight.
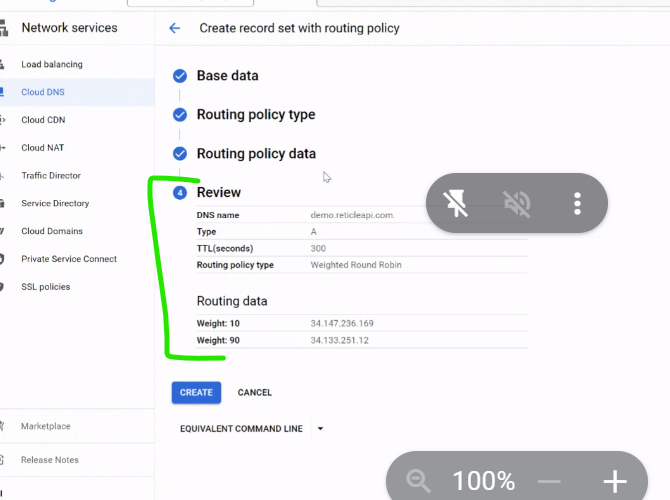
Step 6: Verify Configuration
- After setting up your weighted records, it’s essential to verify that traffic distribution behaves as expected.
- Keep in mind that DNS changes might take some time to propagate, depending on the TTL values and DNS caching behavior.
If you want to distribute traffic between two load balancers with a ratio of 10% to one and 90% to the other, you need to set the weights in a way that the ratio of the weights reflects this distribution.
Given that the weight can be any non-negative number from 0.0 to 1000.0 and the distribution ratio between the two targets is based on the proportion of their weights relative to the total weight sum, you can choose weights that simplify the calculation and clearly represent this ratio.
Option 1: Direct Percentage Representation
- Load Balancer 1 (10% of traffic): Set the weight to
100.0(representing 10%). - Load Balancer 2 (90% of traffic): Set the weight to
900.0(representing 90%).
Option 2: Simplified Representation
Alternatively, you can use a simplified ratio that still maintains the 10:90 distribution:
- Load Balancer 1 (10% of traffic): Set the weight to
10.0. - Load Balancer 2 (90% of traffic): Set the weight to
90.0.
Both options achieve the same traffic distribution ratio. The choice between them may depend on whether you plan to adjust these weights frequently or add more resources into the mix in the future. Using smaller numbers (like 10 and 90) makes the calculation easier and more straightforward, especially when adjusting weights or adding more targets later.
How It Works:
- The traffic distribution is calculated based on the weight of each record relative to the total sum of weights for all records under the same DNS name.
- In the first option, the total weight is
100.0 + 900.0 = 1000.0. The first load balancer gets100.0 / 1000.0 = 10%of the traffic, and the second gets900.0 / 1000.0 = 90%. - In the second option, the total weight is
10.0 + 90.0 = 100.0. The distribution ratio remains the same:10.0 / 100.0 = 10%for the first and90.0 / 100.0 = 90%for the second.
I’m Rajesh Kumar, a DevOps, SRE, DevSecOps, Cloud, and Platform Engineering expert passionate about sharing practical knowledge, real-world experiences, and industry best practices. I have worked at Cotocus and regularly write about technology, travel, investing, health, product reviews, and digital marketing through my various platforms.
I publish technical articles at DevOps School, travel stories at Holiday Landmark, stock market insights at Stocks Mantra, health and fitness guidance at My Medic Plus, product reviews at TrueReviewNow, and SEO and digital marketing strategies at Wizbrand.
Find Trusted Cardiac Hospitals
Compare heart hospitals by city and services — all in one place.
Explore Hospitals