Zabbix can use SNMP (Simple Network Management Protocol) to monitor network devices. SNMP is a standard protocol that allows devices to exchange management information.
In Zabbix, SNMP monitoring works as follows:
- The Zabbix server sends an SNMP request to the monitored device.
- The monitored device responds to the SNMP request with the requested information.
- The Zabbix server stores the information in its database.
- The Zabbix server uses the information to generate graphs, reports, and alerts.
The Zabbix server can use SNMP to monitor a variety of information from the monitored devices, such as:
- CPU usage
- Memory usage
- Disk usage
- Network traffic
- Interface status
- Uptime
- Temperature
- Fan speed
To use SNMP monitoring in Zabbix, you need to configure the Zabbix server and the monitored devices. The configuration process varies depending on the type of device and the version of SNMP that it supports.
Here are some of the benefits of using SNMP monitoring in Zabbix:
- Widely supported: SNMP is a widely supported protocol, so it can be used to monitor a wide variety of devices.
- Easy to configure: The configuration process for SNMP monitoring is relatively easy.
- Scalable: SNMP monitoring can be scaled to monitor a large number of devices.
- Cost-effective: SNMP monitoring is a cost-effective way to monitor network devices.
Here are some of the limitations of using SNMP monitoring in Zabbix:
- Polling: SNMP monitoring relies on polling, which can introduce latency.
- Security: SNMP is not a secure protocol, so it is important to take steps to secure the SNMP traffic.
- MIBs: The SNMP data that is available depends on the MIBs that are supported by the monitored devices.
How zabbix agent monitor using snmp?
Zabbix agent can monitor using SNMP by using the following steps:
- Install the SNMP service on the device that you want to monitor.
- Configure the SNMP service to allow read access to the MIBs that you want to monitor.
- Install the Zabbix agent on the device that you want to monitor.
- Configure the Zabbix agent to use SNMP monitoring.
- Create a Zabbix host and configure it to use SNMP monitoring.
Here are the specific steps for each of these tasks:
Installing the SNMP service
The steps for installing the SNMP service will vary depending on the operating system that you are using. For example, to install the SNMP service on a Linux system, you can use the following command:
sudo apt-get install snmpd
Code language: JavaScript (javascript)
Configuring the SNMP service
The specific settings that you need to configure will vary depending on the SNMP agent that you are using. However, in general, you will need to configure the following settings:
- The read-only community string: This is the string that Zabbix will use to access the SNMP agent.
- The MIBs that you want to monitor: This is a list of the MIBs that contain the data that you want to monitor.
Installing the Zabbix agent
The steps for installing the Zabbix agent will vary depending on the operating system that you are using. For example, to install the Zabbix agent on a Linux system, you can use the following command:
sudo apt-get install zabbix-agent
Code language: JavaScript (javascript)
Configuring the Zabbix agent
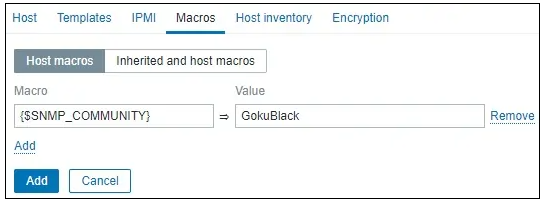
To configure the Zabbix agent to use SNMP monitoring, you need to edit the zabbix_agentd.conf file. In this file, you need to set the following options:
SnmpAgentEnabled: This must be set to1to enable SNMP monitoring.SnmpCommunity: This must be set to the same read-only community string that you configured for the SNMP service.
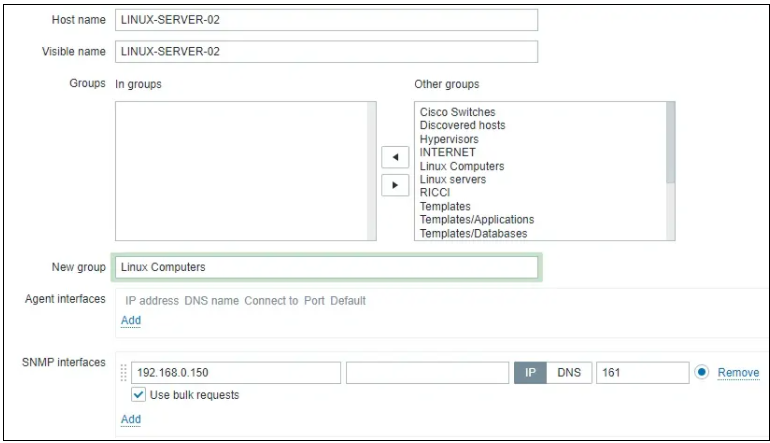
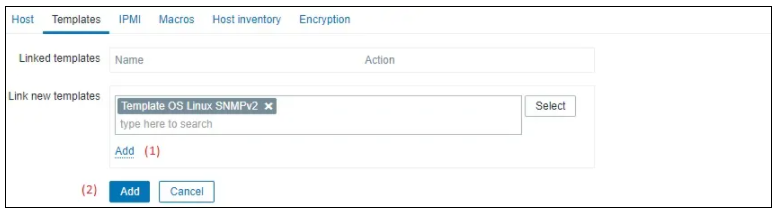
Creating a Zabbix host
To create a Zabbix host, you need to log in to the Zabbix web interface and go to the Hosts page. Click the Create Host button and select the SNMP monitoring method. In the SNMP tab, you need to configure the following settings:
- Host: The IP address or hostname of the device that you want to monitor.
- Community string: The read-only community string that you configured for the SNMP service.
- Version: The SNMP version to use.
Conclusion
Once you have completed these steps, Zabbix will be able to monitor the device using SNMP.
Here are some additional things to keep in mind:
- The SNMP agent and Zabbix server must be running on the same subnet.
- The SNMP agent must have read access to the MIBs that you want to monitor.
- You can use SNMPv3 instead of SNMPv2c. SNMPv3 provides stronger security features.
Ubuntu 18.X – Verified
Reference
- https://techexpert.tips/zabbix/zabbix-monitor-linux-using-snmp/
- https://techexpert.tips/zabbix/zabbix-monitor-windows-using-snmp/
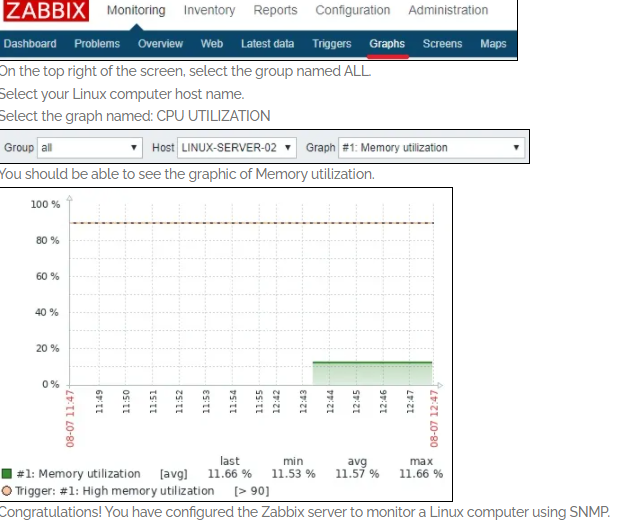
After a few minutes, you will be able to see the initial result on the Zabbix Dashboard.
The final result will take at least one hour.
By default, Zabbix will wait 1 hour to discover the number of interfaces available on the Linux computer.
By default, Zabbix will wait 1 hour before collect information from the network interfaces.
In order to test your configuration, access the Monitoring menu and click on the Graphs option.
Wait 1 hour before trying to access the Linux computer graph.
here are the steps on how to configure Zabbix Linux Agent with SNMP protocol:
- Install the SNMP service on the Linux host.
sudo apt-get install snmpd snmp
Code language: JavaScript (javascript)- Edit the
snmpd.conffile and configure the following settings:
agentAddress: This specifies the IP address and port number that the SNMP agent will listen on.rocommunity: This defines the read-only community string that will be used by Zabbix to access the SNMP agent.sysLocation: This specifies the physical location of the Linux host.sysContact: This specifies the contact information for the Linux host.
For example:
agentAddress udp:127.0.0.1:161
rocommunity public
sysLocation Sitting on the Dock of the Bay
sysContact Me <me@example.org>
Code language: CSS (css)- Restart the SNMP service.
sudo service snmpd restart
- Install the Zabbix agent on the Linux host.
sudo apt-get install zabbix-agent
Code language: JavaScript (javascript)- Edit the
zabbix_agentd.conffile and configure the following settings:
SnmpAgentEnabled: This must be set to1to enable SNMP monitoring.SnmpCommunity: This must be set to the same read-only community string that you configured in thesnmpd.conffile.
For example:
SnmpAgentEnabled=1
SnmpCommunity=public
Code language: PHP (php)- Restart the Zabbix agent.
sudo service zabbix-agent restart
- Create a Zabbix host and configure it to use SNMP monitoring.
In the Zabbix web interface, go to Hosts > Create Host. In the General tab, select SNMP as the Monitoring method. In the SNMP tab, configure the following settings:
- Host: The IP address or hostname of the Linux host.
- Community string: The read-only community string that you configured in the
snmpd.conffile. - Version: The SNMP version to use.
For example:
Host = 192.168.1.10
Community string = public
Version = 2c
Code language: PHP (php)- Click Create.
Once you have completed these steps, Zabbix will be able to monitor the Linux host using SNMP.
Here are some additional things to keep in mind:
- The SNMP agent and Zabbix server must be running on the same subnet.
- The SNMP agent must have read access to the MIBs that you want to monitor.
- You can use SNMPv3 instead of SNMPv2c. SNMPv3 provides stronger security features.
I’m a DevOps/SRE/DevSecOps/Cloud Expert passionate about sharing knowledge and experiences. I have worked at Cotocus. I share tech blog at DevOps School, travel stories at Holiday Landmark, stock market tips at Stocks Mantra, health and fitness guidance at My Medic Plus, product reviews at TrueReviewNow , and SEO strategies at Wizbrand.
Do you want to learn Quantum Computing?
Please find my social handles as below;
Rajesh Kumar Personal Website
Rajesh Kumar at YOUTUBE
Rajesh Kumar at INSTAGRAM
Rajesh Kumar at X
Rajesh Kumar at FACEBOOK
Rajesh Kumar at LINKEDIN
Rajesh Kumar at WIZBRAND
Find Trusted Cardiac Hospitals
Compare heart hospitals by city and services — all in one place.
Explore Hospitals