Step 1 – Download a Latest version of logstash.
https://www.elastic.co/downloads/logstash
$ wget https://artifacts.elastic.co/downloads/logstash/logstash-7.15.0-linux-x86_64.tar.gz
$ tar -zxvf logstash-7.15.0-linux-x86_64.tar.gz
$ cd logstash-7.15.0

Code language: JavaScript (javascript)
Step 2 – Configure first pipeline
$ vi logstash-7.2.0/first-pipeline.conf
Step 3 – To verify your configuration, run the following command:
$ bin/logstash -f first-pipeline.conf --config.test_and_exit
The --config.test_and_exit option parses your configuration file and reports any errors.

If the configuration file passes the configuration test, start Logstash with the following command:

$ bin/logstash -f first-pipeline.conf --config.reload.automatic

The --config.reload.automatic option enables automatic config reloading so that you don’t have to stop and restart Logstash every time you modify the configuration file.
Code language: JavaScript (javascript)
Example Commands
$ bin/logstash -e 'input { stdin { } } output { stdout {} }'

After starting Logstash, wait until you see "Pipeline main started" and then enter hello world at the command prompt:

hello world
2013-11-21T01:22:14.405+0000 0.0.0.0 hello world

Logstash adds timestamp and IP address information to the message. Exit Logstash by issuing a CTRL-D command in the shell where Logstash is running.
Code language: PHP (php)
Configure Logstash with Elastic Search
The Logstash pipeline can index the data into an Elasticsearch cluster. Edit the first-pipeline.conf file and replace the entire output section with the following text:
output {
    elasticsearch {
        hosts => [ "localhost:9200" ]
    }
}

output {
    elasticsearch {
        hosts => [ "172.31.26.247:9200" ]
    }
}Code language: PHP (php)
-e flag
The -e flag enables you to specify a configuration directly from the command line. Specifying configurations at the command line lets you quickly test configurations without having to edit a file between iterations. The pipeline in the example takes input from the standard input, stdin, and moves that input to the standard output, stdout, in a structured format.
Import & Parse CSV Data using Logstash
$ mkdir -p csv-data
$ cd csv-data && { curl -O https://raw.githubusercontent.com/devopsschool-demo-labs-projects/elasticsearch/master/sample-data/csv-schema-short-numerical.csv ; cd -; }
$ sudo wget -P /home/centos/logstash-7.15.0 https://raw.githubusercontent.com/devopsschool-demo-labs-projects/elasticsearch/master/logstash-config-file/csv-read.conf
$ bin/logstash -f csv-read.conf --config.reload.automatic
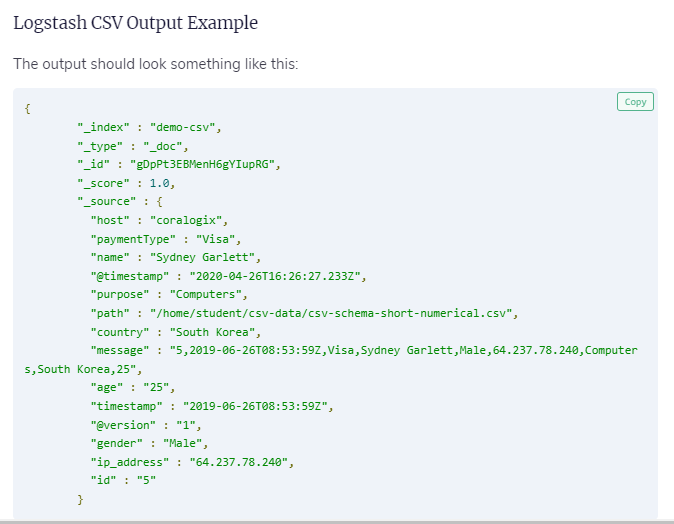
$ curl -XGET localhost:9200/demo-csv/_search?pretty=trueCopied!Code language: JavaScript (javascript)input {
file {
path => "/home/student/csv-data/csv-schema-short-numerical.csv"
start_position => "beginning"
sincedb_path => "/dev/null"
}
}Code language: PHP (php)Here, the “file” subsection indicates that a file will be used for the input. Within, we use these options:
- path which indicates the full path to the input file (in our case, the CSV file we prepared earlier).
- Start_position is where we instruct Logstash to read the file from the beginning. This setting only applies to files that are read for the first time. By default, the program would prefer to read from the end, since it expects to process a file that would have data added to it periodically. This way, it could import only the new data whenever it’s added to the end of the CSV file. If the file has been seen before, the next parameter will be used to decide what to do.
- sincedb_path points to a database file that keeps track of the last line parsed in an input file (in this scenario, the CSV file). The next time the input file would be parsed, the process would continue from the position recorded in the sincedb file. Here, we set this to “/dev/null” so that Logstash won’t be able to record the last line it previously read for that particular file. This way, it will process the entire file each time, from beginning, rather than continue where it left off.
filter {
  csv {
      separator => ","
      skip_header => "true"
      columns => ["id","timestamp","paymentType","name","gender","ip_address","purpose","country","age"]
  }
}Code language: PHP (php)
We’re going to use “csv” as a subsection to specify that this is the type of file we intend to parse. Within that, we declare the following options:
- separator where we pass the comma character “,”. This way, Logstash will know that commas are used as a delimiter to separate fields.
- skip_header is important here, telling the parser to ignore the first line, which only indicates column names and not the actual data fields we intend to import.
- columns where we specify the names of the columns that will be imported. In this case, we are telling our parser that the first field on each line is an ID, the second is a timestamp, and so on, until the last one which is an age.
output {
elasticsearch {
hosts => "http://localhost:9200"
index => "demo-csv"
}
stdout {}
}Code language: PHP (php)- elasticsearch subsection instructs our program that we intend to send the data to Elasticsearch.
- hosts option specifies the host and port where our Elasticsearch accepts incoming connections.
- index option defines the name of the Elasticsearch index where imported data will be stored.
- stdout will make the import action display its status output and log information in the terminal.
Logstash Mutate Filter Plugin
So far, we’ve only played around with the basics of importing CSV files but we can already see that it’s pretty straightforward.
But that’s only because we haven’t been picky about the exact nature of the data. Other times though, we may need to be specific with what data we use and how. For example, we may need to skip importing some fields that are unnecessary, change the mapping of the selected fields, convert the data type of some values or process them in some other way, by changing all characters to uppercase, for example.
These kinds of scenarios can be configured by adding another entry to our Logstash configuration located in the filter section which is called mutate.
To make the next part easier, you can download the configuration file which we are going to be working with. You can do so by typing in the following command:
$ sudo wget -P /home/centos/logstash-7.15.0 https://raw.githubusercontent.com/devopsschool-demo-labs-projects/elasticsearch/master/logstash-config-file/csv-read-drop.conf
$ bin/logstash -f csv-read-drop.conf --config.reload.automatic
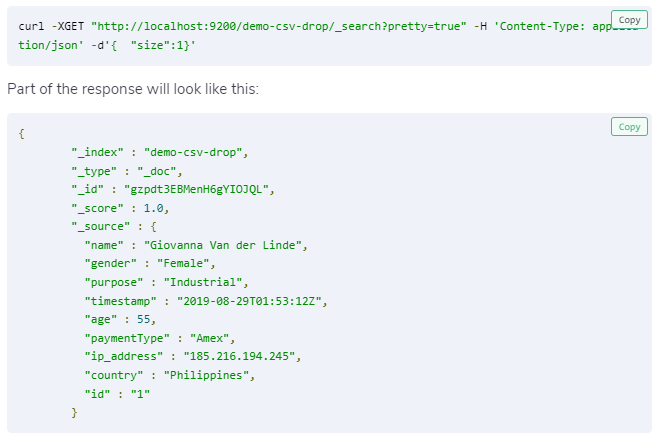
$ curl -XGET "http://localhost:9200/demo-csv-drop/_search?pretty=true" -H 'Content-Type: application/json' -d'{ "size":1}'
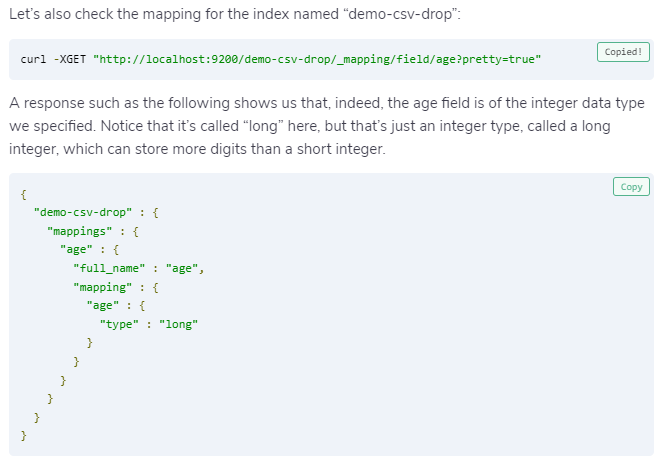
$ curl -XGET "http://localhost:9200/demo-csv-drop/_mapping/field/age?pretty=true"Copied!Code language: JavaScript (javascript)filter {
csv {
separator => ","
skip_header => "true"
columns => ["id","timestamp","paymentType","name","gender","ip_address","purpose","country","age"]
}
mutate {
convert => {
age => "integer"
}
remove_field => ["message","@timestamp","path","host","@version"]
}
}Code language: PHP (php)In this example, the filter section has two main entries: “csv” and “mutate“.
Keep in mind that the order in which these appear is important. In this case, the parameters from the “csv” section will be applied first, and only afterwards will the ones from “mutate” be applied.
The convert section is pretty straight forward. All values in the age field will be converted to integer values. For example, the age value of “30.5” will be converted to the integer value “30”.
Under remove_field we specify all the fields that we want to remove.
I’m Rajesh Kumar, a DevOps, SRE, DevSecOps, Cloud, and Platform Engineering expert passionate about sharing practical knowledge, real-world experiences, and industry best practices. I have worked at Cotocus and regularly write about technology, travel, investing, health, product reviews, and digital marketing through my various platforms.
I publish technical articles at DevOps School, travel stories at Holiday Landmark, stock market insights at Stocks Mantra, health and fitness guidance at My Medic Plus, product reviews at TrueReviewNow, and SEO and digital marketing strategies at Wizbrand.
Find Trusted Cardiac Hospitals
Compare heart hospitals by city and services — all in one place.
Explore Hospitals