How to install and configure snmp agent service in Ubuntu?
SNMP Manager Server
$ sudo apt update
$ sudo apt install snmp snmp-mibs-downloader
SNMP Agent Server
$ sudo apt update
$ sudo apt install snmpd
Configuring the SNMP Manager Server
$ vi /etc/snmp/snmp.conf

In this file, there are a few comments and a single un-commented line. To allow the manager to import the MIB files, comment out the mibs : line:

/etc/snmp/snmp.conf
# As the snmp packages come without MIB files due to license reasons, loading
# of MIBs is disabled by default. If you added the MIBs you can reenable
# loading them by commenting out the following line.
#mibs :

Save and close snmp.conf by pressing CTRL+X, followed by Y, and then ENTER if you’re using nano. You are now finished configuring the manager server, but you will still need to use this server to help configure your agent server.Code language: PHP (php)
Configuring the SNMP Agent Server
$ /etc/snmp/snmpd.conf
Inside, you will have to make a few changes. These will mainly be used to bootstrap your configuration so that you can manage it from your other server.
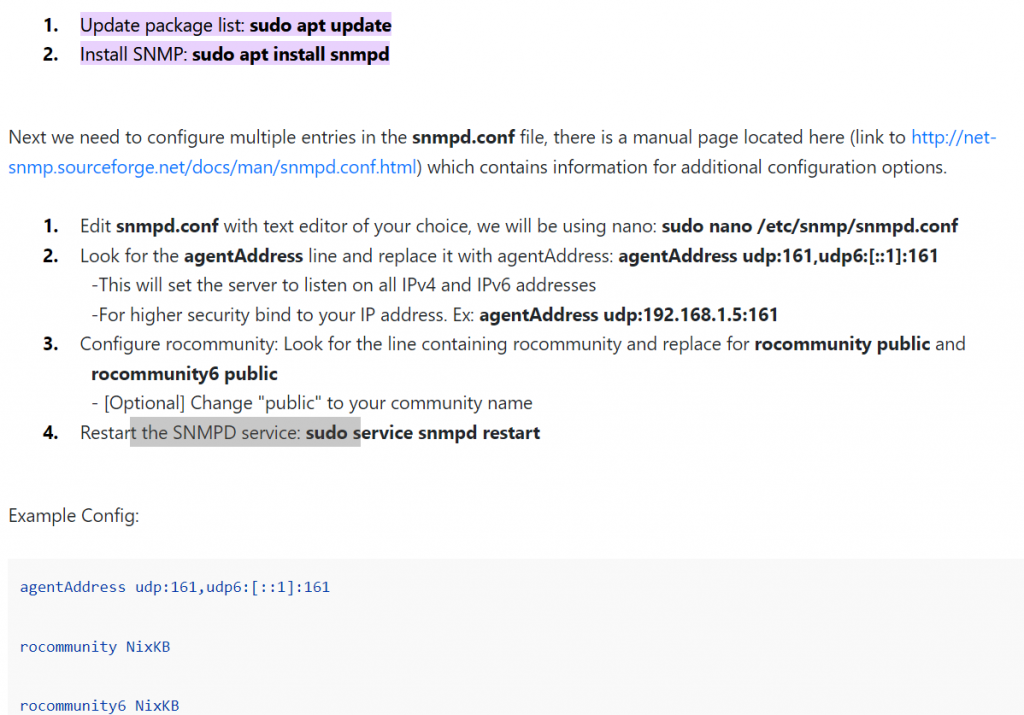
First, you need to change the agentAddress directive. Currently, it is set to only allow connections originating from the local computer. You’ll need to comment out the current line, and uncomment the line underneath, which allows all connections.
# Listen for connections from the local system only
#agentAddress udp:127.0.0.1:161
# Listen for connections on all interfaces (both IPv4 *and* IPv6)
agentAddress udp:161,udp6:[::1]:161
The user you are creating will be called bootstrap and will be used as a template in which to create your first actual user. The SNMP packages do this through a process of cloning the user’s properties.
createUser bootstrap MD5 temp_password DES
Now that you have a new user specified, you can set up the level of access that this user will have. In this tutorial you will set this up for your bootstrap user, and also for the new user you will be creating, called demo.
rwuser bootstrap priv
rwuser demo priv
When you are finished making these changes, save and close the file.
To implement these changes, restart the snmpd service on your agent server:
sudo systemctl restart snmpd
The SNMP daemon will listen for connections on port :161. Configure UFW to allow connections from the manager server to this port:
sudo ufw allow from manager_server_ip_address to any port 161Code language: PHP (php)Verifying Authentication to the Agent Server
In this step, you will test to make sure you can connect with your bootstrap account to the agent server. Before that, however, this tutorial will talk a bit about the general structure of sending an SNMP command.
When using the suite of tools included in the snmp package (the net-snmp software suite), there are a few patterns in the way you must call the commands. The first thing to do is authenticate with the SNMP daemon that you wish to communicate with. This usually involves supplying a few pieces of information. The common ones are as follows:
-v: This flag is used to specify the version of the SNMP protocol that you would like to use. This tutorial will be using v3.-c: This flag is used if you are using SNMP v1 or v2-style community strings for authentication. Since you are using v3-style user-based authentication, you don’t need to do this.-u: This parameter is used to specify the username that you wish to authenticate as. To read or modify anything using SNMP, you must authenticate with a known username.-l: This is used to specify the security level that you are connecting with. The possible values arenoAuthNoPrivfor no authentication and no encryption,authNoPrivfor authentication but no encryption, andauthPrivfor authentication and encryption. The username that you are using must be configured to operate at the security level you specify, or else the authentication will not succeed.-a: This parameter is used to specify the authentication protocol that is used. The possible values areMD5orSHA. This must match the information that was specified when the user was created.-x: This parameter is used to specify the encryption protocol that is used. The possible values areDESorAES. This must match the information that was specified when the user was created. This is necessary whenever the user’s privilege specification hasprivafter it, making encryption mandatory.-A: This is used to give the authentication passphrase that was specified when the user was created.-X: This is the encryption passphrase that was specified when the user was created. If none was specified but an encryption algorithm was given, the authentication passphrase will be used. This is required when the-xparameter is given or whenever a user’s privilege specification has aprivafter it, requiring encryption.
Using this information, you can construct your commands. Given how you set up your bootstrap user, the commands you will be using with that account will look like this:

$ snmp_command -u bootstrap -l authPriv -a MD5 -x DES -A temp_password -X temp_password remote_host snmp_sub_command_or_options

From your manager server, test to make sure your bootstrap account is available. Type the following to display the system information for the agent server:

$ snmpget -u bootstrap -l authPriv -a MD5 -x DES -A temp_password -X temp_password agent_server_ip_address 1.3.6.1.2.1.1.1.0

The 1.3.6.1.2.1.1.1.0 string is the OID that is responsible for displaying system information. It will return the output of uname -a on the remote system.

This will give the following output:

Output
SNMPv2-MIB::sysDescr.0 = STRING: Linux agent 4.15.0-66-generic #75-Ubuntu SMP Tue Oct 1 05:24:09 UTC 2019 x86_64
Now that you have verified that you can authenticate to the server running the SNMP daemon, you can continue on to create your regular user account.Code language: PHP (php)
How to install and configure snmp agent service in Centos/RHEL?
How to install and configure snmp agent service in Windows?
I’m Rajesh Kumar, a DevOps, SRE, DevSecOps, Cloud, and Platform Engineering expert passionate about sharing practical knowledge, real-world experiences, and industry best practices. I have worked at Cotocus and regularly write about technology, travel, investing, health, product reviews, and digital marketing through my various platforms.
I publish technical articles at DevOps School, travel stories at Holiday Landmark, stock market insights at Stocks Mantra, health and fitness guidance at My Medic Plus, product reviews at TrueReviewNow, and SEO and digital marketing strategies at Wizbrand.
Find Trusted Cardiac Hospitals
Compare heart hospitals by city and services — all in one place.
Explore Hospitals