Step 1 — Installing MySQL
To install it, update the package index on your server if you’ve not done so recently:
$sudo apt update

Then install the mysql-server package:
$ sudo apt install mysql-server

Ensure that the server is running using the systemctl start command:
$ sudo systemctl start mysql.serviceCode language: PHP (php)
$ mysql
mysql> ALTER USER 'root'@'localhost' IDENTIFIED WITH mysql_native_password by 'Rajesh$123sa332';
mysql> exitCode language: PHP (php)Step 2 — Configuring MySQL – NOT WORKING WITH LATEST
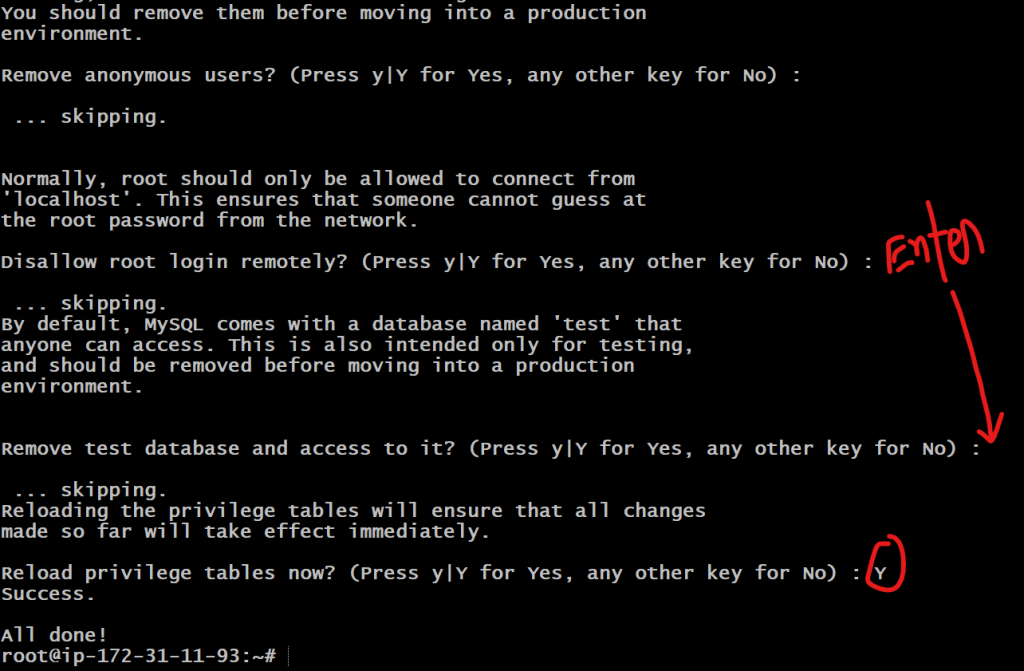
For fresh installations of MySQL, you’ll want to run the DBMS’s included security script. This script changes some of the less secure default options for things like remote root logins and sample users.

Run the security script with sudo:
$ sudo mysql_secure_installationCode language: JavaScript (javascript)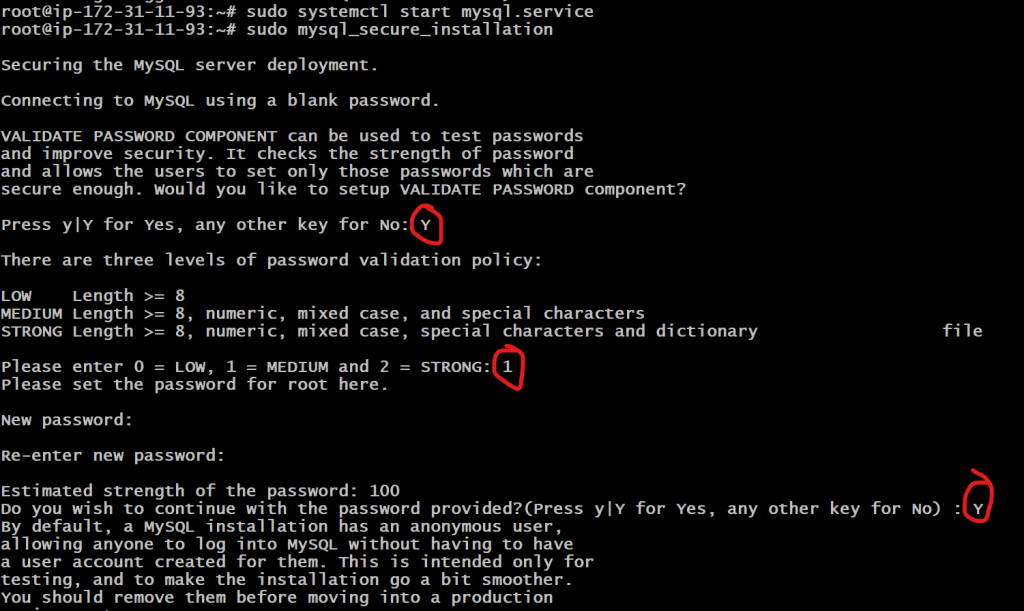
Step 3 — Creating a Dedicated MySQL User and Granting Privileges
$ mysql -u root -p

$ CREATE USER 'sammy'@'localhost' IDENTIFIED BY 'DevOpsSchool$123';
$ GRANT ALL PRIVILEGES ON *.* TO 'sammy'@'localhost' WITH GRANT OPTION;
$ FLUSH PRIVILEGES;
$ exit
$ mysql -u sammy -p

# OPTIONAL Only for Reference
$ CREATE USER 'sammy'@'localhost' IDENTIFIED WITH mysql_native_password BY 'password';
$ ALTER USER 'sammy'@'localhost' IDENTIFIED WITH mysql_native_password BY 'password';
$ GRANT CREATE, ALTER, DROP, INSERT, UPDATE, DELETE, SELECT, REFERENCES, RELOAD on *.* TO 'sammy'@'localhost' WITH GRANT OPTION;Code language: PHP (php)I’m a DevOps/SRE/DevSecOps/Cloud Expert passionate about sharing knowledge and experiences. I have worked at Cotocus. I share tech blog at DevOps School, travel stories at Holiday Landmark, stock market tips at Stocks Mantra, health and fitness guidance at My Medic Plus, product reviews at TrueReviewNow , and SEO strategies at Wizbrand.
Do you want to learn Quantum Computing?
Please find my social handles as below;
Rajesh Kumar Personal Website
Rajesh Kumar at YOUTUBE
Rajesh Kumar at INSTAGRAM
Rajesh Kumar at X
Rajesh Kumar at FACEBOOK
Rajesh Kumar at LINKEDIN
Rajesh Kumar at WIZBRAND
Find Trusted Cardiac Hospitals
Compare heart hospitals by city and services — all in one place.
Explore Hospitals