The Docker client limitations:
- You cannot use a context path when providing the registry path (e.g localhost:8082/artifactory is not valid)
- Docker will only send basic HTTP authentication when working against an HTTPS host or when using the insecure registry flag
Artifactory offers solutions to these limitations
Artifactory offers solutions to these limitations allowing you to create and use any number of Docker registries.
- Using a reverse proxy: – When used, a reverse proxy, maps Docker commands to one of the multiple Docker registries in Artifactory
- Without a reverse proxy: From version 5.8, Artifactory supports using Docker without the use of a reverse proxy allowing you to create and use multiple Docker registries in Artifactory out-of-the-box.
Using a Reverse Proxy
When using Artifactory with a reverse proxy, you need to map Docker commands to Docker registries in Artifactory using either
- The subdomain method,
- ports method or
- repository path method.
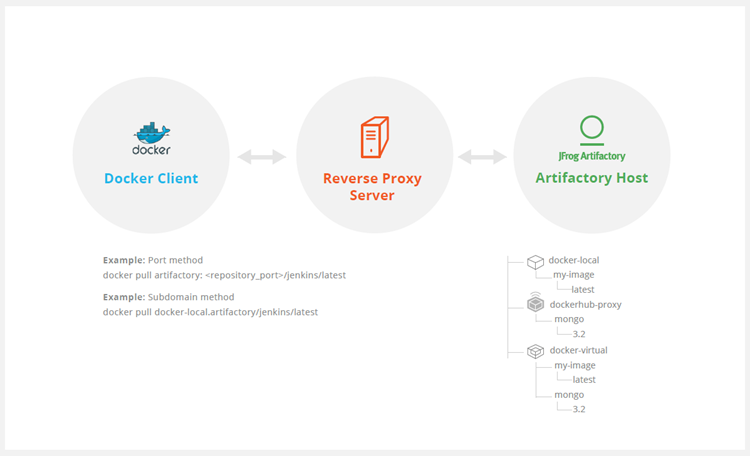
Ports method
With the ports method, a port number is mapped to each Artifactory Docker registry. While this is an easy way to get started, you will need to modify your reverse proxy configuration and add a new mapping for each new Docker registry you define in Artifactory. In addition, firewalls and other restrictions by your IT department may restrict port numbers making the ports method not feasible.
The subdomain method
With the subdomain method, you only need to configure your reverse proxy once, and from then on, the mapping from Docker commands to Docker registries in Artifactory is dynamic and requires no further modification of your reverse proxy configuration.
Repository path method
The repository path method allows a single point of entry (URL) to access different repositories. This is done by embedding the name of the repository being accessed into the image path.
Step 1 – Register and Login bintray.com
Url – https://bintray.com/
Step 2 – Get a API key
Browse https://bintray.com/profile/edit & Tab called “API Key”
Step 3 – In Host Machine, Login to jfrog-docker-reg2.bintray.io
$ docker login -u scmgalaxy -p 543a55849465b127357a92231f63b321980f1fb jfrog-docker-reg2.bintray.ioStep 4 – Pull the Artifactory image.
$ docker pull jfrog-docker-reg2.bintray.io/jfrog/artifactory-pro:6.1.0Step 5 – Run the Artifactory Image
$ docker run -d -p 8081:8081 jfrog-docker-reg2.bintray.io/jfrog/artifactory-pro:6.1.0Step 6 – Browse the Artifactory
http://13.232.91.6:8081/artifactory/
admin / password
Step 7 – Get a Artifactory trial License
Get a Trial Artifactory trial using https://jfrog.com/artifactory/free-trial/
Step 8 – Apply License
Step 9 – Create Docker repo using Artifactory
Create Docker repo using Artifactory and in Repo Advance Setting, use Docker Access Method “Repostory Path”. and Note down the Repo
Step 10 – Convert Docker default https to http
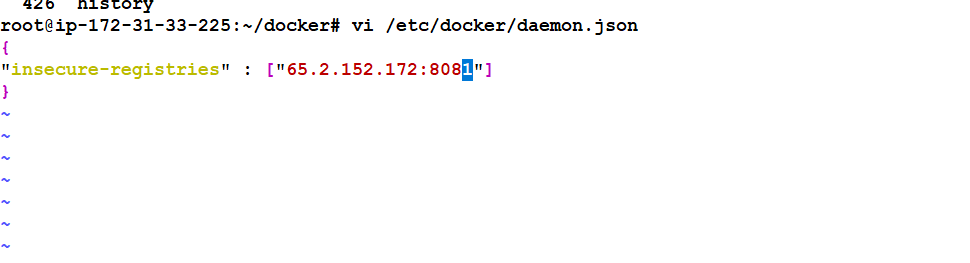
Convert Docker default https to http using
https://www.devopsschool.com/blog/setup-docker-service-to-use-insecurehttp-registry-instead-of-https/
i.e – 13.232.91.6:8081
Step 11 – Stop and Start Docker Engine
$ systemctl stop docker
$ systemctl start docker
$ docker start cont-id-artifactory
Step 12 – Login / Push / Pull now
$ docker login -u admin -p password 13.232.91.6:8081
$ docker pull 13.232.91.6:8081/REPO-KEY/<IMAGE>:<TAG>
$ docker push 13.232.91.6:8081/REPO-KEY/<IMAGE>:<TAG>
$ docker push 13.232.91.6:8081/rajesh/xyz
$ docker pull 13.232.91.6:8081/rajesh/<IMAGE>:<TAG>Code language: HTML, XML (xml)I’m Rajesh Kumar, a DevOps, SRE, DevSecOps, Cloud, and Platform Engineering expert passionate about sharing practical knowledge, real-world experiences, and industry best practices. I have worked at Cotocus and regularly write about technology, travel, investing, health, product reviews, and digital marketing through my various platforms.
I publish technical articles at DevOps School, travel stories at Holiday Landmark, stock market insights at Stocks Mantra, health and fitness guidance at My Medic Plus, product reviews at TrueReviewNow, and SEO and digital marketing strategies at Wizbrand.
Find Trusted Cardiac Hospitals
Compare heart hospitals by city and services — all in one place.
Explore Hospitals