Emulator of Android Studio Consumes lots of Ram and also Slow Down PC. So, Better is to use BlueStacks as emulator in android studio as well as in VS Code.
Steps to Connect Bluestacks to Android Studio or VS Code.
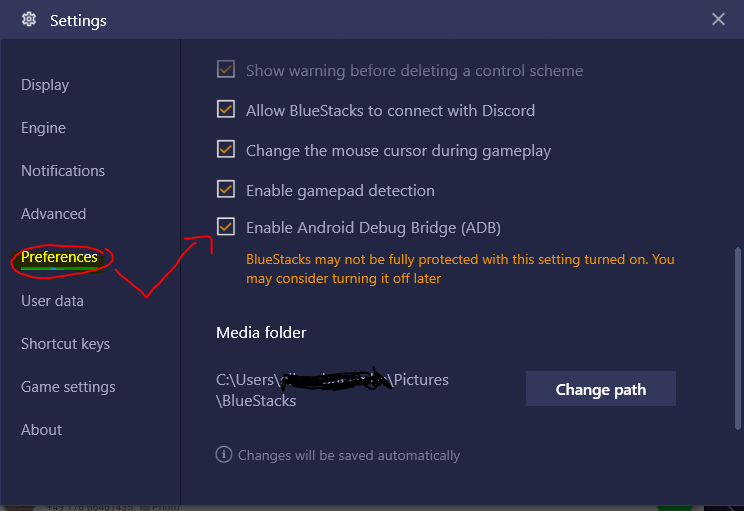
Step 1 :- Enable Android Debug Bridge (ADB) in BlueStacks :- Go to Settings / Preferences and Scroll Down to last and you find the ADB option. Just Enable it. See the Below ScreenShot.
Note:- Start and Keep BlueStacks Running before executing the Below Command else it can’t connect to port 5555.
Step 2 :- Go to adb.exe location :- Go to adb.exe location means go to C:\Users\user-name\AppData\Local\Android\Sdk\platform-tools or press Win + R and paste it %LocalAppData%\Android\sdk\platform-tools and open command prompt or Terminal there and Execute the below Command.
adb connect localhost:5555
After running command it shows connect to localhost:5555 means Successfully Connected.
Step 3 :- Now Open your Android Studio or VS Code, It Shows a device connected Already. Now Run your App directly to BlueStacks.
That’s All.
Thanks for Reading.
Keep Coding.

With MotoShare.in, you can book a bike instantly, enjoy doorstep delivery, and ride without worries. Perfect for travelers, professionals, and adventure enthusiasts looking for a seamless mobility solution.
Find Trusted Cardiac Hospitals
Compare heart hospitals by city and services — all in one place.
Explore Hospitals