A PriorityClass in Kubernetes is a non-namespaced object that defines a mapping from a priority class name to an integer value of the priority. The higher the value, the higher the priority.
In Kubernetes, preemption is a mechanism that allows higher priority pods to evict lower priority pods if there are not enough resources available to schedule the higher priority pods.
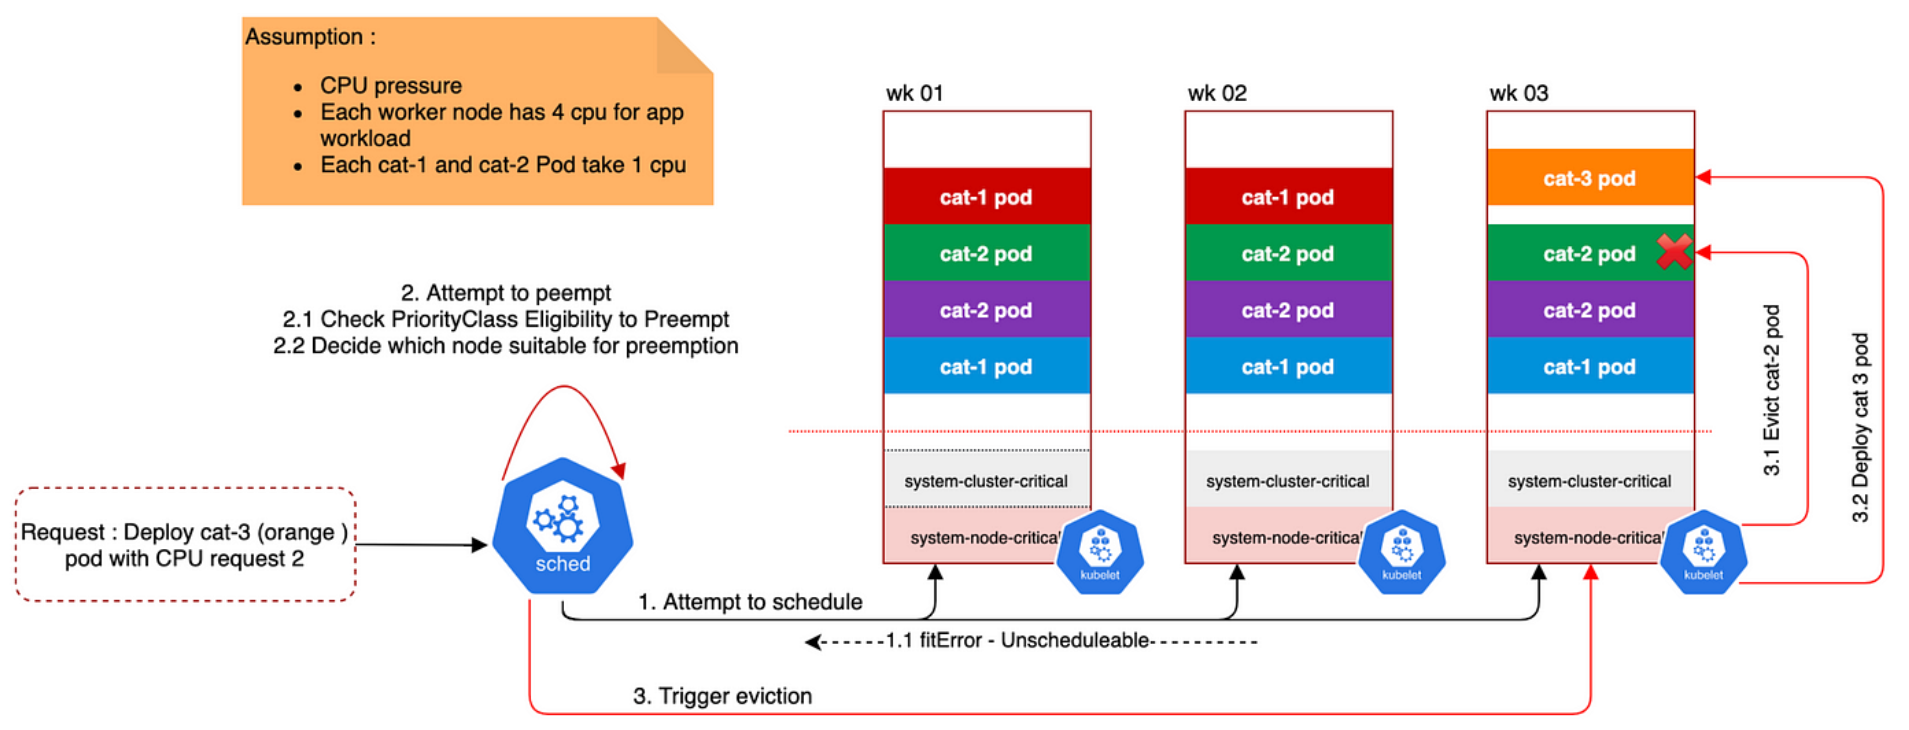
Preemption
Preemption is the process of evicting a lower priority Pod from a node in order to schedule a higher priority Pod. Preemption is enabled by default for PriorityClasses, but you can disable it by setting the preemptionPolicy field to Never.
Default PriorityClass
If you do not specify a priority class for a Pod, the scheduler will assign it the default priority class. The default priority class has a value of 0.
System PriorityClasses
Kubernetes comes with two built-in priority classes:
system-cluster-critical– This priority class has a value of 2000001000 and is used for all pods that should never be evicted from a node.system-node-critical– This priority class has a value of 2000000000 and is used for all pods that are essential to the operation of a node, such as the kubelet and kube-proxy pods.
The list of values of priority class in Kubernetes is as follows:
The list of values of priority class in Kubernetes is as follows:
| Value | Explanation |
|---|---|
| -2147483648 to 0 | Pods with these priorities will be preempted by Pods with any higher priority. |
| 1 to 1000000000 | Pods with these priorities will be scheduled in order of priority, with higher priority Pods being scheduled first. |
| 2000000000 | Pods with this priority will not be preempted by any other Pod. |
| 2000001000 | Pods with this priority will not be preempted by any other Pod, and will also be scheduled before Pods with a priority of 2000000000. |
The built-in priority classes, system-cluster-critical and system-node-critical, use the values 2000000000 and 2000001000, respectively. This ensures that these Pods are always scheduled first and will never be preempted.
For example, suppose you have a Kubernetes cluster with a set of nodes, and you want to schedule a new pod with a high priority. However, all of the nodes are currently running at capacity, and there are no nodes with enough available resources to schedule the new pod.
In this case, the Kubernetes scheduler can use preemption to evict lower priority pods in order to make room for the new high-priority pod. The Kubernetes scheduler determines which pods to evict based on their priority and resource utilization.
Here is an example of how preemption works in Kubernetes:
- You have a Kubernetes cluster with three nodes, each with 2 CPU cores and 4 GB of memory.
- You have three pods running on the cluster: pod A, pod B, and pod C.
- Pod A has a high priority and requires 2 CPU cores and 3 GB of memory.
- Pod B has a medium priority and requires 1 CPU core and 2 GB of memory.
- Pod C has a low priority and requires 1 CPU core and 1 GB of memory.
- All three nodes are currently running at capacity, with no available CPU cores or memory.
- You try to schedule pod A, but it cannot be scheduled because there are no available resources.
- The Kubernetes scheduler uses preemption to evict pod C, which has the lowest priority and is using the least amount of resources.
- Pod A is scheduled on the node where pod C was running, since that node now has enough available resources.
- Pod C is rescheduled on a different node with available resources.
In this example, preemption allowed the higher priority pod A to be scheduled by evicting the lower priority pod C.
Without preemption, pod A would not have been able to be scheduled, since all of the nodes were running at capacity.
How to set Preemption in kubernetes with pod

In Kubernetes, you can set preemption policies for pods using the priorityClassName field in the pod spec. This field allows you to assign a priority class to your pod, which can be used by the Kubernetes scheduler to determine which pods to evict when resources are limited.
Here’s how to set preemption policies for pods in Kubernetes:
Define a priority class:
apiVersion: scheduling.k8s.io/v1
kind: PriorityClass
metadata:
  name: high-priority
<strong>value: 1000000</strong>
globalDefault: false
description: "This priority class is for high-priority pods"
Code language: HTML, XML (xml)
This priority class is given a value of 1000000, which is a high priority value. You can adjust the value as needed to reflect your priority requirements.
Assign the priority class to your pod:
apiVersion: v1
kind: Pod
metadata:
  name: my-pod
spec:
  <strong>priorityClassName: high-priority</strong>
  containers:
  - name: my-container
    image: my-image
    ...
Code language: HTML, XML (xml)
Here, the priorityClassName field is set to high-priority, which is the name of the priority class defined in step 1.
With these settings, if the Kubernetes scheduler determines that resources are insufficient to schedule the pod, it will evict lower priority pods in order to make room for the higher priority pod. The Kubernetes scheduler will evict the lowest priority pod first until enough resources are available for the higher priority pod.
EXAMPLE
apiVersion: scheduling.k8s.io/v1
kind: PriorityClass
metadata:
  name: high-priority
value: 1000000
apiVersion: v1
kind: Pod
metadata:
  name: my-pod
spec:
  priorityClassName: high-priority
  containers:
  - name: my-container
    image: nginx
I’m Rajesh Kumar, a DevOps, SRE, DevSecOps, Cloud, and Platform Engineering expert passionate about sharing practical knowledge, real-world experiences, and industry best practices. I have worked at Cotocus and regularly write about technology, travel, investing, health, product reviews, and digital marketing through my various platforms.
I publish technical articles at DevOps School, travel stories at Holiday Landmark, stock market insights at Stocks Mantra, health and fitness guidance at My Medic Plus, product reviews at TrueReviewNow, and SEO and digital marketing strategies at Wizbrand.
Find Trusted Cardiac Hospitals
Compare heart hospitals by city and services — all in one place.
Explore Hospitals
This blog gives a clear and helpful explanation of preemption in Kubernetes with easy‑to‑follow examples. I like how it breaks down what preemption is and why it matters for scheduling and prioritizing pods. It’s a useful read for anyone looking to understand how Kubernetes handles resource allocation and keeps workloads running efficiently.