
How to access applications running within minikube
There are two major categories of services in Kubernetes:
- NodePort
- LoadBalancer
NodePort access with Minikube
A NodePort service is the most basic way to get external traffic directly to your service. NodePort, as the name implies, opens a specific port, and any traffic that is sent to this port is forwarded to the service.
Getting the NodePort using the service command: We also have a shortcut for fetching the minikube IP and a service’s NodePort:
$ minikube service –url
Example of NodePort

Step - 1: Create a Kubernetes deployment
$ kubectl create deployment hello-minikube1 --image=k8s.gcr.io/echoserver:1.4

Step - 2: Create a Kubernetes service type NodePort
$ kubectl expose deployment hello-minikube1 --type=NodePort --port=8080

Step - 3: Check Node Port
$ kubectl get svc
NAME              TYPE        CLUSTER-IP      EXTERNAL-IP   PORT(S)          AGE
hello-minikube1   NodePort    10.100.238.34   <none>        8080:31389/TCP   3s

Step - 4: Run service tunnel
$ minikube service hello-minikube1 --url

Step - 5: To determine the NodePort for your service, you can use a kubectl command like this (note that nodePort begins with lowercase n in JSON output):
$ kubectl get service <service-name> --output='jsonpath="{.spec.ports[0].nodePort}"'Code language: JavaScript (javascript)
Connect to LoadBalancer services with Minikube
A LoadBalancer service is the standard way to expose a service to the internet. With this method, each service gets its own IP address.
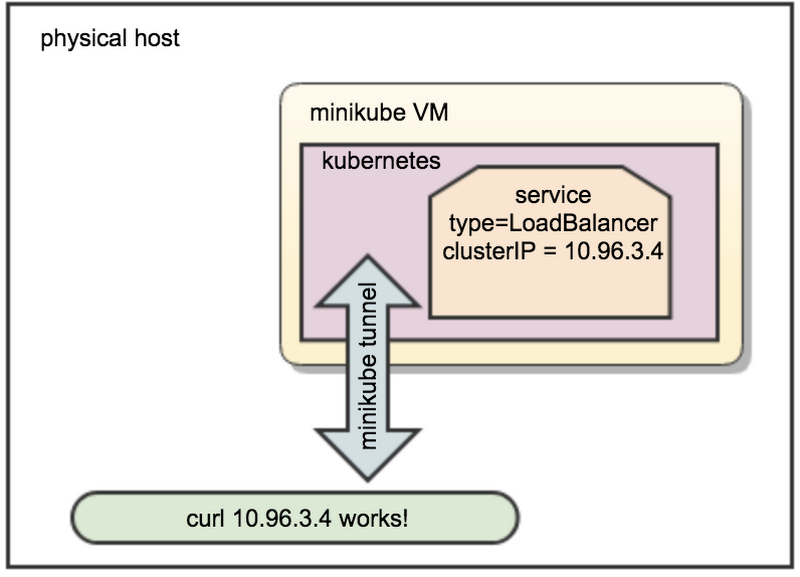
Using minikube tunnel
Services of type LoadBalancer can be exposed via the minikube tunnel command. It must be run in a separate terminal window to keep the LoadBalancer running. Ctrl-C in the terminal can be used to terminate the process at which time the network routes will be cleaned up
minikube tunnel creates a network route on the host to the service using the cluster’s IP address as a gateway. The tunnel command exposes the external IP directly to any program running on the host operating system.
Note: The command requires root rights (sudo) because it creates a network configuration.
Tunnel is used to expose the service from inside of VM where minikube is running to the host machine’s network. Works with LoadBalancer service type.
Example of LoadBalancer with Minikube tunnel
Step 1 - Run the tunnel in a separate terminal

It will ask for a password.
$ minikube tunnel
minikube tunnel runs as a process, creating a network route on the host to the service CIDR of the cluster using the cluster’s IP address as a gateway. The tunnel command exposes the external IP directly to any program running on the host operating system.

tunnel output example

 Password:
 Status:
 machine: minikube
 pid: 39087
 route: 10.96.0.0/12 -> 192.168.64.194
 minikube: Running
 services: [hello-minikube]
     errors:
   minikube: no errors
   router: no errors
   loadbalancer emulator: no errors


Step 2 - Create a Kubernetes deployment
$ kubectl create deployment hello-minikube1 --image=k8s.gcr.io/echoserver:1.4

Step 3 - Create a Kubernetes service with type LoadBalancer

kubectl expose deployment hello-minikube1 --type=LoadBalancer --port=8080

Step 4 - Check the external IP
$ kubectl get svc
$ kc get svc
 NAME              TYPE           CLUSTER-IP      EXTERNAL-IP     PORT(S)          AGE
 hello-minikube1   LoadBalancer   10.96.184.178   10.96.184.178   8080:30791/TCP   40s

Note that without minikube tunnel, Kubernetes will show the external IP as “pending”.

Step 5 - Try in your browser

Open in your browser (ensure there is no proxy set)

http://REPLACE_WITH_EXTERNAL_IP:8080
Each service will get its own external IP.Code language: JavaScript (javascript)I’m Rajesh Kumar, a DevOps, SRE, DevSecOps, Cloud, and Platform Engineering expert passionate about sharing practical knowledge, real-world experiences, and industry best practices. I have worked at Cotocus and regularly write about technology, travel, investing, health, product reviews, and digital marketing through my various platforms.
I publish technical articles at DevOps School, travel stories at Holiday Landmark, stock market insights at Stocks Mantra, health and fitness guidance at My Medic Plus, product reviews at TrueReviewNow, and SEO and digital marketing strategies at Wizbrand.
Find Trusted Cardiac Hospitals
Compare heart hospitals by city and services — all in one place.
Explore Hospitals