What is Ajax?

Ajax is a set of web development techniques that allows web pages to be updated asynchronously by exchanging small amounts of data with the server behind the scenes. It enables web applications to retrieve and send data to a server asynchronously, without requiring a full page reload. Ajax uses a combination of technologies, including HTML, CSS, JavaScript, and XMLHttpRequest (XHR) objects.
Key Components of Ajax:
- HTML/CSS: Provide the structure and style of the web page.
- JavaScript: Handles the asynchronous communication and manipulates the Document Object Model (DOM) dynamically.
- XMLHttpRequest (XHR): An API in web browsers that allows HTTP requests to be sent to a server and processed asynchronously.
What is top use cases of Ajax?
Top Use Cases of Ajax:
- Dynamic Content Loading:
- Ajax is commonly used to load dynamic content on a web page without requiring a full page refresh. This is particularly useful for updating parts of a page, such as comments, chat messages, or news feeds.
- Form Submission and Validation:
- Ajax allows submitting form data to the server without reloading the entire page. It is often used for form validation and providing real-time feedback to users.
- Autocomplete and Suggestions:
- Autocomplete features in search boxes or input fields benefit from Ajax. As users type, Ajax requests are made to the server to fetch and display relevant suggestions in real-time.
- Infinite Scrolling:
- Websites that implement infinite scrolling, where new content is loaded as the user scrolls down, often utilize Ajax to fetch and append additional data without refreshing the entire page.
- Updating User Interfaces:
- Ajax is employed to update various elements of a user interface, such as dashboards, charts, and graphs, with new data fetched from the server.
- Single Page Applications (SPAs):
- SPAs heavily rely on Ajax to load content dynamically as users navigate through the application. This outcomes in a smoother and more responsive user experience.
- Live Search and Filtering:
- Ajax is used in live search features where search results are updated in real-time as the user types. It’s also employed for filtering and sorting data without reloading the entire page.
- Interactive Maps:
- Websites that incorporate interactive maps often use Ajax to fetch map data dynamically based on user interactions, allowing for a more dynamic and responsive mapping experience.
- Real-Time Collaboration:
- Collaborative applications, such as collaborative document editing or project management tools, use Ajax to update content in real-time for all users involved.
- User Authentication:
- Ajax is commonly used in user authentication processes, allowing users to log in or out without needing to refresh the entire page.
- Notifications and Alerts:
- Ajax is employed to update and display notifications or alerts in real-time, notifying users of new messages, events, or updates.
- Weather Updates and Stock Prices:
- Websites displaying real-time data like weather updates, stock prices, or sports scores often use Ajax to fetch and update information without refreshing the entire page.
Ajax significantly enhances the user experience on the web by providing a more dynamic and responsive interface. It has become a fundamental technology in modern web development, and its principles are often integrated into more advanced frameworks and libraries, such as jQuery, React, or Vue.js.
What are feature of Ajax?
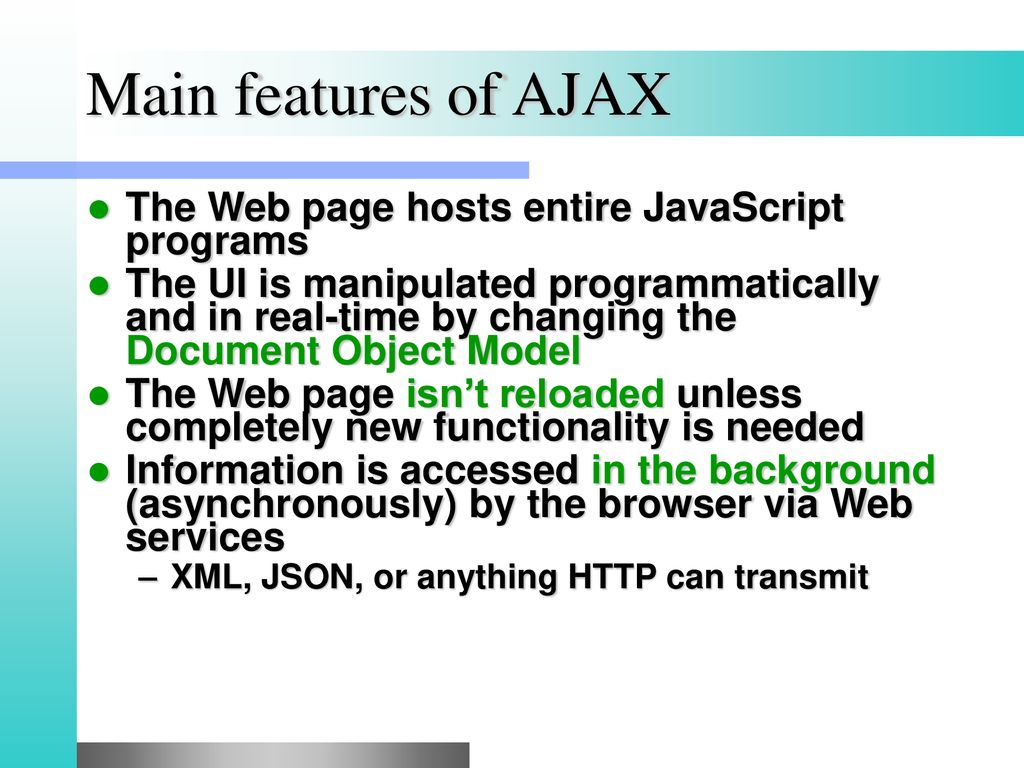
Features of Ajax:
Ajax (Asynchronous JavaScript and XML) brings several features to web development that enable asynchronous communication between a web browser and a web server. Here are some key features of Ajax:
- Asynchronous Data Loading:
- Ajax allows data to be fetched from a server and updated on a web page asynchronously without requiring a full page reload. This leads to a more responsive user interface.
- Partial Page Update:
- Instead of refreshing the entire web page, Ajax enables developers to update specific parts of a page. This is especially useful for dynamic content, such as chat messages or comments, without disrupting the user’s overall experience.
- Background Processing:
- Ajax requests are performed in the background, allowing users to continue interacting with the web page while data is being fetched or sent to the server.
- Reduced Server Load:
- By fetching only the necessary data, Ajax requests reduce the amount of data transferred between the client and server. This can result in lower server load and improved performance.
- Improved User Experience:
- Ajax contributes to a smoother and more interactive user experience by eliminating the need for full page reloads. This is particularly beneficial for single-page applications (SPAs) and web applications with dynamic content.
- Dynamic Content:
- Ajax enables the loading and updating of dynamic content on a web page. This can include content retrieved from the server, such as images, text, or other media.
- Form Submission Without Page Reload:
- Web forms can submit data to the server using Ajax without requiring a full page refresh. This allows for real-time form validation and submission feedback.
- Cross-Browser Compatibility:
- Ajax is supported by major web browsers, making it a widely compatible technology for building interactive and dynamic web applications.
- Support for Various Data Formats:
- While XML is part of its name, Ajax is not limited to XML. It supports various data formats, including JSON (JavaScript Object Notation), which has become the preferred format for data interchange in modern web development.
- Client-Side Scripting:
- Ajax relies on client-side scripting, primarily using JavaScript to handle asynchronous requests and manipulate the Document Object Model (DOM) dynamically.
- Server-Side Scripting:
- On the server side, Ajax interacts with server-side scripts or APIs to fetch or submit data. These scripts handle the incoming requests and respond with the necessary data.
What is the workflow of Ajax?
- Event Trigger:
- An event, such as a user action (button click, form submission, etc.), triggers the need for data to be fetched from the server or sent to the server.
2. Creation of XMLHttpRequest Object:
- In JavaScript, an XMLHttpRequest object is created. This object is responsible for making asynchronous requests to the server.
var xhttp = new XMLHttpRequest();Code language: JavaScript (javascript)- Specify the Request Details:
- Set the request details, such as the request type (GET or POST), the URL of the server-side script or API endpoint, and any parameters to be sent.
xhttp.open("GET", "example.com/data", true);Code language: JavaScript (javascript)- Define Callback Function:
- Define a callback function that will be executed when the server responds to the request. This function manages the processing of the received data.
   xhttp.onreadystatechange = function() {
     if (this.readyState == 4 && this.status == 200) {
       // Process and update the DOM with the received data
       console.log(this.responseText);
     }
};Code language: JavaScript (javascript)- Send the Request:
- Send the XMLHttpRequest to the server.
xhttp.send();Code language: CSS (css)- Server-Side Processing:
- On the server side, the server processes the request and returns the necessary data. This can involve querying a database, executing server-side scripts, or interacting with an API.
7. Response Handling:
- The callback function defined earlier is triggered when the server responds. The function processes the received data and updates the DOM or performs other actions as needed.
8. User Interface Update:
- The web page’s user interface is dynamically updated based on the received data, providing a seamless and responsive user experience.
The Ajax workflow involves the coordination of client-side and server-side processes to facilitate asynchronous data exchange, leading to a more interactive and dynamic web experience.
How Ajax Works & Architecture?
AJAX (Asynchronous JavaScript and XML) is a technique for creating web pages that update dynamically without reloading the entire page. This makes web applications feel more responsive and engaging.
Following is a breakdown of how Ajax works and its architecture:
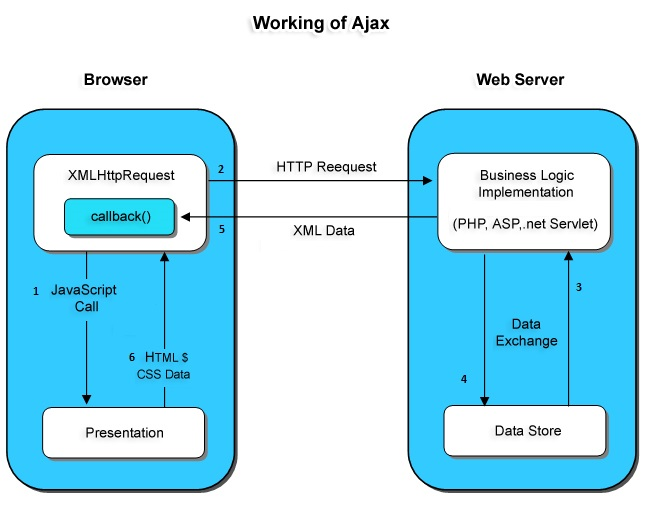
1. User Interaction:
- The user interacts with a web page element, triggering an event (e.g., clicking a button).
2. JavaScript Request:
- JavaScript code within the web page creates an XMLHttpRequest object.
- This object sends a request to the server, specifying the URL, method (e.g., GET, POST), and any data to be sent.
3. Server Processing:
- The server receives the request and processes it, typically using a server-side script (e.g., PHP, Python).
- The server generates a response, which can be XML, JSON, or plain text.
4. Response Handling:
- The response is sent back to the browser.
- JavaScript code in the browser receives the response and parses it.
5. Dynamic Update:
- The JavaScript code updates the web page based on the received data, using methods like DOM manipulation.
- This allows for partial updates to the page without reloading the entire content.
Ajax Architecture:
- Client-side:
- JavaScript code: Initiates requests, handles responses, and updates the UI.
- XMLHttpRequest object: Responsible for making asynchronous requests to the server.
- Server-side:
- Server-side script: Processes requests, generates responses, and interacts with databases or other resources.
- Web server: Receives requests, sends responses, and communicates with the client.
Benefits of Ajax:
- Improved user experience: Web pages feel more responsive and interactive.
- Reduced page loads: Only the necessary data is loaded, improving performance.
- Enhanced functionality: Enables features like real-time updates and dynamic content.
Examples of Ajax Use Cases:
- Live chat applications
- Online forms and validation
- Content loading and updates
- Autocomplete suggestions
- Social media feeds
Points to Remember:
- Ajax is a powerful tool for enhancing web applications.
- Understanding how it works and its architecture is crucial for effective implementation.
- Practice and explore various resources to master Ajax development.
How to Install and Configure Ajax?
Installing Ajax:
As Ajax is a client-side technology based on JavaScript, it doesn’t require any specific installation process. However, you need the following:
1. Web Browser: Any modern web browser with JavaScript support (e.g., Chrome, Firefox, Safari).
2. JavaScript Knowledge: Basic understanding of JavaScript syntax and concepts is essential for writing Ajax code.
3. Server-Side Technology: Although Ajax focuses on the client-side, you need a server-side language (e.g., PHP, Python) and server environment for processing requests and generating responses.
Configuring Ajax:
1. JavaScript Code:
- Write JavaScript code to initiate requests, handle responses, and update the UI.
- Utilize the XMLHttpRequest object for communication with the server.
- Define request parameters like URL, method (GET, POST), and data to be sent.
- Specify functions to handle successful and unsuccessful responses.
- Update the web page based on the received data using DOM manipulation techniques.
2. Server-Side Script:
- Develop a server-side script (e.g., PHP file) to process Ajax requests.
- Receive request data and parameters.
- Interact with database or other resources to retrieve or manipulate data.
- Generate a response containing the desired data (XML, JSON, or plain text).
3. Web Server:
- Configure your web server (e.g., Apache, Nginx) to handle Ajax requests and serve static files.
- Map the server-side script to the request URL defined in the JavaScript code.
Important Points:
- Utilize JavaScript libraries like jQuery to simplify Ajax development.
- Implement error handling and data validation for robust functionality.
- Consider security aspects like cross-origin resource sharing (CORS) when dealing with communication between different domains.
Ajax implementation depends on the specific requirements and functionalities you want to achieve. By exploring the resources and practicing, you can develop effective and interactive web applications using Ajax.
Fundamental Tutorials of Ajax: Getting started Step by Step

Some of the basic tutorials for getting started with Ajax:
1. Setting Up Your Development Environment:
- Web browser: Any modern web browser with JavaScript support will work.
- Text editor: You’ll need a text editor for writing your code. Popular choices include Visual Studio Code, Sublime Text, and Atom.
- Web server: A web server is not required for basic Ajax tutorials, but you will need one if you want to test your code with a real server. Popular options include Apache, Nginx, and IIS.
2. Your First Ajax Request:
- Open your text editor and create a new file.
- Add the following code to your file:
function makeRequest() {
  // Create a new XMLHttpRequest object
  const xhr = new XMLHttpRequest();

  // Open a connection to the server
  xhr.open("GET", "https://example.com/data.json", true);

  // Set up a callback function to handle the response
  xhr.onload = function() {
    if (xhr.status === 200) {
      // Parse the JSON response
      const data = JSON.parse(xhr.responseText);
      // Update the page with the data
      console.log(data);
    } else {
      console.error("Error:", xhr.statusText);
    }
  };

  // Send the request
  xhr.send();
}

// Make the request
makeRequest();
Code language: JavaScript (javascript)- Save the file as
index.html. - Open the file in your web browser.
- The
console.log(data)statement will print the data from the server to the browser console.
3. Sending Data to the Server:
- Modify the
makeRequestfunction to send data to the server:
function makeRequest() {
  const xhr = new XMLHttpRequest();
  xhr.open("POST", "https://example.com/submit", true);
  xhr.setRequestHeader("Content-Type", "application/json");

  const data = JSON.stringify({ name: "John Doe", email: "john.doe@example.com" });

  xhr.onload = function() {
    if (xhr.status === 200) {
      console.log("Data submitted successfully");
    } else {
      console.error("Error:", xhr.statusText);
    }
  };

  xhr.send(data);
}
Code language: JavaScript (javascript)- This code defines a JSON object containing name and email data.
- The
setRequestHeadermethod sets the content type toapplication/json. - The
JSON.stringifymethod converts the data object to a JSON string. - The
sendmethod sends the data to the server.
4. Updating the UI with Ajax:
- Modify the
onloadfunction to update the UI with the data:
JavaScript
xhr.onload = function() {
  if (xhr.status === 200) {
    const data = JSON.parse(xhr.responseText);
    const element = document.getElementById("data-container");
    element.innerHTML = data.message;
  } else {
    console.error("Error:", xhr.statusText);
  }
};
Code language: JavaScript (javascript)- This code retrieves the element with the ID
data-containerand updates its inner HTML with the message received from the server.
5. More Resources:
- W3Schools Ajax Tutorial
- Mozilla Developer Network XMLHttpRequest
- The Definitive Guide to Ajax
- Ajax for Beginners
These are just some of the basic steps to getting started with Ajax. There are many other features and techniques that you can learn, such as using libraries like jQuery, handling errors, and implementing security measures. By practicing and exploring the resources provided, you can develop your skills in Ajax and create dynamic and interactive web applications.

Find Trusted Cardiac Hospitals
Compare heart hospitals by city and services — all in one place.
Explore Hospitals