What is Amazon Redshift?
If you’re in the world of big data, you’ve probably heard of Amazon Redshift. But what exactly is it? Simply put, Amazon Redshift is a cloud-based data warehousing service that allows you to store and analyze large amounts of data. But it’s more than just a data warehouse – it’s a powerful tool that can help you make sense of your data and gain insights that can drive business decisions.
Top 10 use cases of Amazon Redshift
Amazon Redshift has a wide range of use cases across various industries. Here are the top 10 use cases of Amazon Redshift:
- Business Intelligence: With Amazon Redshift, you can analyze large amounts of data to gain insights into your business and make data-driven decisions.
- E-commerce: Amazon Redshift can help e-commerce companies analyze customer behavior, sales trends, and inventory data to optimize their operations.
- Healthcare: Healthcare organizations can use Amazon Redshift to store and analyze patient data, clinical data, and research data.
- Media and entertainment: Media and entertainment companies can use Amazon Redshift to analyze audience behavior, advertising data, and content consumption patterns.
- Gaming: Gaming companies can use Amazon Redshift to analyze player behavior, in-game data, and revenue streams.
- Financial services: Financial services organizations can use Amazon Redshift to store and analyze transaction data, market data, and risk data.
- Manufacturing: Manufacturing companies can use Amazon Redshift to analyze production data, supply chain data, and product quality data.
- Education: Education institutions can use Amazon Redshift to store and analyze student data, enrollment data, and academic research data.
- Government: Government agencies can use Amazon Redshift to store and analyze public data, census data, and crime data.
- Marketing: Marketing teams can use Amazon Redshift to analyze customer behavior, campaign data, and social media data.
What are the features of Amazon Redshift?
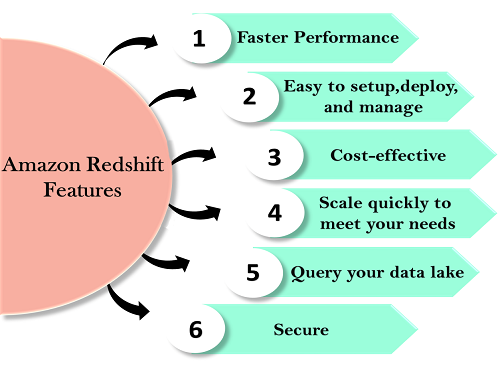
Amazon Redshift comes with a variety of features that make it a powerful data warehousing tool. See, I have listed some of the key features:
- Columnar storage: Data is stored column-wise, reducing I/O and improving query performance.
- Distributed architecture: Amazon Redshift is built on a distributed architecture that allows for parallel processing and scalability.
- Data encryption: Amazon Redshift supports encryption at rest and in transit, ensuring that your data is secure.
- Automatic backup and recovery: Amazon Redshift automatically backs up your data and provides point-in-time recovery options.
- Integration with other AWS services: Amazon Redshift integrates with other AWS services such as S3, EMR, and Data Pipeline.
- SQL support: Amazon Redshift supports SQL, making it easy to work with for anyone familiar with SQL.
How Amazon Redshift works and Architecture?
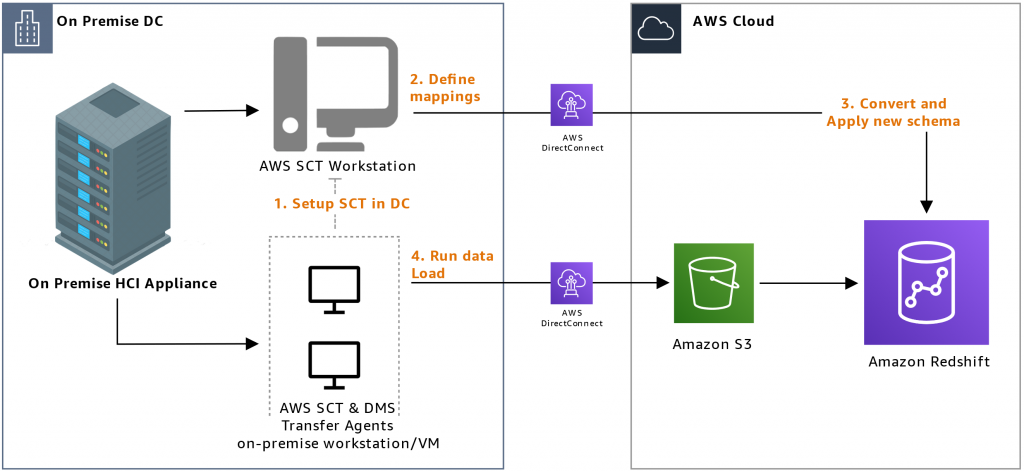
Amazon Redshift is designed to be a scalable, cost-effective, and fast data warehousing solution. It is built on a distributed architecture that allows for parallel processing of data. Here’s how it works:
- Data is loaded into Amazon Redshift from various sources such as S3, EMR, or other databases.
- The data is then distributed across nodes in the cluster based on a chosen distribution key.
- Queries are executed in parallel across the nodes, allowing for faster processing.
- Amazon Redshift uses a columnar storage format that allows for efficient data compression and faster query performance.
- Data is encrypted at rest and in transit, ensuring that it is secure.
- Amazon Redshift also provides automatic backup and recovery options.
How to Install Amazon Redshift?
Installing Amazon Redshift is a straightforward process. Here are the steps:
- Sign up for an AWS account if you don’t already have one.
- Log in to your AWS account and navigate to the Amazon Redshift console.
- Create a new cluster by specifying the cluster configuration, including the number and type of nodes.
- Configure your security settings, including encryption and access control.
- Load your data into Amazon Redshift from various sources such as S3, EMR, or other databases.
- Start querying your data using SQL.
That’s it! With just a few simple steps, you can start using Amazon Redshift to store and analyze your data.
Basic Tutorials of Amazon Redshift: Getting Started
As Amazon Redshift is a fully managed service provided by AWS, there is no traditional installation process. Instead, you configure and create a Redshift cluster using the AWS Management Console or AWS Command Line Interface. Below is a step-by-step basic tutorial to get started with Amazon Redshift:

Step 1: Go with the Sign in option to the AWS Management Console
- Go to the AWS Management Console at https://console.aws.amazon.com/ and sign in with your AWS account.
Step 2: Open the Amazon Redshift Console
- In the AWS Management Console, search for “Redshift” in the services search bar, or navigate to the “Analytics” section and select “Amazon Redshift.”
Step 3: Create a Redshift Cluster
- Click on the “Create cluster” button to start creating a new Redshift cluster.
- Configure the cluster settings, including Cluster identifier, Database name, Database port, Node type, Number of nodes, and optionally enable Enhanced VPC Routing and Publicly accessible settings.
Step 4: Set up Cluster Access
- Define the Master user credentials (username and password) to access the Redshift cluster.
Step 5: Choose Additional Configuration
- Optionally, configure additional settings, such as Cluster Permissions, Encryption, VPC, and Maintenance settings.
Step 6: Review and Launch
- Review all the configurations you’ve set for the Redshift cluster.
- Create the Redshift cluster with the” Create cluster” option. The cluster creation process may take a few minutes to complete.
Step 7: Connect to the Redshift Cluster
- Once the cluster is created, click on the cluster name to view the cluster details.
- In the “Connect” tab, find the connection details, including the JDBC URL, ODBC URL, and other information needed to connect to the cluster.
Step 8: Load Data into the Redshift Cluster
- You can use various methods to load data into the Redshift cluster, such as using the COPY command, AWS Data Pipeline, AWS Glue, or other ETL tools. To efficiently load your CSV files into your data warehouse, use the Redshift import CSV feature.
Step 9: Run Queries and Analyze Data
- Use SQL clients or Business Intelligence (BI) tools to connect to the Redshift cluster and run queries for data analysis.
Step 10: Monitor and Manage the Redshift Cluster
- In the Redshift console, you can monitor the performance and health of your cluster and make any necessary optimizations or adjustments.
Please note that Amazon Redshift is a powerful data warehousing service, and this basic tutorial provides an overview of creating and using a Redshift cluster. For advanced configurations and performance optimization, you may refer to the official AWS documentation and best practices.
How Amazon Redshift Works? 🚀
Amazon Redshift is a fully managed, petabyte-scale data warehouse service in the AWS cloud. It is designed for fast querying and analytics on large datasets. Here’s how it works:
1️⃣ Columnar Storage & Compression – Redshift stores data in a columnar format, reducing disk I/O and improving performance.
2️⃣ Massively Parallel Processing (MPP) – Redshift distributes queries across multiple nodes to process data faster.
3️⃣ Automatic Workload Management (WLM) – It optimizes resource allocation based on workloads.
4️⃣ Optimized Query Execution – Uses caching, result reuse, and materialized views for speed.
5️⃣ Integration with AWS Services – Works seamlessly with S3, Glue, Athena, QuickSight, and Lambda for ETL and visualization.
6️⃣ Scalability & Fault Tolerance – Allows resizing of clusters and auto-replicates data across nodes for durability.
Best Alternatives to Amazon Redshift 🏆
If you’re looking for an alternative to Redshift, consider the following data warehouse solutions based on your needs:
1️⃣ Google BigQuery – Serverless, highly scalable, and works great for real-time analytics with minimal management.
2️⃣ Snowflake – Fully managed, cloud-native warehouse with seamless scaling and multi-cloud support (AWS, Azure, GCP).
3️⃣ Microsoft Azure Synapse Analytics – Deeply integrated with Power BI and SQL-based analytics on Azure.
4️⃣ Databricks (Delta Lake) – Best for big data analytics & AI/ML workloads, optimized for Apache Spark.
5️⃣ ClickHouse – High-speed OLAP database that’s open-source and optimized for real-time analytics.
6️⃣ Apache Druid – Great for real-time ingestion and fast aggregation on streaming data.

👤 About the Author
Ashwani is passionate about DevOps, DevSecOps, SRE, MLOps, and AiOps, with a strong drive to simplify and scale modern IT operations. Through continuous learning and sharing, Ashwani helps organizations and engineers adopt best practices for automation, security, reliability, and AI-driven operations.
🌐 Connect & Follow:
- Website: WizBrand.com
- Facebook: facebook.com/DevOpsSchool
- X (Twitter): x.com/DevOpsSchools
- LinkedIn: linkedin.com/company/devopsschool
- YouTube: youtube.com/@TheDevOpsSchool
- Instagram: instagram.com/devopsschool
- Quora: devopsschool.quora.com
- Email– contact@devopsschool.com
Find Trusted Cardiac Hospitals
Compare heart hospitals by city and services — all in one place.
Explore Hospitals