What is Apache MXNet?
Apache MXNet is an open-source deep learning framework designed to facilitate the development, training, and deployment of machine learning models. It was initially developed by the Apache Software Foundation in collaboration with other organizations and is known for its efficiency, scalability, and support for both symbolic and imperative programming paradigms. MXNet supports a wide range of hardware, including CPUs, GPUs, and specialized accelerators, making it suitable for various machine learning tasks across different domains.
Top 10 use cases of Apache MXNet:
Here are the top 10 use cases of Apache MXNet:
- Image Classification: MXNet can be used to build and train convolutional neural networks (CNNs) for tasks such as image classification, where the model learns to classify images into different predefined categories.
- Object Detection: MXNet enables the development of models for object detection, allowing machines to identify and locate objects within images or video streams.
- Natural Language Processing (NLP): MXNet can be used to build models for NLP tasks such as sentiment analysis, named entity recognition, text generation, and machine translation.
- Speech Recognition: MXNet can be employed to create speech recognition systems that convert spoken language into text, enabling applications like voice assistants and transcription services.
- Anomaly Detection: MXNet’s ability to learn complex patterns makes it suitable for anomaly detection in various domains, such as identifying fraudulent transactions or detecting defects in manufacturing.
- Recommender Systems: MXNet can build recommendation models that suggest items to users based on their preferences and historical behavior, which is commonly used in e-commerce and content platforms.
- Time Series Analysis: MXNet can be used for time series forecasting, allowing businesses to predict future trends based on historical data, which is valuable for financial forecasting and demand prediction.
- Healthcare and Biomedicine: MXNet can be employed in medical image analysis, disease diagnosis, and drug discovery, aiding researchers and healthcare professionals in their work.
- Autonomous Vehicles: MXNet’s real-time processing capabilities are suitable for building models used in autonomous vehicles for tasks like object detection, pedestrian tracking, and lane detection.
- Gaming and Entertainment: MXNet can be used to create models for gesture recognition, emotion detection from facial expressions, and other applications within the gaming and entertainment industries.
These are just a few examples of the diverse range of applications for which Apache MXNet can be used. Its flexibility, scalability, and support for various hardware make it a popular choice among machine learning practitioners and researchers.
What are the feature of Apache MXNet?
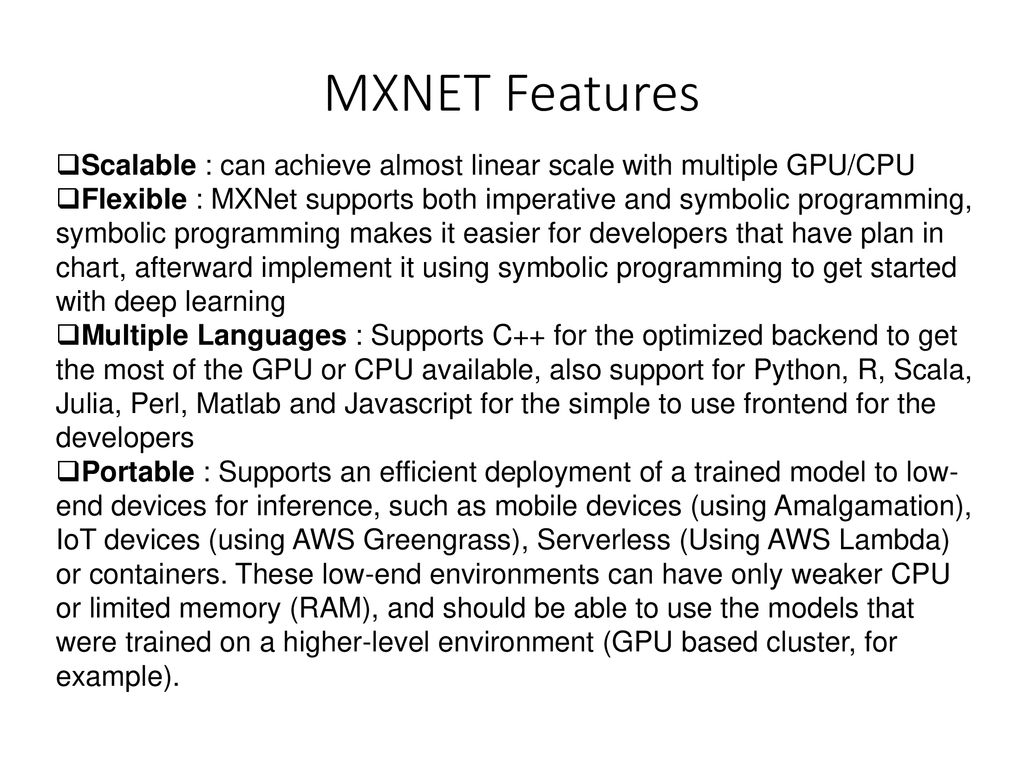
Apache MXNet is a powerful deep learning framework that offers a variety of features to support the development and deployment of machine learning models. Some of the key features of Apache MXNet include:
- Symbolic and Imperative Programming: MXNet supports both symbolic and imperative programming paradigms, allowing users to choose between defining their models symbolically (using a computation graph) or imperatively (similar to writing code step by step).
- Dynamic Computational Graph: MXNet’s dynamic computation graph allows for more flexible model designs where the structure of the graph can change dynamically during runtime, making it suitable for tasks with varying input sizes or dynamic network architectures.
- Efficiency and Performance: MXNet is designed for efficiency and performance. It offers optimized implementations for a variety of hardware, including CPUs, GPUs, and specialized accelerators, enabling faster training and inference.
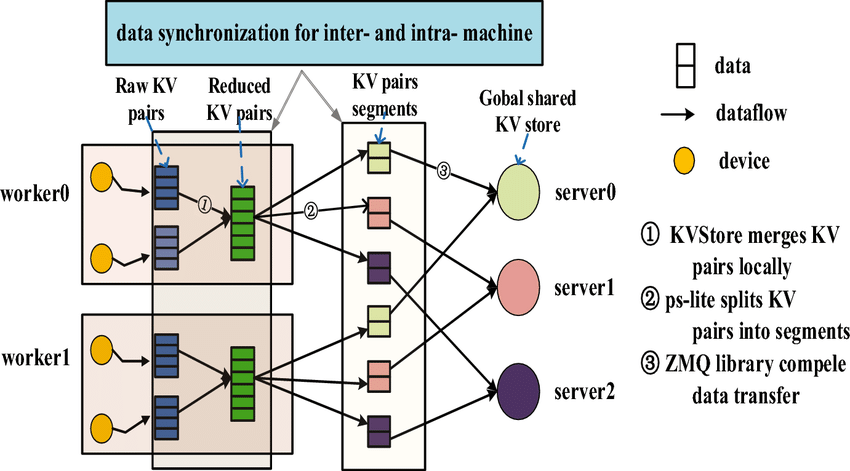
- Scalability: MXNet is known for its scalability across multiple devices and machines. It supports distributed training, allowing users to train large models across multiple GPUs or machines.
- Multiple Language Support: MXNet provides APIs for multiple programming languages, including Python, Scala, Julia, and R, making it accessible to a wide range of developers.
- Flexible Model Deployment: MXNet supports deploying models for inference on various platforms, including cloud services, mobile devices, and embedded systems.
- High-Level APIs: MXNet offers high-level APIs, such as Gluon and Keras-like interfaces, which simplify the process of building and training deep learning models.
- Advanced Operators: MXNet includes a rich library of pre-defined operators for common machine learning operations, as well as custom operator support for implementing custom layers or functions.
- Sparse Tensors: MXNet supports sparse tensor operations, which can significantly reduce memory usage and computation time when dealing with large datasets.
- ONNX Compatibility: MXNet is compatible with the Open Neural Network Exchange (ONNX) format, enabling seamless interoperability with other deep learning frameworks.
How Apache MXNet works and Architecture?
Now, let’s discuss how Apache MXNet works and its architecture:
1. Symbolic and Imperative Programming:
MXNet allows users to define their deep learning models using symbolic computation, which creates a computation graph representing the model’s architecture. This graph can then be optimized for efficiency before training. Alternatively, MXNet also supports imperative programming, where models are constructed using regular imperative programming constructs. This provides greater flexibility in designing dynamic models.
2. Computation Graph:
In symbolic programming, MXNet creates a computation graph that represents the model’s operations. Each node in the graph corresponds to an operation, and the edges represent the data flow between operations. This graph is optimized for efficient execution, which can lead to faster training and inference.
3. Automatic Differentiation:
MXNet automatically performs differentiation on the computation graph to compute gradients, which are crucial for training deep learning models using gradient-based optimization algorithms like backpropagation.
4. Dynamic Computational Graph:
MXNet’s dynamic computation graph allows for more flexible model architectures. Unlike some other frameworks, where the graph structure is fixed, MXNet’s graph can change during runtime, enabling the creation of models that can handle varying input sizes or dynamic network architectures.
5. Backend Engine:
MXNet’s backend engine is responsible for executing operations on hardware devices like CPUs and GPUs. It handles memory allocation, data movement, and computation optimization, ensuring efficient execution of the computation graph.
6. High-Level APIs:
MXNet provides high-level APIs like Gluon and Module for easier model construction and training. Gluon provides a more intuitive interface for creating and training models, while Module offers a more traditional approach to defining models with more control.
7. Model Deployment:
Once a model is trained, MXNet supports deployment on various platforms, including cloud services, mobile devices, and edge devices. The trained model can be converted to formats compatible with inference engines for deployment.
Overall, Apache MXNet’s architecture is designed to provide flexibility, efficiency, and performance for building, training, and deploying deep learning models across a wide range of hardware and use cases.
How to Install Apache MXNet?
There are two methods to install Apache MXNet:
- Install the pre-built binaries
This is the easiest way to install MXNet. The pre-built binaries are available for Linux, macOS, and Windows. To install the pre-built binaries, follow these steps:
1. Go to the MXNet website: https://mxnet.apache.org/ and download the pre-built binaries for your operating system.
2. Unzip the downloaded file.
3. Add the MXNet binary directory to your PATH environment variable.Code language: JavaScript (javascript)- Build from source
This is the more flexible way to install MXNet, but it also requires more knowledge of how to build software. To build MXNet from source, follow these steps:
1. Go to the MXNet GitHub repository: https://github.com/apache/incubator-mxnet and clone the repository.
2. Go to the cloned repository and create a build directory.
3. Run the following commands to build MXNet:

    ```
    cmake ..
    make
    make install
    ```Code language: JavaScript (javascript)
Once you have installed MXNet, you can verify the installation by running the following command:
python -c "import mxnet"Code language: JavaScript (javascript)If the installation is successful, this command will not print any output.
Here are the specific instructions for installing MXNet on different operating systems:
- Ubuntu
- Install the prerequisite packages: sudo apt-get install build-essential cmake git libopencv-dev libprotobuf-dev python-dev python-pip
- Install MXNet:
pip install mxnet
- Windows
- Install the prerequisite packages:
- Visual Studio 2019
- CMake
- Python 3.7 or higher
- NumPy
- OpenCV
- Install MXNet:
- Download the complete source code of MXNet from GitHub.
- Create a Visual Studio solution in
./buildby using CMake. - Open the solution file,
.sln, and accomplish in Visual Studio. These commands produce a library calledmxnet.dll. - Add the
mxnet.dllfile to your system path.
- Install the prerequisite packages:
- macOS
- Install the prerequisite packages:
brew install cmake pkg-config python3 libopencv - Install MXNet:
pip3 install mxnet
- Install the prerequisite packages:
Basic Tutorials of Apache MXNet: Getting Started

The following steps are the basic tutorials of Apache MXNet:
- Manipulating arrays
- Import the MXNet library:
import mxnet as mx - Create an NDArray:
arr = mx.nd.array([1, 2, 3]) - Print the NDArray:
print(arr) - Perform operations on NDArrays:
arr = arr * 2 print(arr)
- Import the MXNet library:
- Building networks
- Import the necessary modules:
import mxnet as mx from mxnet.gluon import nn - Define a neural network:
class MyNet(nn.Block): def __init__(self): super(MyNet, self).__init__() self.fc1 = nn.Dense(10) self.fc2 = nn.Dense(10) def forward(self, x): x = self.fc1(x) x = self.fc2(x) return x - Create an instance of the neural network:
net = MyNet() - Train the neural network:
net.fit(x_train, y_train, epochs=10)
- Import the necessary modules:
- Loading/preprocessing data
- Import the necessary modules:
import mxnet as mx from mxnet.gluon.data import DataLoader - Load the MNIST dataset:
(x_train, y_train), (x_test, y_test) = mx.gluon.datasets.mnist.load_data() - Preprocess the data:
x_train = x_train.astype('float32') / 255 x_test = x_test.astype('float32') / 255 - Create a data loader:
data_loader = DataLoader( dataset=(x_train, y_train), batch_size=10, shuffle=True, )
- Import the necessary modules:
These are just a few of the basic tutorials available for Apache MXNet. I encourage you to explore the documentation and tutorials to learn more about this powerful deep learning framework.

👤 About the Author
Ashwani is passionate about DevOps, DevSecOps, SRE, MLOps, and AiOps, with a strong drive to simplify and scale modern IT operations. Through continuous learning and sharing, Ashwani helps organizations and engineers adopt best practices for automation, security, reliability, and AI-driven operations.
🌐 Connect & Follow:
- Website: WizBrand.com
- Facebook: facebook.com/DevOpsSchool
- X (Twitter): x.com/DevOpsSchools
- LinkedIn: linkedin.com/company/devopsschool
- YouTube: youtube.com/@TheDevOpsSchool
- Instagram: instagram.com/devopsschool
- Quora: devopsschool.quora.com
- Email– contact@devopsschool.com
Find Trusted Cardiac Hospitals
Compare heart hospitals by city and services — all in one place.
Explore Hospitals