What is ASP.NET?

ASP.NET is a widely used framework developed by Microsoft for building web applications, services, and dynamic websites. It is a part of the larger .NET ecosystem and provides developers with a platform to create robust, scalable, and secure web applications. ASP.NET enables developers to build web applications using various programming languages, including C#, Visual Basic, and F#. It offers a range of tools, libraries, and features to streamline the development process.
What is top use cases of ASP.NET?
Here are the top use cases of ASP.NET:
- Web Application Development: ASP.NET is primarily used for building dynamic web applications and websites. It provides tools for creating user interfaces, handling user inputs, and managing data interactions.
- E-Commerce Platforms: Many e-commerce websites are built using ASP.NET due to its ability to handle complex transactions, manage product catalogs, and provide secure payment processing.
- Enterprise Applications: ASP.NET is suitable for building complex enterprise applications that require data management, workflow automation, and integration with other business systems.
- Content Management Systems (CMS): ASP.NET can be used to create custom content management systems that allow users to manage and publish content on websites efficiently.
- Customer Relationship Management (CRM) Systems: ASP.NET can power CRM systems, enabling businesses to manage customer interactions, sales processes, and customer data effectively.
- Web Services and APIs: ASP.NET is used to create RESTful APIs and web services that enable communication between different applications, allowing data exchange and integration.
- Social Networking Platforms: ASP.NET can be utilized to build social networking sites that involve user profiles, posts, friends, and real-time interactions.
- Real-Time Applications: ASP.NET SignalR, a library within the framework, facilitates building real-time web applications that involve live updates, messaging, and collaborative features.
- Financial and Banking Applications: Due to its security features, ASP.NET is a preferred choice for developing financial applications that handle sensitive data and transactions.
- Healthcare Information Systems: ASP.NET is used to create healthcare applications for managing patient records, appointment scheduling, and medical information.
- Education and E-Learning Platforms: ASP.NET can be used to build e-learning platforms, course management systems, and online educational resources.
- Government Portals: Government websites and portals can leverage ASP.NET to provide citizens with services, information, and resources.
ASP.NET’s versatility and features make it suitable for a wide range of web development projects. It offers tools for creating responsive web applications, supports multiple authentication methods, provides robust security features, and can be deployed on both Windows and Linux servers.
What are the features of ASP.NET?
ASP.NET comes with a rich set of features that make web application development efficient, scalable, and secure. Here are some key features of ASP.NET:
- Server-Side Technology: ASP.NET is a server-side technology that processes requests on the server before sending the output to the client’s browser. This enables dynamic and data-driven web application development.
- Language Support: ASP.NET favors multiple programming languages, including C#, F#, and Visual Basic.NET. Developers can select the language they are most comfortable with.
- Web Forms: ASP.NET Web Forms provide a drag-and-drop interface for building web applications. They abstract the complexities of HTML and provide a way to create user interfaces using controls.
- MVC Framework: ASP.NET MVC (Model-View-Controller) offers a structured approach to building web applications. It separates concerns between the data (model), user interface (view), and application logic (controller).
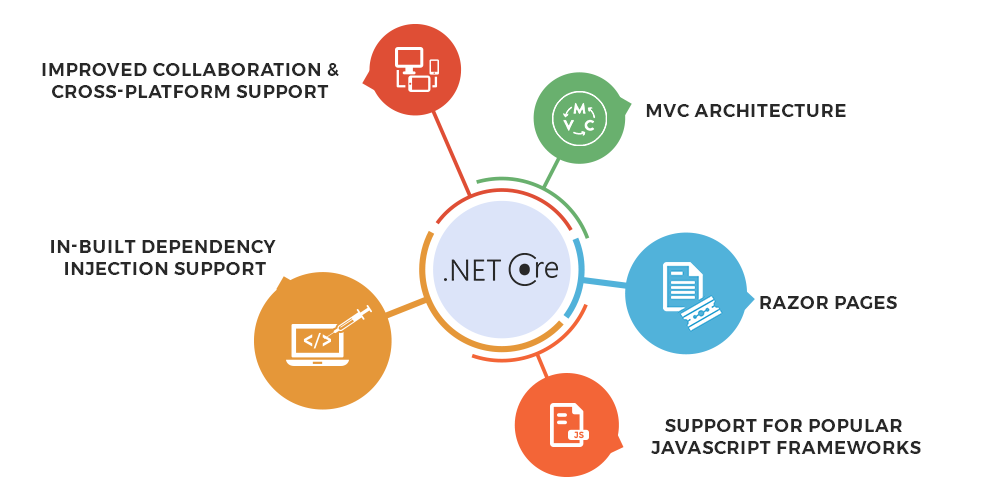
- Razor Pages: Razor Pages is a newer approach that combines the simplicity of Web Forms with the benefits of the MVC pattern. It focuses on building single-page applications with lightweight views.
- Web API: ASP.NET Web API enables the creation of RESTful APIs, allowing applications to communicate and share data over HTTP.
- Security Features: ASP.NET provides built-in security features, including authentication (Windows, Forms, Identity), authorization, and protection against common security vulnerabilities like cross-site scripting (XSS) and SQL injection.
- State Management: ASP.NET offers various mechanisms for managing state, such as session state, view state, and application state, ensuring data persistence between requests.
- Caching: ASP.NET allows developers to implement caching strategies to improve performance by storing frequently used data or rendered pages in memory.
- Master Pages and Layouts: Master Pages enable the consistent layout and design of a website’s pages, making it easy to maintain a uniform look and feel across the application.
- Data Access: ASP.NET supports various data access approaches, including Entity Framework (EF) for object-relational mapping (ORM), and ADO.NET for low-level data access.
- Cross-Browser Compatibility: ASP.NET applications are designed to work across different browsers, ensuring a consistent user experience.
- Deployment Flexibility: ASP.NET applications can be deployed on both Windows and Linux servers. They can be hosted on-premises or in cloud environments.
What is the workflow of ASP.NET?
Now, let’s discuss the general workflow of an ASP.NET application:
- Request Handling: When a user requests a page or resource from an ASP.NET application, the request is sent to the server.
- Routing: The URL routing module determines which controller or page should handle the request based on the URL.
- Controller/Page Execution: If using the MVC framework, the controller’s action method is executed. If using Web Forms or Razor Pages, the corresponding page’s code-behind logic is executed.
- Data Processing: The controller or page logic interacts with data sources, such as databases, to fetch or manipulate data.
- View Rendering: The controller or page generates HTML content, which is sent to the client’s browser.
- Client-Side Rendering: The client’s browser renders the HTML and displays the page to the user.
- User Interaction: The user interacts with the page, submitting forms or triggering events.
- Postback/Callback: For Web Forms, user interactions often trigger postbacks, which send data back to the server. For MVC and Razor Pages, client-side callbacks can be used.
- Response Generation: The server processes the user’s input and generates an appropriate response, which is sent back to the client.
- Client-Side Scripting: Client-side scripting (JavaScript) can enhance the user experience by adding interactivity and dynamic behavior to the page.
- State Management: ASP.NET manages the state between requests, ensuring that data is persisted across multiple interactions.
- Final Rendering: The final HTML is rendered on the client’s browser, completing the round trip of the request-response cycle.
This workflow ensures that user requests are processed, data is fetched and manipulated, and responses are generated to provide dynamic and interactive web applications.
How ASP.NET Works & Architecture?
Here’s an overview of how ASP.NET works and its architecture:
1. Request Handling:
- When a user accesses a URL, a request is sent to the web server hosting the ASP.NET application.
- The web server’s URL routing module maps the URL to the appropriate controller, page, or resource within the application.
2. MVC, Web Forms, or Razor Pages:
- Depending on the application’s structure, ASP.NET supports different programming models: MVC (Model-View-Controller), Web Forms, and Razor Pages.
- In the MVC pattern, the controller’s action method is executed to handle the request and perform necessary data processing.
- In Web Forms, the code-behind logic for the requested page is executed.
- In Razor Pages, the corresponding page’s logic is executed.
3. Application Logic and Data Processing:
- The controller or page’s logic interacts with data sources such as databases, services, or APIs to retrieve, manipulate, or store data.
- Business logic is executed, such as applying calculations, transformations, and business rules.
4. View Rendering:
- The controller or page generates HTML content that represents the response to the user’s request.
- The view might include dynamic content, placeholders, and data-bound elements.
5. Response Generation:
- The HTML generated by the controller, page, or view is combined with any other necessary content (like headers, scripts, styles).
- The response is prepared to be sent back to the client’s browser.
6. Client Interaction and UI:
- The client’s browser receives the response from the server.
- The browser processes the HTML, renders the user interface, and displays the web page to the user.
7. User Interaction and Postback (Web Forms):
- In Web Forms, user interactions can trigger postbacks, which involve sending data back to the server.
- Postbacks maintain the application’s state across interactions.
8. State Management:
- ASP.NET provides various mechanisms for managing state between requests, such as session state, view state, and application state.
- This ensures that data remains consistent and available across different interactions.
9. Client-Side Scripting and Interactivity:
- Client-side scripting, often using JavaScript, enhances the user experience by adding interactivity and dynamic behavior to the web page.
10. Final Rendering:
- The final HTML content, possibly enriched with client-side interactions, is displayed to the user in their browser.
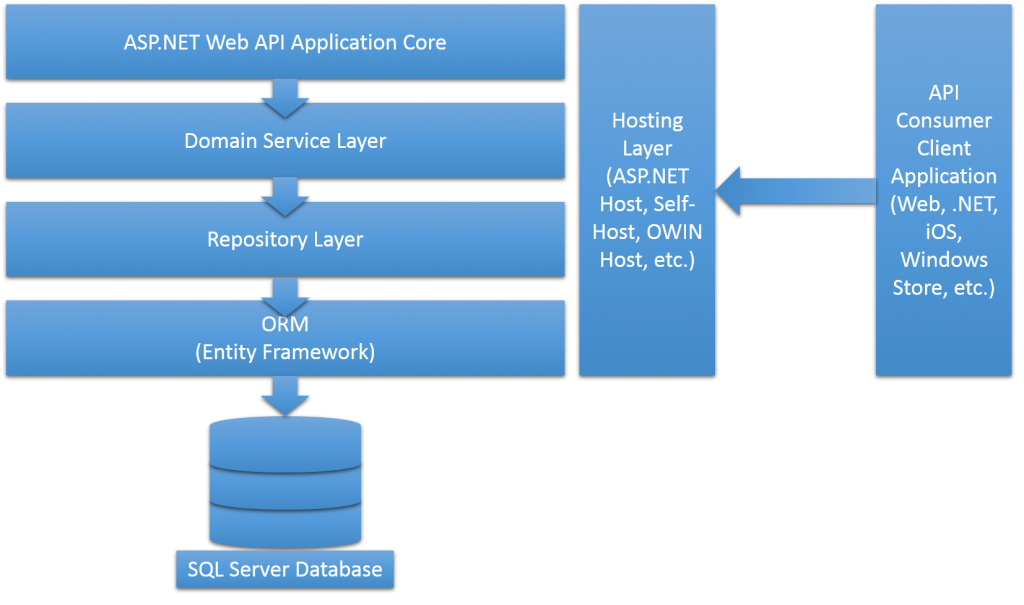
ASP.NET Architecture:
The architecture of ASP.NET includes several key components:
- Web Server: The web server, like Internet Information Services (IIS), hosts the ASP.NET application and manages incoming HTTP requests.
- URL Routing: URL routing determines which part of the application will handle a given URL request, based on predefined routing rules.
- Application Core: The core of the application contains the controllers, views, models, business logic, and data access layers. This component processes requests and generates responses.
- Model-View-Controller (MVC): In the MVC pattern, the Model represents data and business logic, the View handles the user interface, and the Controller manages the interaction between the Model and View.
- Web Forms or Razor Pages: These are different programming models within ASP.NET for creating web user interfaces.
- Data Access Layer: This layer interacts with databases or other data sources to retrieve or manipulate data.
- Client-Side Interactions: JavaScript and client-side frameworks enhance the user interface and interactions.
- State Management: ASP.NET provides various mechanisms for maintaining state across requests, ensuring data persistence.
- Security and Authentication: ASP.NET includes security features for authentication, authorization, and protection against common web vulnerabilities.
- Middleware and Pipelines: ASP.NET applications often use middleware to handle request processing, authentication, caching, and more.
- Deployment: ASP.NET applications can be deployed on web servers, cloud platforms, and containerized environments.
Overall, ASP.NET’s architecture enables the creation of powerful and responsive web applications, providing developers with tools to structure their applications, manage data, handle user interactions, and ensure security and scalability.
How to Install and Configure ASP.NET?
To install and configure ASP.NET, you need to have the following:
- A web server, such as Apache or IIS
- The .NET Framework
- An IDE, such as Visual Studio
Once you have the necessary software, you can install ASP.NET by following the instructions in the .NET Framework documentation.
To configure ASP.NET, you need to add the appropriate modules and settings to your web server. The specific configuration steps vary depending on the web server that you are using.
Here are the detailed steps on how to install and configure ASP.NET on Windows:
- Install the .NET Framework. You can download the .NET Framework installer from the Microsoft website.
- Install IIS. IIS is a web server that is covered with Windows. You can install IIS by going to the Control Panel and clicking on “Programs and Features”.
- Enable ASP.NET in IIS. To enable ASP.NET in IIS, you need to add the ASP.NET module to the IIS configuration. You can do this by opening the IIS Manager and going to the “Modules” section.
- Create an ASP.NET application. You can create an ASP.NET application by using an IDE, such as Visual Studio.
- Run your ASP.NET application. To run your ASP.NET application, you need to deploy it to your web server. You can do this by using the IIS Manager or by using a deployment tool, such as Visual Studio.
Here are the detailed steps on how to install and configure ASP.NET on Linux:
- Install Mono. Mono is an open-source and free implementation of Microsoft’s .NET Framework, designed to enable developers to build applications that can run on multiple platforms, including Windows, macOS, and Linux. You can download Mono from the Mono website.
- Install Apache. Apache is a web server that is commonly used with Mono. You can install Apache by going to the Apache website and following the instructions.
- Enable ASP.NET in Apache. To enable ASP.NET in Apache, you need to add the mod_mono module to the Apache configuration. You may execute this by editing the Apache configuration file.
- Create an ASP.NET application. You can create an ASP.NET application by using an IDE, such as Visual Studio Code.
- Run your ASP.NET application. To run your ASP.NET application, you need to deploy it to your web server. You can do this by using the Apache configuration file or by using a deployment tool, such as Visual Studio Code.
Fundamental Tutorials of ASP.NET: Getting Started Step by Step
The following are the steps of fundamental tutorials of ASP.NET:
- Generate a new ASP.NET MVC project in Visual Studio
To generate a new ASP.NET MVC project in Visual Studio, you can follow these steps:
  1. Open Visual Studio.
  2. Hit the "Create a new project" button.
  3. In the "New Project" dialog box, select the "ASP.NET Web Application" project
   template and click on the "Next" button.
  4. In the "Configure your new ASP.NET project" dialog box, select the "MVC"
   project type and click on the "Next" button.
  5. In the "Choose a name and location for your project" dialog box, enter a name
for your project and click on the "Create" button.Code language: JavaScript (javascript)- Add a controller to your project
A controller is a class that handles requests from the client and returns responses. To add a controller to your project, you can follow these steps:
  1. Right-click on the "Controllers" folder in the Solution Explorer and select the
   "Add" > "Controller" menu item.
  2. In the "Add Scaffolding" dialog box, select the "MVC Controller - Empty"
   template and click on the "Add" button.
  3. In the "Configure the new controller" dialog box, enter a name for your
controller and click on the "Add" button.Code language: JavaScript (javascript)- Add a view to your controller
A view is a file that contains the HTML code for the user interface. To add a view to your controller, you can follow these steps:
  1. Right-click on the controller that you created in the previous step and select
   the "Add" > "View" menu item.
  2. In the "Add View" dialog box, select the "Empty" template and click on the
   "Add" button.
  3. In the "Configure the new view" dialog box, enter a name for your view and
click on the "Add" button.Code language: JavaScript (javascript)- Write code in your controller
The code in your controller handles requests from the client and returns responses. To write code in your controller, you can follow these steps:
  1. Open the controller that you created in the previous step.
  2. In the controller class, add a method that handles the request that you want to
   respond to.
3. In the method, write code to return the response to the client.Code language: JavaScript (javascript)- Write code in your view
The code in your view contains the HTML code for the user interface. To write code in your view, you can follow these steps:
  1. Open the view that you created in the previous step.
2. In the view, add the HTML code for the user interface.Code language: PHP (php)- Run your application
To run your application, you can follow these steps:
  1. Press F5 to run your application.
  2. In the browser, navigate to the URL of your application.
👤 About the Author
Ashwani is passionate about DevOps, DevSecOps, SRE, MLOps, and AiOps, with a strong drive to simplify and scale modern IT operations. Through continuous learning and sharing, Ashwani helps organizations and engineers adopt best practices for automation, security, reliability, and AI-driven operations.
🌐 Connect & Follow:
- Website: WizBrand.com
- Facebook: facebook.com/DevOpsSchool
- X (Twitter): x.com/DevOpsSchools
- LinkedIn: linkedin.com/company/devopsschool
- YouTube: youtube.com/@TheDevOpsSchool
- Instagram: instagram.com/devopsschool
- Quora: devopsschool.quora.com
- Email– contact@devopsschool.com
Find Trusted Cardiac Hospitals
Compare heart hospitals by city and services — all in one place.
Explore Hospitals