
What is AWS Glue?
Are you tired of manually coding and maintaining your ETL (Extract, Transform, Load) jobs? Say hello to AWS Glue, a fully managed ETL service that makes it easy to move data between data stores. AWS Glue eliminates the need for infrastructure provisioning and maintenance, and can scale to handle petabyte-scale data.
Top 10 use cases of AWS Glue
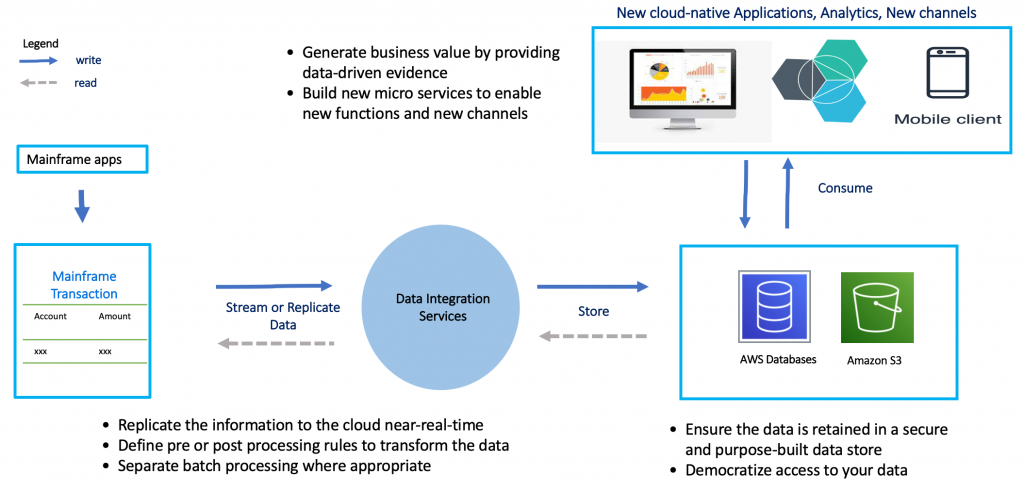
- Data integration – AWS Glue can integrate data from various sources, such as RDS, S3, and Redshift, and transform it as needed.
- Data migration – AWS Glue can migrate data from on-premises databases to the cloud, or from one cloud provider to another.
- Data warehousing – AWS Glue can transform and load data into a data warehouse, such as Redshift, for analysis.
- Business intelligence – AWS Glue can prepare data for BI tools, such as Tableau or Power BI, by cleaning and transforming it.
- Machine learning – AWS Glue can preprocess data for machine learning workflows, such as cleaning and feature engineering.
- Log analysis – AWS Glue can parse and transform log data from various sources, such as CloudTrail or VPC Flow Logs.
- IoT – AWS Glue can preprocess data from IoT devices, such as filtering and aggregating sensor data.
- Real-time data processing – AWS Glue can transform and load data in real-time, such as streaming data from Kinesis.
- Media processing – AWS Glue can preprocess media files, such as transcoding and resizing videos.
- Fraud detection – AWS Glue can preprocess data for fraud detection workflows, such as filtering and anomaly detection.
What are the features of AWS Glue?
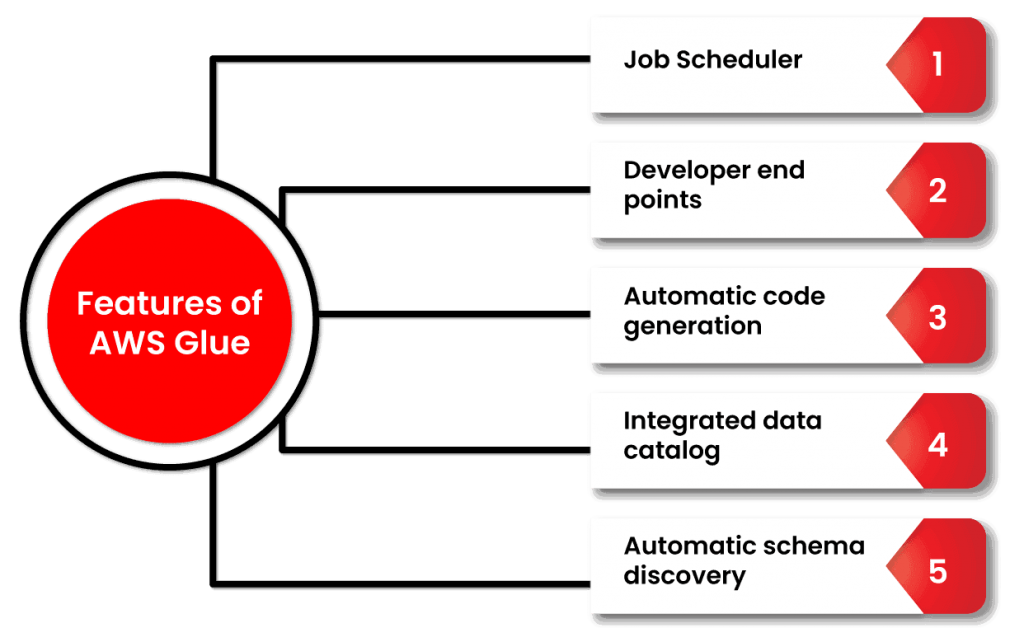
- Fully managed ETL service
- Serverless architecture
- Automatic schema discovery and inference
- Supports various data sources and formats
- Built-in job monitoring and logging
- Integration with other AWS services, such as S3, Redshift, and EMR
- Flexible and scalable
How AWS Glue works and Architecture?
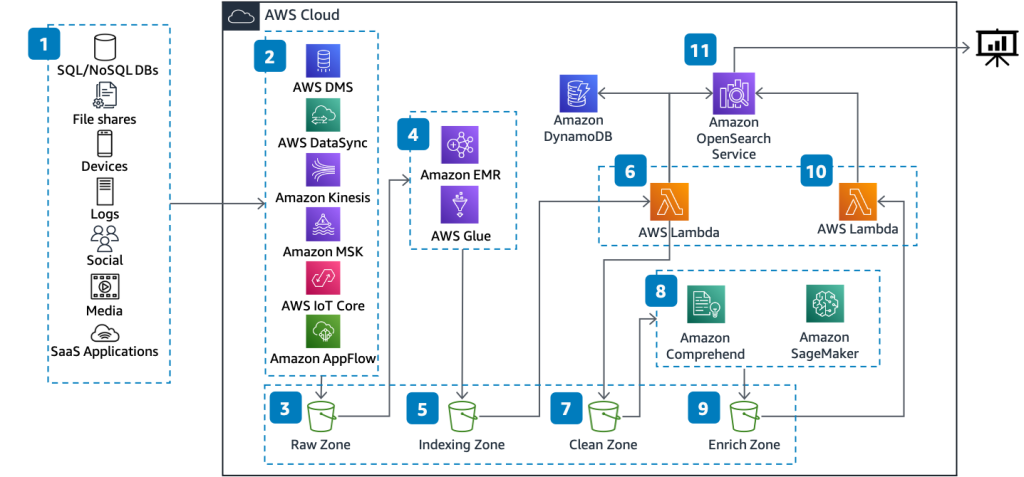
AWS Glue is a really cool tool that helps people who work with computers and data. It’s like a special helper that makes it easier to organize and analyze lots of information. It consists of three main components:
- Data catalog: The data catalog is a centralized metadata repository that stores information about your data assets, such as tables, columns, and partitions.
- ETL engine: The ETL engine is responsible for running your ETL jobs. It automatically generates the code necessary to extract, transform, and load your data.
- Job scheduler: The job scheduler is responsible for scheduling and monitoring your ETL jobs.
AWS Glue supports a wide range of data sources, including relational databases, NoSQL databases, and data warehouses. It also supports a variety of data formats, such as JSON, Parquet, and CSV.
AWS Glue uses Apache Spark as its underlying ETL engine, which allows it to scale horizontally and process large amounts of data quickly. It also supports Python and Scala as its primary programming languages.
How to Install AWS Glue?
AWS Glue is a managed service provided by Amazon Web Services, so you don’t need to install it like traditional software. Instead, you can directly access AWS Glue through the AWS Management Console and start using it. To use AWS Glue, you’ll need an AWS account. If you don’t have already, you can sign up for free on the AWS site.
Here are the steps to get started with AWS Glue:
Step 1: Sign in to AWS Console
Go to the AWS Management Console (https://aws.amazon.com/console/), and sign in with your AWS account credentials.
Step 2: Open AWS Glue Console
Once you are logged in, type “Glue” in the AWS services search bar and click on “AWS Glue” to open the AWS Glue Console.
Step 3: Set up IAM Role (Optional)
AWS Glue requires an IAM role to access your data stored in other AWS services (e.g., Amazon S3) and perform ETL operations. If you don’t have an existing IAM role with the necessary permissions, you can create one within the AWS Glue Console.
a. In the AWS Glue Console, click on “Settings” on the left-hand navigation pane.
b. Under “Amazon S3 access,” select an existing IAM role or create a new one by clicking on “Create an IAM role.”
c. Follow the on-screen instructions to create the IAM role with the necessary permissions.
Step 4: Start Using AWS Glue
Once you have access to the AWS Glue Console and, if required, an IAM role with appropriate permissions, you can start using AWS Glue to perform various ETL operations on your data.
For example:
- Create databases and tables by using Glue Crawlers to automatically infer the schema of your data.
- Create ETL jobs to transform and load your data into other destinations.
AWS Glue also integrates with other AWS services, such as Amazon S3, Amazon RDS, Amazon Redshift, and more, allowing you to use it in conjunction with other data services on AWS.
That’s it! You don’t need to install any software to use AWS Glue. It’s a fully managed service that you can access directly from the AWS Management Console.
Basic Tutorials of AWS Glue: Getting Started
To get started with AWS Glue, follow these basic tutorials:
Step 1: Sign in to AWS Console
Go to the AWS Management Console (https://aws.amazon.com/console/), and sign in with your AWS account credentials.
Step 2: Open AWS Glue Console
Once you are logged in, type “Glue” in the AWS services search bar and click on “AWS Glue” to open the AWS Glue Console.
Step 3: Set up IAM Role
Before you can use AWS Glue, you need to create an AWS Identity and Access Management (IAM) role that grants necessary permissions to AWS Glue to access other AWS services on your behalf.
a. In the AWS Glue Console, click on “Settings” on the left-hand navigation pane.
b. Under “Amazon S3 access,” select an existing IAM role or create a new one by clicking on “Create an IAM role.”
c. Follow the on-screen instructions to create the IAM role with the necessary permissions. At a minimum, the role should have permissions to access your data stored in Amazon S3.
Step 4: Create a Database
In AWS Glue, data is organized into databases and tables. Let’s start by creating a database.
a. Click on “Databases” on the left-hand navigation pane.
b. Click on “Add database” and provide a name for your database.
c. Click on “Create” to create the database.
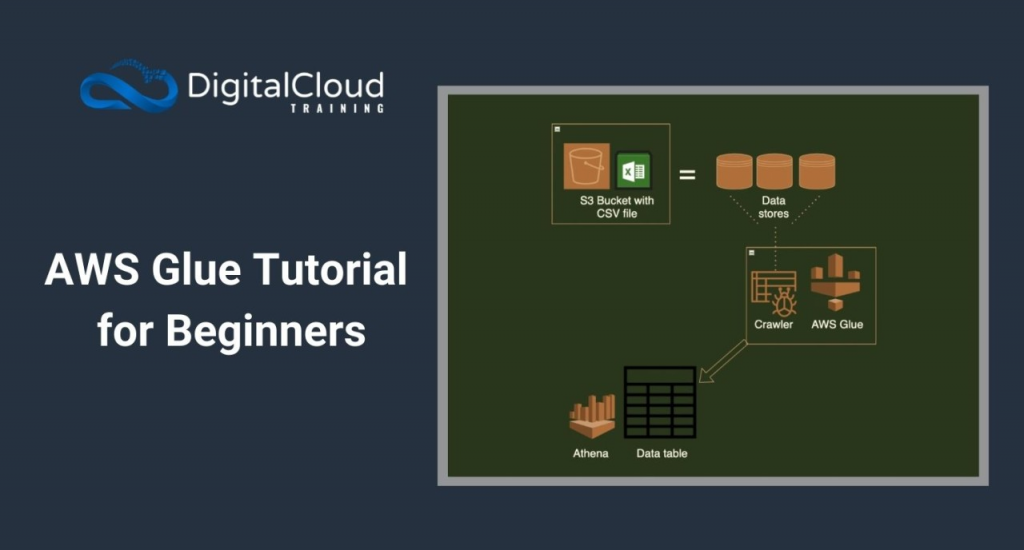
Step 5: Crawling and Creating Tables
To access and work with your data, you need to create tables that define the structure of your data. AWS Glue can automatically discover the schema of your data using a process called “crawling.”
a. Click on “Crawlers” on the left-hand navigation pane.
b. Click on “Add crawler” to create a new crawler.
c. Follow the on-screen instructions to configure the crawler:
- Specify a name for your crawler.
- Select the data store where your data is located (e.g., Amazon S3).
- Provide the data store path or connection details.
- Choose the IAM role created in Step 3 to allow the crawler to access your data.
- Configure a schedule for the crawler (how often it should run).
d. Once the crawler is configured, click on “Finish” to create the crawler.
e. Select the newly created crawler and click on “Run crawler” to initiate the crawling process. The crawler will automatically infer the schema and create tables based on the data it finds.
Step 6: ETL Jobs
Now that you have created tables representing your data, you can perform ETL operations to transform and load the data into other destinations.
a. Click on “Jobs” on the left-hand navigation pane.
b. Click on “Add job” to create a new ETL job.
c. Provide a name for your job and select the IAM role created in Step 3.
d. In “Data source,” choose the table you want to perform ETL on (created in Step 5).
e. In “Data target,” specify the destination where you want to load the transformed data (e.g., another table, Amazon S3, etc.).
f. Configure the ETL script using the AWS Glue ETL language (Python or Scala).
g. Click on “Save” to create the job.
h. Select the newly created job and click on “Run job” to execute the ETL process.
Step 7: Monitoring and Troubleshooting
You can monitor and troubleshoot your AWS Glue jobs from the AWS Glue Console.
a. Click on “Jobs” on the left-hand navigation pane to see a list of all your jobs.
b. Click on a specific job to see its details, monitor its progress, and view logs.
That’s it! You’ve completed a basic tutorial on how to use AWS Glue to perform ETL operations on your data. AWS Glue offers many advanced features, such as job scheduling, data catalogs, and custom transformations, which you can explore as you become more familiar with the service.

👤 About the Author
Ashwani is passionate about DevOps, DevSecOps, SRE, MLOps, and AiOps, with a strong drive to simplify and scale modern IT operations. Through continuous learning and sharing, Ashwani helps organizations and engineers adopt best practices for automation, security, reliability, and AI-driven operations.
🌐 Connect & Follow:
- Website: WizBrand.com
- Facebook: facebook.com/DevOpsSchool
- X (Twitter): x.com/DevOpsSchools
- LinkedIn: linkedin.com/company/devopsschool
- YouTube: youtube.com/@TheDevOpsSchool
- Instagram: instagram.com/devopsschool
- Quora: devopsschool.quora.com
- Email– contact@devopsschool.com
Find Trusted Cardiac Hospitals
Compare heart hospitals by city and services — all in one place.
Explore Hospitals