What is Azure Blob Storage?
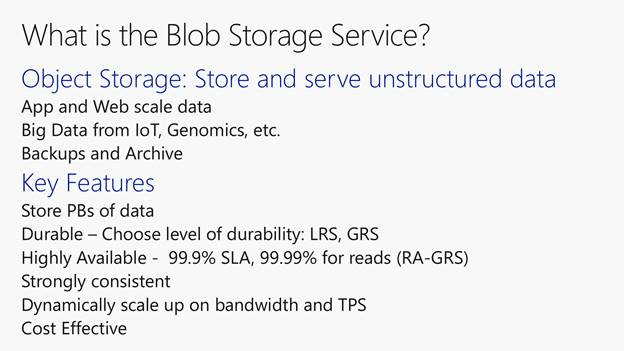
Azure Blob Storage is a powerful and versatile storage solution that offers scalability, durability, security, and integration with other Azure services. It allows you to store and manage unstructured data, such as documents, images, videos, backups, and logs, in the cloud. Blob Storage offers scalable, durable, and highly available storage for various types of data, making it a core component of many cloud-based applications and data management solutions.
Top 10 use cases of Azure Blob Storage:
Here are the top 10 use cases of Azure Blob Storage:
- Data Storage for Applications: Azure Blob Storage serves as a reliable and scalable storage solution for applications, enabling them to store and retrieve files, assets, and other resources.
- Content Distribution: Blob Storage is used to store and distribute static content like images, videos, and downloadable files. Content can be delivered to users globally through Azure Content Delivery Network (CDN).
- Data Archiving and Backup: Organizations use Blob Storage to archive and backup data, taking advantage of its durability and long-term retention capabilities.
- Log and Event Storage: Applications and systems can store logs, events, and telemetry data in Blob Storage for analysis, monitoring, and compliance purposes.
- Big Data and Analytics: Blob Storage serves as a landing zone for big data and analytics workloads. It allows you to store raw data before processing it with tools like Azure HDInsight, Databricks, or other analytics platforms.
- Media Storage and Streaming: Azure Blob Storage stores media files like videos, audio, and images, which can be accessed and streamed by users and applications.
- Data Lakes: Blob Storage is often used as the storage layer for Azure Data Lake Storage Gen1 and Gen2, providing a foundation for data lake architectures.
- IoT Data Storage: Blob Storage is used to store and manage data generated by IoT devices, which can be processed and analyzed for insights.
- Document and Content Management: Blob Storage is used to manage documents, presentations, and other content in cloud-based document management systems.
- Data Migration: Organizations utilize Blob Storage to facilitate data migration from on-premises systems to the cloud, serving as a temporary repository before data is processed and ingested into Azure services.
- Machine Learning Datasets: Blob Storage stores datasets used in machine learning and AI training. Machine learning models can also be stored in Blob Storage for serving predictions.
- Backup and Disaster Recovery: Blob Storage’s durability and geo-replication features make it suitable for disaster recovery scenarios. Data can be replicated across regions for data resilience.
These use cases highlight the versatility of Azure Blob Storage as a fundamental storage solution that addresses various data storage and management needs. Its integration with other Azure services, security features, and tiered storage options make it a valuable asset for organizations leveraging cloud technology.
What are the feature of Azure Blob Storage?
Azure Blob Storage offers a range of features that make it a versatile and robust cloud storage service:
- Scalability: Blob Storage provides virtually limitless storage capacity, allowing you to scale up or down based on your needs.
- Durability and Availability: Data stored in Blob Storage is automatically replicated across multiple datacenters within a region, ensuring high availability and durability.
- Tiered Storage: Blob Storage offers different storage tiers, including Hot, Cool, and Archive tiers, allowing you to choose the right storage class based on data access patterns and cost requirements.
- Data Encryption: Blob Storage supports encryption at rest, allowing you to protect your data using server-side encryption. Azure Key Vault integration provides enhanced security.
- Data Lifecycle Management: You can define lifecycle policies to automatically transition objects between storage tiers or delete objects that are no longer needed.
- Data Access Control: Blob Storage provides granular access control through shared access signatures (SAS), Azure Active Directory, and role-based access control (RBAC).
- Blob Types: Azure Blob Storage supports three types of blobs: Block Blobs for large amounts of unstructured data, Page Blobs for virtual machine disks, and Append Blobs for append-only scenarios.
- Geo-Replication: You can replicate data across different Azure regions for data resilience and disaster recovery using Geo-Replication options.
- Versioning: Blob Storage supports versioning, allowing you to preserve, retrieve, and restore previous versions of objects.
- Blob Triggers: You can set up triggers to automatically invoke Azure Functions or Logic Apps when new data is uploaded or changes occur in Blob Storage.
How Azure Blob Storage Works and Architecture?
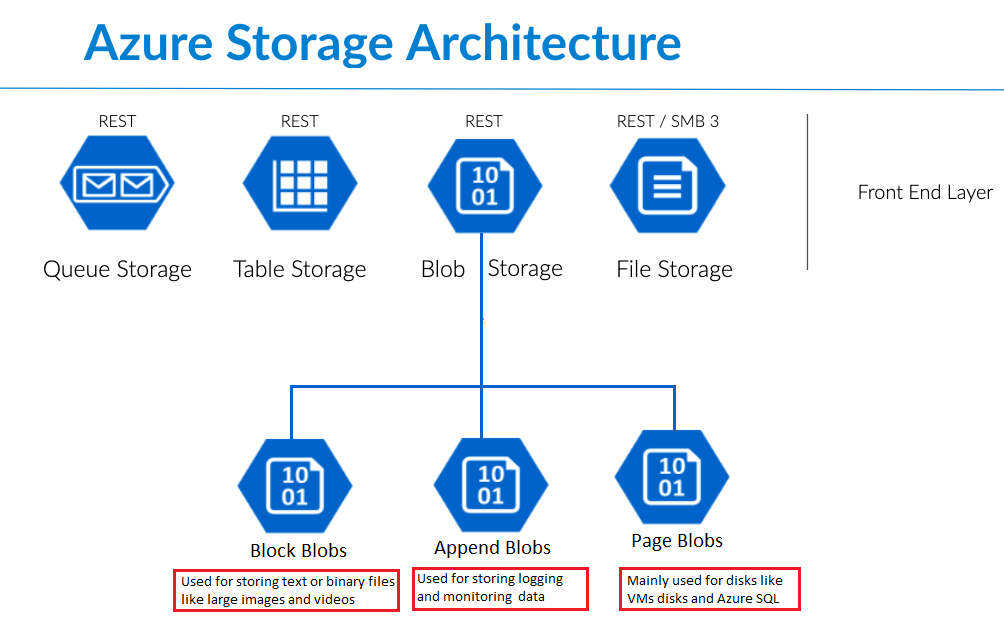
Blob Storage Architecture:
Azure Blob Storage’s architecture is designed for high availability, scalability, and durability:
- Account: At the highest level, Blob Storage is organized under an Azure Storage account. Each account has a globally unique name.
- Container: Within an account, you create containers to store objects. Containers help organize and group related objects together.
- Blob: Objects are stored in blobs (binary large objects). Each blob has a unique identifier (URI) composed of the account name, container name, and blob name.
Data Flow and Interaction:
Here’s how Azure Blob Storage works in terms of data flow and interaction:
- Data Upload: Clients (applications or users) upload data to Azure Blob Storage using SDKs, APIs, or tools like Azure Storage Explorer. Data is divided into smaller chunks (blocks) for efficient upload.
- Block Management: Block Blobs are composed of blocks. You can upload blocks in parallel, update or delete individual blocks, and then commit them to form the complete blob.
- Metadata and Properties: Each blob can have associated metadata (key-value pairs) and properties that provide additional information about the blob.
- Data Access: Clients retrieve data from blobs using the blob’s URI. Access can be controlled through shared access signatures (SAS), Azure Active Directory, or public access settings.
- Data Movement and Tiering: You can move data between storage tiers based on access patterns and cost considerations. Azure Blob Storage offers Hot, Cool, and Archive tiers.
- Data Versioning: Blob Storage supports versioning, allowing you to maintain multiple versions of a blob over time.
- Data Replication: Azure Blob Storage automatically replicates data within a region for high availability. You can also enable geo-replication to replicate data across regions for disaster recovery.
- Lifecycle Management: You can configure lifecycle policies to transition objects between storage tiers or delete objects that are no longer needed based on defined rules.
Azure Blob Storage’s architecture and features make it a reliable and flexible solution for storing and managing various types of unstructured data in the cloud. It provides the foundation for data-intensive applications, data lakes, backups, and content distribution networks.
How to Install Azure Blob Storage?
Azure Blob Storage does not require any installation. It is a cloud-based object storage service that can be accessed through the Azure Portal, the Azure CLI, or the Azure SDKs.
To create an Azure Blob Storage container, you can follow these steps:
- Move to the Azure Portal and sign in to your account.
- Choose the “Blob Storage” service after typing the “Blob Storage” in the search bar.
- Click on the “Containers” tab.
- Click on the Create Container button.
- In the Create Container dialog box, enter a name for your container and select a storage account.
- Click on the Create button.
Once you have created an Azure Blob Storage container, you can upload blobs to it by dragging and dropping files into the container in the Azure Portal, or by using the Azure CLI or SDKs.
Here are some of the benefits of using Azure Blob Storage:
- It is a scalable and reliable object storage service.
- It is secure and can be used to store sensitive data.
- It is cost-effective and can be used to store large amounts of data.
Here are some of the drawbacks of using Azure Blob Storage:
- It is a cloud-based service, so you need an internet connection to access it.
- It can be complex to manage, especially for large and complex deployments.
Overall, Azure Blob Storage is a powerful and versatile object storage service that can be used to store a variety of data. It is a good choice for organizations that need to store large amounts of data and need a secure and reliable storage solution.
Here are some stepwise basic tutorials of Azure Blob Storage:
- Create an Azure Blob Storage container
To create an Azure Blob Storage container, you can follow these steps:
1. Go to the Azure Portal and sign in to your account.
2. In the search bar, type "Blob Storage" and select the "Blob Storage" service.
3. Click on the "Containers" tab.
4. Click on the **Create Container** button.
5. In the **Create Container** dialog box, enter a name for your container and select a storage account.
6. Click on the **Create** button.Code language: JavaScript (javascript)- Upload blobs to an Azure Blob Storage container
To upload blobs to an Azure Blob Storage container, you can follow these steps:
1. In the Azure Portal, navigate to the container that you want to upload blobs to.
2. Click on the **Upload** button.
3. In the **Upload** dialog box, select the files that you want to upload and click on the **Open** button.
4. To start the upload process, hit on the **Upload** button.- Download blobs from an Azure Blob Storage container
To download blobs from an Azure Blob Storage container, you can follow these steps:
1. In the Azure Portal, navigate to the container that you want to download blobs from.
2. Click on the blob that you want to download.
3. Click on the **Download** button.Code language: JavaScript (javascript)- Configure access permissions for an Azure Blob Storage container
You can configure access permissions for an Azure Blob Storage container to control who can access the blobs in the container. To do this, you can use the Container ACL.
The Container ACL is a set of permissions that are applied to the container as a whole.
- Use Azure Blob Storage Transfer
Azure Blob Storage Transfer is a service that can automatically transfer blobs to and from Azure Blob Storage. You can use Transfer to move blobs to a different storage account, delete blobs after a certain period of time, or take other actions.
- Use Azure Blob Storage Lifecycle Management
Azure Blob Storage Lifecycle Management is a feature that can automatically manage the lifecycle of blobs in an Azure Blob Storage container. You can use Lifecycle Management to move blobs to a different storage class, delete blobs after a certain period of time, or take other actions.
Basic Tutorials of Azure Blob Storage: Getting Started
The following steps are the basic tutorials of Azure Blob Storage:
- Create an Azure Blob Storage account
To create an Azure Blob Storage account, you can follow these steps:
1. Move to the Azure Portal and sign in to your account.
2. Choose the "Storage Accounts" service by typing the "Storage Accounts" in the search bar.
3. Click on the **Create** button.
4. In the **Create Storage Account** dialog box, select the **Blob Storage** service and enter a name for your account.
5. Select a region and subscription.
6. Click on the **Create** button.
Code language: JavaScript (javascript)- Create a container
A container is similar to a folder and is used to organize and manage your blobs. To create a container, you can follow these steps:
1. In the Azure Portal, navigate to the storage account that you want to create the container in.
2. Click on the **Containers** tab.
3. Click on the **Create Container** button.
4. In the **Create Container** dialog box, enter a name for your container.
5. Click on the **Create** button.
- Upload a blob
A blob is a piece of data that is stored in Azure Blob Storage. To upload a blob, you can follow these steps:
1. In the Azure Portal, navigate to the container that you want to upload the blob to.
2. Click on the **Upload** button.
3. In the **Upload** dialog box, select the file that you want to upload and click on the **Open** button.
4. To start the upload process, hit on the **Upload** button.
- Download a blob
To download a blob, you can follow these steps:
1. In the Azure Portal, navigate to the container that contains the blob that you want to download.
2. Click on the blob that you want to download.
3. Click on the **Download** button.
- Configure access permissions for a container
You can configure access permissions for a container to control who can access the blobs in the container. To do this, you can use the Container ACL.
The Container ACL is a set of permissions that are applied to the container as a whole.
- Use Azure Blob Storage Transfer
Azure Blob Storage Transfer is a service that can automatically transfer blobs to and from Azure Blob Storage. You can use Transfer to move blobs to a different storage account, delete blobs after a certain period of time, or take other actions.
- Use Azure Blob Storage Lifecycle Management
Azure Blob Storage Lifecycle Management is a feature that can automatically manage the lifecycle of blobs in an Azure Blob Storage container. You can use Lifecycle Management to move blobs to a different storage class, delete blobs after a certain period of time, or take other actions.

👤 About the Author
Ashwani is passionate about DevOps, DevSecOps, SRE, MLOps, and AiOps, with a strong drive to simplify and scale modern IT operations. Through continuous learning and sharing, Ashwani helps organizations and engineers adopt best practices for automation, security, reliability, and AI-driven operations.
🌐 Connect & Follow:
- Website: WizBrand.com
- Facebook: facebook.com/DevOpsSchool
- X (Twitter): x.com/DevOpsSchools
- LinkedIn: linkedin.com/company/devopsschool
- YouTube: youtube.com/@TheDevOpsSchool
- Instagram: instagram.com/devopsschool
- Quora: devopsschool.quora.com
- Email– contact@devopsschool.com
Find Trusted Cardiac Hospitals
Compare heart hospitals by city and services — all in one place.
Explore Hospitals