What is Azure Resource Manager?
Azure Resource Manager (ARM) is the management and deployment service for Azure. It provides a consistent management layer for deploying, updating, and managing resources within Microsoft Azure. ARM enables you to deploy and manage resources as a group rather than individually, allowing for greater control and flexibility.
Top 10 use cases of Azure Resource Manager?
Here are ten common use cases for Azure Resource Manager:
- Resource Deployment Templates:
- Create reusable templates in JSON format that define the resources you want to deploy.
- Define the infrastructure and configuration for applications in a declarative manner.
- Infrastructure as Code (IaC):
- Implement Infrastructure as Code principles using ARM templates to automate the provisioning and configuration of Azure resources.
- Maintain version control and consistency across environments.
- Application Lifecycle Management:
- Manage the complete lifecycle of applications, including provisioning, updating, and deletion of resources.
- Use ARM templates for versioned releases and rollbacks.
- Role-Based Access Control (RBAC):
- Implement RBAC to handle access to Azure resources.
- Define roles and assign permissions to users or groups based on their responsibilities.
- Resource Group Management:
- Group related resources together using resource groups.
- Manage and monitor resources collectively within a resource group.
- Cross-Resource Dependencies:
- Define dependencies between resources to ensure they are provisioned in the correct order.
- Specify relationships and dependencies between resources within the same template.
- Policy Enforcement:
- Enforce organizational policies and compliance standards using Azure Policy.
- Define policies to audit and enforce specific rules for resource configurations.
- Resource Tagging and Metadata:
- Apply tags to resources for categorization, organization, and cost management.
- Leverage metadata for efficient resource tracking and management.
- Hybrid Cloud Deployments:
- Facilitate hybrid cloud deployments by using ARM templates to define and deploy resources across on-premises and Azure environments.
- Enable consistent configurations across the hybrid infrastructure.
- Custom Resource Providers:
- Extend Azure capabilities by creating and deploying custom resource providers.
- Integrate third-party services or resources into ARM templates.
- Integration with Azure DevOps:
- Integrate ARM templates with Azure DevOps for continuous integration and continuous delivery (CI/CD).
- Automate deployment pipelines and ensure consistent releases.
- Multi-Tier Application Deployments:
- Deploy multi-tier applications with complex architectures using ARM templates.
- Define and manage the entire application stack, including virtual networks, load balancers, and databases.
- Cost Management and Reporting:
- Leverage resource group-based cost management and reporting for better insights into resource consumption and expenditures.
- Understand and optimize costs associated with different applications or departments.
Azure Resource Manager provides a unified and comprehensive platform for managing resources in Azure. The above use cases highlight its capabilities in automating deployments, enforcing policies, and managing resources at scale.
What are the feature of Azure Resource Manager?
Here are the key features of Azure Resource Manager (ARM):
Deployment and Management:
- Declarative templates: Define infrastructure using JSON or Bicep templates, ensuring consistent and repeatable deployments.
- Resource groups: Organize resources logically for easier management, tagging, and cost allocation.
- Lifecycle management: Manage resource creation, updates, and deletion through ARM APIs or the Azure portal.
Access Control:
- Role-based access control (RBAC): Secure resources using Azure Active Directory (AAD) roles and permissions.
- Locks: Prevent accidental deletion or modification of resources.
- Audit logs: Track resource operations for security and compliance.
Resource Dependencies:
- Dependency management: Declare dependencies between resources within templates, ensuring proper creation order and configuration.
- Deployment coordination: ARM orchestrates the deployment process, handling dependencies and rolling back changes if needed.
Tagging:
- Attach metadata: Add tags to resources for categorization, cost tracking, and automation.
- Organize and filter: Use tags to organize and filter resources in the portal and for cost reporting.
Templates and Automation:
- ARM templates: Reuse templates for consistent deployments and version control.
- Bicep: A domain-specific language for easier ARM template authoring.
- Integration with automation tools: Use ARM templates with tools like Azure DevOps for CI/CD pipelines.
Resiliency and Monitoring:
- Geo-replication: Replicate resources across regions for high availability.
- Health checks: Monitor resource health and performance through Azure Monitor.
- Alerts: Set up alerts for issues or changes in resource status.
How Azure Resource Manager works and Architecture?
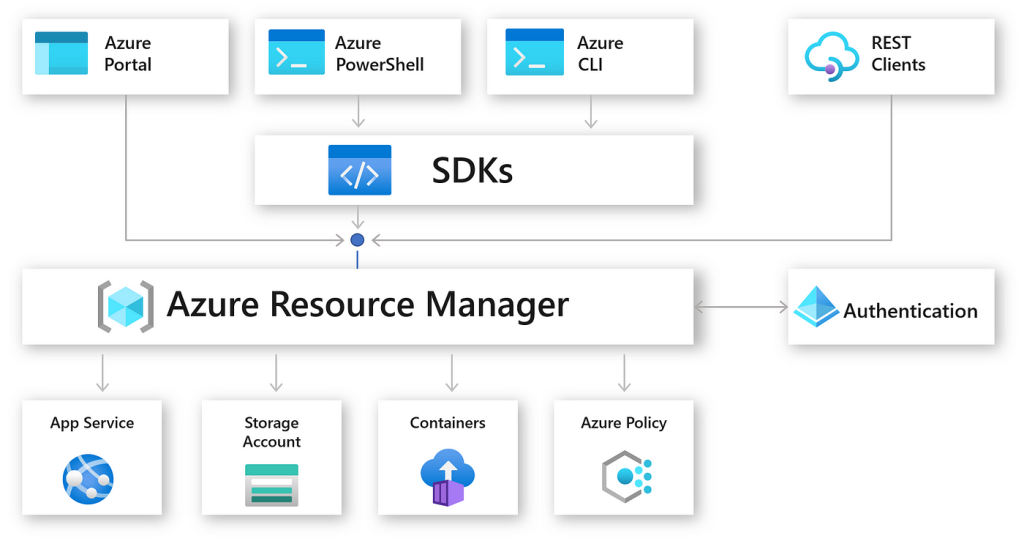
Azure Resource Manager (ARM) serves as the central control point for managing your resources in Azure. It simplifies deployments, grants granular access control, and orchestrates infrastructure with flexibility. Here’s a breakdown of how it works and its architecture:
How it Works:
- Template Authoring: You define your desired infrastructure (VMs, storage, databases etc.) in a template using JSON or Bicep (a more user-friendly language). This template specifies resources and their configurations.
- Template Deployment: You submit the template to ARM through the Azure portal, CLI, SDKs, or REST APIs.
- Validation: ARM checks the template for syntax errors and resource compatibility.
- Resource Creation: ARM calls the relevant Azure service APIs to create the resources specified in the template, following the defined dependencies.
- Monitoring: ARM tracks the deployment progress and reports any errors.
- Management: You can manage resources throughout their lifecycle (create, update, delete) using the same tools as deployment.
Architecture:
- Management Plane: ARM itself is a service that interacts with other Azure services through their APIs. It acts as the conductor, orchestrating resource creation and management.
- Client: You interact with ARM through various clients, including the Azure portal, CLI, SDKs, and REST APIs. These clients send requests to the management plane.
- Resource Provider: Each Azure service has a dedicated resource provider. It’s responsible for managing specific resources within that service based on instructions from ARM.
Key Features:
- Declarative Templates: Templates define desired state, not specific actions, simplifying deployments and enabling consistency.
- Resource Groups: Group related resources for easier management, tagging, and cost allocation.
- Access Control: Use Azure Active Directory (AAD) roles and permissions to control access to resources.
- Dependency Management: Define dependencies between resources in templates, ensuring proper creation order and configuration.
- Tagging: Add metadata to resources for categorization, cost tracking, and automation.
- Templates and Automation: Use ARM templates with automation tools like Azure DevOps for CI/CD pipelines.
- Resiliency and Monitoring: Geo-replication for high availability and Azure Monitor for resource health and performance.
Benefits:
- Simplified Deployment and Management: Consistent and repeatable deployments, easier resource organization, and centralized management.
- Improved Security and Control: Fine-grained access control through AAD roles and resource locks.
- Automation and Scalability: Automate deployments and resource management with templates and tools.
- Cost Optimization: Manage resource groups and track costs effectively.
By understanding how ARM works and its architecture, you can leverage its features to manage your Azure resources efficiently, securely, and scalably.
How to Install Azure Resource Manager it?
Azure Resource Manager (ARM) is not a separate software or service that you need to install. It’s a built-in, fundamental component of Azure itself. It’s available in all Azure regions and accessible through various methods:
1. Azure Portal:
- The Azure portal provides a visual interface for interacting with ARM.
- You can create, update, and manage resource groups, deploy templates, and view resource properties and dependencies directly within the portal.
2. Azure Command-Line Interface (CLI):
- Install the Azure CLI on your local machine to manage ARM resources programmatically.
- Use commands like
az group create,az deployment group create, andaz resource listto perform various actions.
3. Azure SDKs:
- Download and install the Azure SDK for your preferred programming language (Python, Java, JavaScript, etc.).
- Use the SDK’s ARM API to manage resources within your applications or scripts.
4. REST APIs:
- Directly interact with ARM through its REST APIs for more granular control.
- Use tools like Postman or curl to send HTTP requests to the ARM APIs.
No Additional Installation Required:
- ARM is seamlessly integrated into the Azure platform.
- You don’t need to install any additional software or plugins to use it.
Key Points:
- ARM is a core component of Azure, not a separate installation.
- Access it through the portal, CLI, SDKs, or REST APIs.
- It’s available in all Azure regions.
Basic Tutorials of Azure Resource Manager: Getting Started
Following is a step-by-step guide to getting started with Azure Resource Manager (ARM), tailored for beginners:
1. Comprehend ARM Templates:
- ARM templates are JSON files that define the infrastructure and configuration of your Azure resources.
- They offer a declarative approach to provisioning and managing resources in a consistent and reusable manner.
2. Create a Basic Template:
- Start with a simple template to deploy a virtual machine (VM):
JSON
{
  "$schema": "https://schema.management.azure.com/schemas/2019-04-01/deploymentTemplate.json#",
  "contentVersion": "1.0.0.0",
  "parameters": {
    "vmName": {
      "type": "string",
      "defaultValue": "myVM"
    }
  },
  "resources": [
    {
      "type": "Microsoft.Compute/virtualMachines",
      "name": "[parameters('vmName')]",
      "apiVersion": "2020-12-01",
      "location": "eastus",
      "properties": {
        "hardwareProfile": {
          "vmSize": "Standard_A1"
        },
        "osProfile": {
          "computerName": "[parameters('vmName')]",
          "adminUsername": "azureuser",
          "adminPassword": "P@ssw0rd1234!"
        },
        "storageProfile": {
          "imageReference": {
            "publisher": "MicrosoftWindowsServer",
            "offer": "WindowsServer",
            "sku": "2019-Datacenter",
            "version": "latest"
          }
        }
      }
    }
  ]
}
Code language: JSON / JSON with Comments (json)
3. Deploy the Template:
- Use the Azure portal, Azure CLI, or Azure PowerShell to deploy the template.
- Here’s how to do it in the Azure portal:
- Navigate to the Azure portal and search for “Resource groups.”
- Generate a new resource group or choose an existing one.
- Click “Deploy” and choose “Template deployment.”
- Upload the template file or provide its URL.
- Provide parameter values (like the VM name).
- Review and create the deployment.
4. Monitor and Manage the Deployment:
- Track the deployment progress in the portal.
- Once complete, view the deployed resources in the resource group.
- Manage the resources individually or as a group using ARM features like tags and locks.
5. Explore Additional Features:
- Parameters: Make templates reusable by accepting input values.
- Outputs: Return values from the deployment for use in other templates or scripts.
- Dependencies: Manage resource creation order for complex deployments.
- Nested Templates: Break down large templates into smaller, manageable sections.
Important Tips:
- Start with simple templates and gradually increase complexity.
- Use the Azure portal for a visual interface and guidance.
- Refer to Azure documentation for detailed explanations and examples.
- Utilize the Azure Quickstart Templates for pre-built templates for common scenarios.

Find Trusted Cardiac Hospitals
Compare heart hospitals by city and services — all in one place.
Explore Hospitals
This blog provides a clear and easy explanation of Azure Resource Manager and its key use cases. I like how it explains resource management, automation, and access control in a simple way. It’s very helpful for understanding how to efficiently manage and deploy cloud resources in Azure.