What is CloudCheckr?
CloudCheckr is a cloud management and optimization platform that provides businesses with tools and insights to effectively manage their cloud infrastructure and costs across multiple cloud providers, including AWS, Azure, Google Cloud, and others.
CloudCheckr’s extensive features make it a valuable solution for organizations seeking to optimize their cloud costs, enhance security and compliance, and gain better visibility and control over their cloud environments. It caters to both cost-conscious and security-focused cloud management needs.
Top 10 use cases of CloudCheckr:
Here are the top 10 use cases of CloudCheckr:
- Cost Management and Optimization: CloudCheckr helps organizations optimize their cloud spending by identifying cost-saving opportunities, such as reserved instance recommendations, right-sizing instances, and detecting unused resources.
- Visibility and Monitoring: It provides a unified dashboard for monitoring cloud resources and services, offering insights into performance, security, and compliance.
- Security and Compliance: CloudCheckr offers security and compliance checks to identify vulnerabilities, misconfigurations, and compliance violations in cloud environments. It helps organizations maintain a strong security posture.
- Resource Inventory and Management: Organizations can maintain an up-to-date inventory of cloud resources and track changes over time, making it easier to manage and secure assets effectively.
- Savings Plans and Reserved Instances: It assists in selecting the appropriate savings plans and reserved instances to reduce cloud costs while maintaining performance and availability.
- Rightsizing Recommendations: CloudCheckr helps identify over-provisioned or underutilized cloud resources, allowing organizations to adjust instance sizes and configurations for optimal cost-efficiency.
- Cost Allocation and Chargeback: It offers cost allocation and reporting features, helping organizations track cloud costs by department, project, or user and facilitating chargeback or showback processes.
- Security Posture Assessment: CloudCheckr assesses the security posture of cloud resources and provides recommendations for securing data, configuring firewall rules, and implementing encryption.
- Compliance Reporting: It generates compliance reports and audit trails to demonstrate adherence to industry standards and regulatory requirements, such as HIPAA, GDPR, and CIS benchmarks.
- Multi-Cloud Management: CloudCheckr supports multiple cloud providers, allowing organizations to manage and optimize their cloud resources consistently across different platforms.
- Automation and Remediation: It offers automation capabilities to remediate security and compliance issues automatically, reducing manual intervention and response times.
- Custom Reporting and Dashboards: Users can create custom reports and dashboards to visualize cloud cost and performance data that aligns with their specific needs and objectives.
- Cost Forecasting: CloudCheckr provides cost forecasting tools to estimate future cloud spending based on historical usage and cost data.
- Integration with Third-Party Tools: It can be integrated with other cloud management and DevOps tools to streamline workflows and enhance cloud management processes.
- Alerts and Notifications: Organizations can set up alerts and notifications to be informed of critical events, cost overruns, security incidents, and compliance violations.
What are the feature of CloudCheckr?
CloudCheckr is a cloud management and optimization platform designed to help organizations manage their cloud infrastructure effectively across multiple cloud providers. It offers a wide range of features and capabilities to optimize cloud costs, enhance security, and maintain compliance. Here are the key features of CloudCheckr, as well as an overview of how it works and its typical architecture:
Key Features of CloudCheckr:
- Cost Management and Optimization: CloudCheckr provides tools to optimize cloud spending by identifying cost-saving opportunities, right-sizing instances, and managing reserved instances effectively.
- Resource Inventory and Tracking: It offers visibility into cloud resources and changes, helping organizations maintain an accurate inventory and track resource usage over time.
- Security and Compliance: CloudCheckr performs security and compliance checks to identify vulnerabilities, misconfigurations, and compliance violations in cloud environments. It provides recommendations for remediation.
- Cost Allocation and Reporting: Organizations can allocate and report cloud costs by department, project, or user, facilitating chargeback or showback processes.
- Rightsizing and Performance Optimization: CloudCheckr helps organizations rightsize instances and optimize performance to reduce costs while maintaining service levels.
- Multi-Cloud Management: It supports multiple cloud providers, allowing organizations to manage resources consistently across different platforms.
- Automation and Remediation: CloudCheckr offers automation capabilities to remediate security and compliance issues automatically, reducing manual intervention.
- Custom Reporting and Dashboards: Users can create custom reports and dashboards to visualize cloud cost and performance data tailored to their specific needs.
- Security Posture Assessment: CloudCheckr assesses the security posture of cloud resources, providing recommendations for securing data, configuring firewall rules, and implementing encryption.
- Compliance Reporting: It generates compliance reports and audit trails to demonstrate adherence to industry standards and regulatory requirements.
- Cost Forecasting: CloudCheckr provides cost forecasting tools to estimate future cloud spending based on historical usage and cost data.
How CloudCheckr works and Architecture?
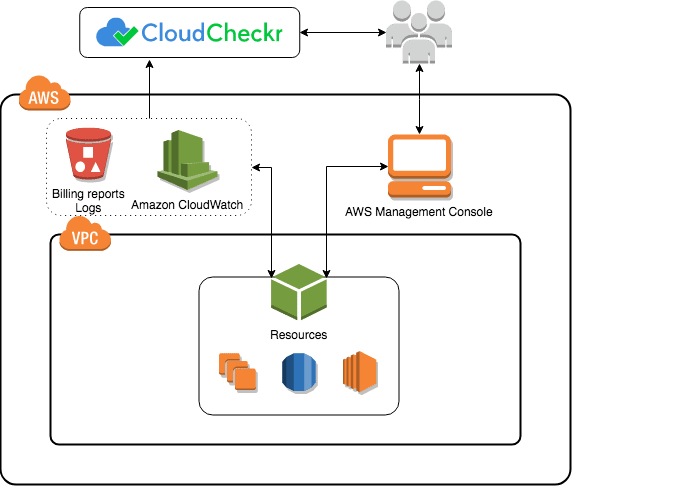
- Data Collection: CloudCheckr collects data from various cloud providers, including AWS, Azure, Google Cloud, and others, as well as third-party security tools.
- Analysis and Monitoring: The collected data is analyzed in real-time by CloudCheckr to identify cost-saving opportunities, security threats, vulnerabilities, and compliance issues.
- Alerts and Recommendations: CloudCheckr generates alerts and recommendations based on the analysis of data, helping organizations proactively address issues.
- Customization: Users can customize reports, dashboards, and automation rules to align CloudCheckr with their specific cloud management goals.
- Automation and Remediation: CloudCheckr can automate remediation actions in response to security and compliance findings, streamlining response processes.
CloudCheckr’s architecture is designed to provide centralized cloud management and optimization capabilities:
- CloudCheckr Platform: The core CloudCheckr platform is hosted in the cloud and provides the user interface and management features.
- Data Collection: CloudCheckr collects data from various cloud providers, including AWS, Azure, Google Cloud, and others. It also integrates with third-party security tools to consolidate data.
- Analysis Engine: The analysis engine processes collected data in real-time, performing cost analysis, security checks, compliance assessments, and generating recommendations.
- Alerts and Notifications: CloudCheckr generates alerts and notifications for findings related to cost, security, compliance, and performance.
- Customization Layer: Users can customize reports, dashboards, and automation rules to meet their specific cloud management and optimization needs.
- Integration Layer: CloudCheckr can integrate with other cloud management and DevOps tools to streamline workflows and enhance cloud management processes.
- Automation and Remediation: Automated response actions can be triggered based on security and compliance findings, helping organizations remediate issues automatically.
CloudCheckr’s architecture is designed to provide organizations with a comprehensive solution for managing and optimizing their cloud resources, enhancing security, and maintaining compliance. It offers flexibility and scalability to adapt to various cloud environments and management needs.
How to Install CloudCheckr?
To install CloudCheckr, you need to create an account and then add your cloud accounts.
Create a CloudCheckr account
- Go to the CloudCheckr website and click Sign Up in the top right corner.
- Enter your email address and generate a password.
- Click Create Account.
- You will get an email with a confirmation link details. Press the link to confirm your account.
Add your cloud accounts
- Once you have logged in to your CloudCheckr account, click Accounts in the left-hand menu.
- Click New Account.
- Select your cloud provider (AWS, Azure, or GCP).
- Enter your cloud account credentials.
- Click Add Account.
CloudCheckr will begin to collect data from your cloud accounts. This process may take some time, depending on the size and complexity of your environment.
Once CloudCheckr has collected enough data, you will be able to start using the platform to manage your cloud resources.
Additional information
- CloudCheckr is a SaaS application, so there is no need to install any software on your computer.
- You can access CloudCheckr from any web browser.
- CloudCheckr offers a free trial, so you can try it out before you commit to a paid subscription.
Some tips for getting started with CloudCheckr:
- Once you have added your cloud accounts, take some time to explore the platform and learn about the different features that are available.
- Create some dashboards and reports to help you track your cloud costs, usage, and security posture.
- Set up alerts to notify you of any potential problems.
- Use CloudCheckr’s recommendations to optimize your cloud resources and save money.
If you have any questions about how to use CloudCheckr, you can contact their support team for assistance.
Basic Tutorials of CloudCheckr: Getting Started
The following are the steps of the basic tutorial of CloudCheckr:
1. Create an account and add your cloud accounts:
- Go to the CloudCheckr website and click Sign Up in the top right corner.
- Enter your email address and create a password.
- Click Create Account.
- You will receive an email with a confirmation link. Click the link to confirm your account.
Once you have confirmed your account, you will be able to log in and add your cloud accounts.
- Go to the Accounts page in the left-hand menu.
- Click New Account.
- Select your cloud provider (AWS, Azure, or GCP).
- Enter your cloud account credentials.
- Click Add Account.
CloudCheckr will begin to collect data from your cloud accounts. This process may take some time, depending on the size and complexity of your environment.
2. Explore the platform:
Once CloudCheckr has collected enough data, you can start exploring the platform and learning about the different features that are available.
The left-hand menu provides access to all of the different features, such as:
- Dashboards: Customizable views of your cloud data.
- Reports: Detailed analyses of your cloud data.
- Recommendations: Suggestions on how to optimize your cloud resources and save money.
- Alerts: Notifications of potential problems with your cloud environment.
3. Create a dashboard:
A dashboard is a great way to get a quick overview of your cloud data. You can add different widgets to your dashboard to track your cloud costs, usage, and security posture.
To create a dashboard:
- Click Dashboards in the left-hand menu.
- Click New Dashboard.
- Give your dashboard a name and then start adding widgets.
To add a widget, click the Add Widget button and then select the type of widget that you want to add. Once you have added a widget, you can configure it to display the data that you want to see.
4. Create a report:
A report is a more detailed analysis of your cloud data. You can create reports on a variety of topics, such as cloud costs, usage, and security.
To create a report:
- Click Reports in the left-hand menu.
- Click New Report.
- Select the type of report that you want to create and then enter the desired parameters.
For example, if you want to create a report on your cloud costs, you would select the Cost Report type and then enter the desired date range.
5. Set up alerts:
Alerts notify you of potential problems with your cloud environment. For example, you can set up an alert to notify you if your cloud costs exceed a certain threshold.
To set up an alert:
- Click Alerts in the left-hand menu.
- Click New Alert.
- Select the type of alert that you want to create and then enter the desired parameters.
For example, if you want to set up an alert for cloud costs, you would select the Cost Alert type and then enter the desired threshold.
6. Use CloudCheckr’s recommendations to optimize your cloud resources and save money:
CloudCheckr analyzes your cloud data and provides recommendations on how to optimize your resources and save money.
To view CloudCheckr’s recommendations:
- Click Recommendations in the left-hand menu.
CloudCheckr will display a list of recommendations, sorted by potential savings. You can review the recommendations and implement the ones that make sense for your environment.
Additional tips:
- You can use CloudCheckr’s search bar to find specific information about your cloud environment.
- You can filter your CloudCheckr data by cloud provider, region, account, and other criteria.
- You can export your CloudCheckr data to CSV or JSON format.
- You can collaborate with other users on your CloudCheckr account.
If you have any questions about how to use CloudCheckr, you can contact their support team for assistance.

👤 About the Author
Ashwani is passionate about DevOps, DevSecOps, SRE, MLOps, and AiOps, with a strong drive to simplify and scale modern IT operations. Through continuous learning and sharing, Ashwani helps organizations and engineers adopt best practices for automation, security, reliability, and AI-driven operations.
🌐 Connect & Follow:
- Website: WizBrand.com
- Facebook: facebook.com/DevOpsSchool
- X (Twitter): x.com/DevOpsSchools
- LinkedIn: linkedin.com/company/devopsschool
- YouTube: youtube.com/@TheDevOpsSchool
- Instagram: instagram.com/devopsschool
- Quora: devopsschool.quora.com
- Email– contact@devopsschool.com
Find Trusted Cardiac Hospitals
Compare heart hospitals by city and services — all in one place.
Explore Hospitals
The explanation of CloudCheckr and its use cases is really clear and easy to follow. I especially liked how it highlights cost management and security monitoring together. This gave me a better understanding of how CloudCheckr helps with real cloud challenges. Thanks for the useful content!