What is Delphix Dynamic Data Platform?
Delphix Dynamic Data Platform is a data management solution that focuses on data virtualization, masking, and cloning. It allows organizations to create virtualized copies of their data, enabling faster and more efficient development, testing, and analytics while minimizing storage requirements and data privacy risks.
Top 10 Use Cases of Delphix Dynamic Data Platform:
- Agile Development and Testing: Provide development and testing teams with up-to-date and masked copies of production data for faster application development and testing.
- Data Privacy and Security: Mask sensitive data to protect customer information and comply with data privacy regulations like GDPR and HIPAA.
- Analytics and Reporting: Quickly provision masked or subset data to analytics teams for business intelligence and reporting purposes.
- DevOps Automation: Integrate Delphix with DevOps pipelines to automate the provisioning of data environments and accelerate application delivery.
- Cloud Migration and Hybrid Cloud: Use Delphix to create cloud-ready data environments for testing and migrating applications to the cloud.
- Disaster Recovery Testing: Create and manage test environments for disaster recovery scenarios without affecting the production data.
- Data Warehousing: Provision subsets of data to data warehouses, improving analytics performance without duplicating large datasets.
- Compliance Testing: Test applications and systems against historical or representative data to ensure compliance with regulations.
- Customer Support and Issue Resolution: Replicate customer data environments to troubleshoot issues and reproduce problems effectively.
- Training and Education: Create isolated training environments using masked data for educating employees and partners.
What are the feature of Delphix Dynamic Data Platform?

- Data Virtualization: Provision virtualized, lightweight copies of data on-demand without consuming excessive storage resources.
- Data Masking: Protect sensitive information by replacing real data with realistic but anonymous values.
- Data Subsetting: Create smaller, representative subsets of data for specific use cases, reducing storage and improving performance.
- Data Rewind: Roll back data environments to a specific point in time, useful for data recovery or testing.
- Data Pod Architecture: Delphix uses a distributed architecture called Data Pods to manage and store data copies efficiently.
How Delphix Dynamic Data Platform Works and Architecture?
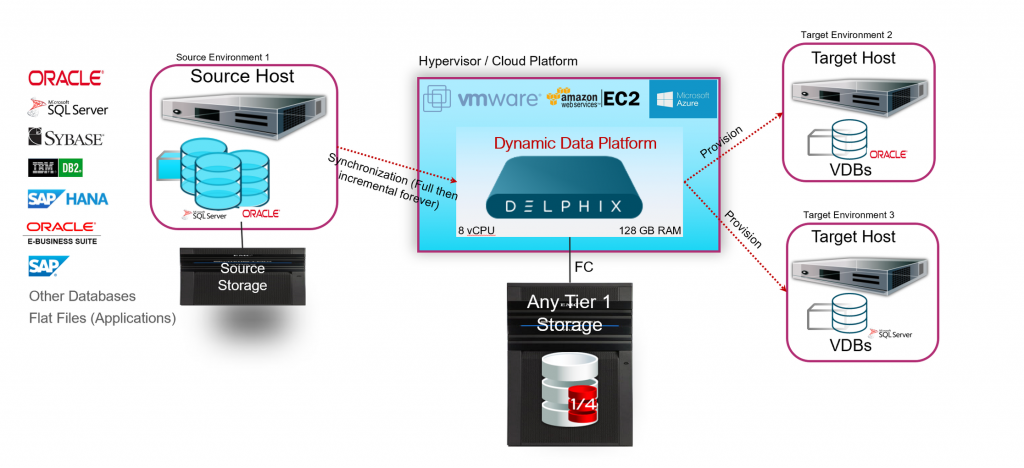
Delphix uses a unique Data Pod architecture to manage data copies efficiently. The architecture involves:
- Delphix Engine: The core component that manages data copies, including provisioning, masking, and storage management.
- Data Pods: Distributed containers that store data copies, ensuring data isolation and optimized storage utilization.
- Source and Target: The source is the original data environment, while the target is where Delphix creates virtualized, masked, or subset data copies.
How to Install Delphix Dynamic Data Platform?
To install Delphix Dynamic Data Platform, you will need to follow these steps:
- Download the Delphix Dynamic Data Platform installer from the Delphix website.
- Run the installer and apply the given screen instructions.
- The installer will ask you to provide the following information:
- The name of the Delphix environment.
- The location of the Delphix repository.
- The credentials for the Delphix administrator account.
- Once the installer is finished, you will need to start the Delphix Engine.
- The Delphix Engine will start and will create a virtual copy of the production database.
- Once the virtual copy is created, you can start using Delphix Dynamic Data Platform.
Here, I have added more details about the installation process:
- The Delphix Dynamic Data Platform installer is a Java application. You will need to have Java installed on your computer in order to run the installer.
- The Delphix repository is where Delphix Dynamic Data Platform stores its data. The repository can be located on a local disk or on a network share.
- The Delphix administrator account is used to manage Delphix Dynamic Data Platform. You will need to create a strong password for the Delphix administrator account.
- The Delphix Engine is the main component of Delphix Dynamic Data Platform. The Delphix Engine is responsible for creating and managing virtual copies of production databases.
Basic Tutorials of Delphix Dynamic Data Platform: Getting Started
Creating a comprehensive step-by-step tutorial for Delphix Dynamic Data Platform involves a lot of detail and can vary depending on the specific version and your environment. However, I can provide you with a basic outline to help you get started.
Step 1: Installation and Setup:
- Prerequisites: Review and fulfill the hardware, software, and networking prerequisites specified in the product documentation.
- Software Installation: Download the Delphix Dynamic Data Platform installer and follow the provided installation guide.
- Licensing: Apply the appropriate license keys to activate the software.
Step 2: Initial Configuration:
- Networking Configuration: Configure network settings, including IP addresses and hostname resolution.
- Storage Setup: Connect Delphix to the required storage resources for storing virtualized data copies.
Step 3: Connect Data Sources:
- Source Database Configuration: Set up connections to your source databases (e.g., Oracle, SQL Server) that contain the data you want to virtualize.
Step 4: Create Data Pods:
- Create Data Pods: Configure Data Pods to manage virtualized data copies efficiently. Define Pod locations and attributes.
Step 5: Data Virtualization:
- Create Virtual Datasets: Use the Delphix interface to create virtual datasets from source databases.
- Provision Virtual Environments: Provision virtual environments for development, testing, and other use cases.
Step 6: Data Masking and Subsetting:
- Create Masking and Subsetting Rules: Define masking and subsetting rules to protect sensitive data and create representative subsets.
- Apply Rules to Virtual Datasets: Apply the defined rules to virtual datasets to mask or subset the data.
Step 7: Data Rewind and Refresh:
- Data Rewind: Roll back virtual datasets to previous points in time using Data Rewind.
- Data Refresh: Refresh virtual datasets with the latest data from the source databases.
Step 8: Monitoring and Reporting:
- Monitor Operations: Use the Delphix dashboard to monitor virtualization, masking, and other operations.
- Generate Reports: Generate reports on data usage, masking status, and performance.
Step 9: Automation and Integration:
- Automate Workflows: Integrate Delphix with DevOps pipelines or other automation tools to automate data provisioning and refresh processes.
Step 10: Documentation and Training:
- Documentation: Document your Delphix configurations, masking rules, and workflows for future reference and auditing.
- Training: Train your team on how to use Delphix effectively.
Remember, this is a simplified overview, and actual implementation may involve additional steps and considerations. Always consult the official Delphix Dynamic Data Platform documentation and resources for accurate and detailed instructions. If you’re new to Delphix, consider reaching out to Delphix support or consulting services for guidance.

👤 About the Author
Ashwani is passionate about DevOps, DevSecOps, SRE, MLOps, and AiOps, with a strong drive to simplify and scale modern IT operations. Through continuous learning and sharing, Ashwani helps organizations and engineers adopt best practices for automation, security, reliability, and AI-driven operations.
🌐 Connect & Follow:
- Website: WizBrand.com
- Facebook: facebook.com/DevOpsSchool
- X (Twitter): x.com/DevOpsSchools
- LinkedIn: linkedin.com/company/devopsschool
- YouTube: youtube.com/@TheDevOpsSchool
- Instagram: instagram.com/devopsschool
- Quora: devopsschool.quora.com
- Email– contact@devopsschool.com
Find Trusted Cardiac Hospitals
Compare heart hospitals by city and services — all in one place.
Explore Hospitals