What is Django?
Django is a high-level web framework written in Python that encourages rapid development and clean, pragmatic design. It follows the model-view-controller (MVC) architectural pattern, known as the model-view-template (MVT) pattern in Django. Django provides a set of tools and libraries for building web applications, handling various tasks, and promoting reusable and maintainable code.
Key features of Django include:
- Object-Relational Mapping (ORM): Django provides a powerful ORM system that allows developers to interact with the database using Python code instead of SQL queries. This simplifies database operations and promotes code readability.
- Admin Interface: Django automatically generates an admin interface based on the defined models, making it easy to manage database records, users, and other application data.
- URL Routing: Django uses a declarative URL routing system, allowing developers to define URL patterns in a clean and expressive way.
- Template Engine: Django comes with its own template engine that enables the separation of logic and presentation. Templates support template inheritance, filters, and custom template tags.
- Forms: Django provides a form-handling library that simplifies form creation, validation, and processing. It includes features like form classes, form widgets, and automatic validation.
- Authentication and Authorization: Django includes a robust authentication system for user registration, login, and password management. It also supports fine-grained access control through its authorization system.
- Middleware: Django middleware components allow developers to process requests and responses globally, adding functionality such as authentication, security, or custom logging.
- Security Features: Django includes built-in security features, including protection against common web vulnerabilities like SQL injection, cross-site scripting (XSS), and cross-site request forgery (CSRF).
- Testing Support: Django provides a testing framework for creating unit tests and integration tests for your applications. This encourages the development of robust and maintainable code.
- Internationalization and Localization: Django supports internationalization (i18n) and localization (l10n), making it easier to build applications that can be adapted to different languages and regions.
What is top use cases of Django?
- Web Development: Django is widely used for building web applications of various sizes and complexities. It’s suitable for anything from small projects to large-scale, high-traffic websites.
- Content Management Systems (CMS): Many content management systems, including popular ones like Wagtail and Mezzanine, are built on top of Django. These CMS solutions provide a flexible and customizable framework for managing website content.
- E-commerce Platforms: Django is used for developing e-commerce platforms and online stores. It provides the necessary tools for managing products, handling transactions, and implementing user authentication.
- Social Media Applications: Django’s flexibility and scalability make it suitable for developing social media platforms, including features like user profiles, feeds, and interactions.
- Data Analytics Platforms: Django can be used to build platforms for data analytics and visualization. Its ORM system and support for database connections make it a solid choice for applications dealing with large datasets.
- API Development: Django Rest Framework, an extension for Django, is commonly used for building robust and scalable RESTful APIs. It simplifies the process of developing APIs with features like serialization, authentication, and viewsets.
- Collaborative Tools: Django is employed for creating collaborative tools such as project management systems, document sharing platforms, and team collaboration tools.
- Educational Platforms: Django is used in educational settings to build learning management systems (LMS) and other educational platforms. Its flexibility allows developers to tailor solutions to the specific needs of educational institutions.
- Healthcare Applications: Django is utilized in the development of healthcare applications, including patient management systems, electronic health records (EHR), and health data analytics platforms.
- Government and Enterprise Solutions: Django is chosen for developing government websites, enterprise applications, and other solutions where security, scalability, and maintainability are crucial.
Django’s versatility, coupled with its emphasis on best practices and rapid development, makes it a popular choice for a wide range of web development projects.
What are feature of Django?
Features of Django:
- Object-Relational Mapping (ORM): Django provides a high-level ORM system that allows developers to interact with databases using Python objects instead of SQL queries. This promotes clean and readable database operations.
- Admin Interface: Django automatically generates a customizable admin interface based on the defined models, allowing easy management of database records, users, and other application data.
- URL Routing: Django uses a declarative URL routing system, allowing developers to define URL patterns in a clean and expressive way, making it easy to map URLs to views.
- Template Engine: Django includes a template engine that enables the separation of logic and presentation. Templates support template inheritance, filters, and custom template tags, promoting code maintainability.
- Forms Handling: Django provides a comprehensive form-handling library, making it easy to create, validate, and process forms in a web application.
- Authentication and Authorization: Django includes a built-in authentication system for user registration, login, and password management. It also supports a flexible authorization system for fine-grained access control.
- Middleware: Django middleware components allow developers to process requests and responses globally. This can be used for adding functionality such as authentication, security features, or custom logging.
- Security Features: Django includes built-in security features, including protection against common web vulnerabilities like SQL injection, cross-site scripting (XSS), and cross-site request forgery (CSRF).
- Testing Support: Django comes with a testing framework that facilitates the creation of unit tests and integration tests. This encourages the development of robust and maintainable code.
- Internationalization and Localization: Django supports internationalization (i18n) and localization (l10n), making it easier to build applications that can be adapted to different languages and regions.
- RESTful APIs (with Django Rest Framework): Django Rest Framework is a powerful and flexible toolkit for building Web APIs. It extends Django’s capabilities to handle the complexities of API development.
- Caching: Django includes a caching framework that allows developers to cache the output of views and other components, improving application performance.
What is the workflow of Django?
- Project Setup:
- Generate a new Django project using the
django-admincommand. - Use the
startprojectcommand to create the project structure.
- Generate a new Django project using the
- App Creation:
- Create Django apps within the project using the
startappcommand. - Each app represents a specific module or functionality of the project.
- Create Django apps within the project using the
- Database Models:
- Define models in the app to represent database tables.
- Use the ORM to define relationships, fields, and constraints.
- Admin Interface:
- Customize the admin interface by registering models in the
admin.pyfile of the app.
- Customize the admin interface by registering models in the
- Views and Templates:
- Create views to handle HTTP requests and define the application’s logic.
- Use templates to render HTML dynamically.
- URL Routing:
- Define URL patterns in the project’s
urls.pyand app-specificurls.pyto map URLs to views.
- Define URL patterns in the project’s
- Forms Handling:
- Create forms to handle user input and data submission.
- Validate and process form data in views.
- Authentication and Authorization:
- Utilize Django’s built-in authentication system for user registration, login, and password management.
- Implement authorization for fine-grained access control.
- Middleware:
- Use middleware for global request and response processing, adding features such as authentication, security, or custom logging.
- Static Files and Media Handling:
- Configure static files and media settings to handle CSS, JavaScript, and user-uploaded files.
- Testing:
- Write tests for models, views, and other components to ensure code correctness.
- Run tests applying the
python manage.py testcommand.
- Deployment:
- Configure deployment settings, including database connections and static file handling.
- Deploy the Django application to a production environment.
- Internationalization and Localization:
- Enable and configure internationalization and localization for multi-language support.
- RESTful APIs (Optional):
- If building an API, use Django Rest Framework to create and expose RESTful endpoints.
- Caching (Optional):
- Implement caching for improved performance, if necessary.
The Django workflow is designed to be scalable and follows the “Don’t Repeat Yourself” (DRY) principle. It encourages modular and reusable code, making it well-suited for rapid development and maintainability in web applications.
How Django Works & Architecture?
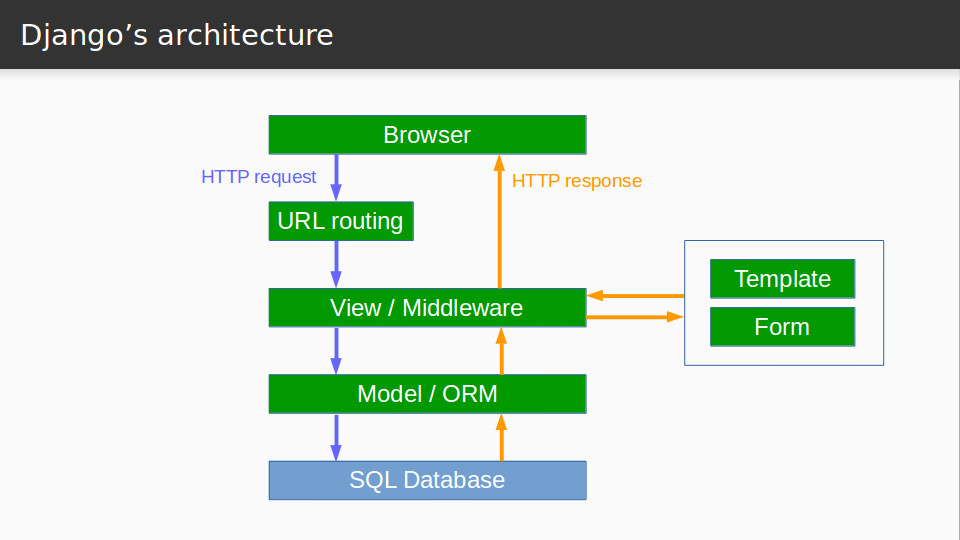
Django is a popular high-level Python web framework that inspires rapid development and clean, pragmatic design. It follows the Model-View-Template (MVT) architecture, which separates the application’s concerns into distinct layers:
Model: The model layer constitutes the data of the application. It defines the data structures and relationships between them using Django’s Object-Relational Mapper (ORM). The ORM handles the interaction with the database, abstracting away the underlying SQL queries and making it easier to work with data in a Pythonic way.
View: The view layer handles the processing of requests and generating responses. It receives requests from the client, interacts with the model layer to retrieve data, and prepares the data to be sent to the template layer. The view layer is responsible for the logic of the application, transforming data and generating the appropriate response for each request.
Template: The template layer handles the presentation of the data. It uses Django’s template language, which is an extension of HTML, to render the data sent by the view layer into a final HTML page. Templates allow for separating the presentation logic from the view logic, promoting code reusability and maintainability.
Django Workflow:
The Django workflow involves the following steps:
- Client Request: A client sends an HTTP request to the Django application.
- URL Routing: The Django routing system matches the incoming URL to a specific view function.
- View Processing: The view function retrieves data from the model layer using the ORM.
- Data Preparation: The view function processes the retrieved data and prepares it for the template layer.
- Template Rendering: The view function renders the prepared data using the appropriate template.
- HTTP Response: The rendered HTML template is sent back to the client as an HTTP response.
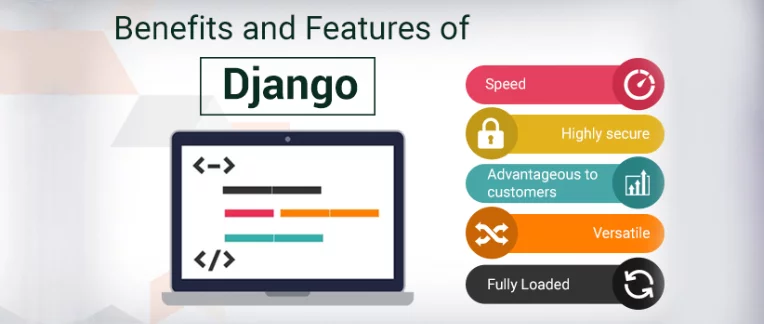
Benefits of Django:
- Rapid Development: Django provides a framework for rapid development, with features like URL routing, forms, and authentication built-in.
- Clean Design: Django encourages clean and maintainable code by separating concerns into distinct layers and using a convention-over-configuration approach.
- Security: Django provides built-in security features to protect against common web vulnerabilities.
- Scalability: Django is designed to be scalable and can handle large traffic volumes.
- Versatility: Django can be used to build a wide range of web applications, from simple websites to complex web applications with user authentication, data management, and APIs.
Django Architecture:
The Django architecture consists of several components, each playing a specific role in the application’s workflow:
- Django Core: The core of Django provides the framework’s essential functionality, including URL routing, template rendering, and the ORM.
- Middleware: Middleware is a layer of pluggable components that intercepts requests and responses, allowing for cross-cutting concerns like security, caching, and logging to be handled independently.
- Third-party Packages: Django has a rich ecosystem of third-party packages that extend its functionality and provide solutions for various tasks, such as social authentication, payment processing, and data visualization.
- Custom Applications: Developers create custom applications to implement the specific business logic and features of their web application.
Django’s architecture provides a flexible and extensible foundation for building web applications, enabling developers to focus on the core logic of their application while utilizing the framework’s powerful features and tools.
How to Install and Configure Django?
Installing and configuring Django involves creating a virtual environment, installing Django, configuring the database settings, and running migrations. Following is a step-by-step guide:
Prerequisites:
- Python 3.6 or higher: Ensure you have Python 3.6 or a later version installed on your system. You can download and install Python from the official website: https://www.python.org/downloads/.
Installation Steps:
- Create a Virtual Environment: A virtual environment isolates your project’s Python dependencies from the global Python environment. To create a virtual environment, use the following command:
Bash
   python3 -m venv <virtual_env_name>
Code language: HTML, XML (xml)- Activate the Virtual Environment: Activate the virtual environment before installing Django and working on your project. Use the following command:
source <virtual_env_name>/bin/activateCode language: HTML, XML (xml)- Install Django: Once the virtual environment is activated, install Django using the following command:
Bash
pip install django- Start a Django Project: Create a Django project using the following command:
Bash
   django-admin startproject <project_name>
Code language: HTML, XML (xml)- Configure Database Settings: Open the
settings.pyfile located in theproject_namedirectory. Modify the following settings to connect to your database:
Python
   DATABASES = {
       'default': {
           'ENGINE': 'django.db.backends.postgresql_psycopg2',
           'NAME': '<database_name>',
           'USER': '<database_user>',
           'PASSWORD': '<database_password>',
           'HOST': 'localhost',
           'PORT': '5432',
       }
   }
Code language: JavaScript (javascript)- Run Migrations: Apply the database migrations to create the tables required for your models:
Bash
   python manage.py makemigrations <app_name>
python manage.py migrateCode language: CSS (css)- Run the Development Server: Start the Django development server to run your application locally:
Bash
python manage.py runserverCode language: CSS (css)This should launch the Django development server on port 8000. Open your web browser and navigate to http://localhost:8000 to see your Django project running.
Remember to deactivate the virtual environment before switching to other Python projects:
Bash
deactivateFundamental Tutorials of Django: Getting started Step by Step

Following is a step-by-step basic tutorial of Django that will teach you the basics of the framework:
Prerequisites:
- Python 3.6 or higher: Ensure you have Python 3.6 or a later version installed on your system. Download and install Python from the official website: https://www.python.org/downloads/: https://www.python.org/downloads/
- Virtual Environment: A virtual environment is recommended to isolate your project’s dependencies from the global Python environment. You can create a virtual environment using tools like virtualenv or pipenv.
Creating a Django Project:
- Navigate to Project Directory: Open a terminal window and navigate to the directory where you want to create your Django project.
- Start a Django Project: Create a Django project using the following command:
Bash
   django-admin startproject <project_name>
Code language: HTML, XML (xml)
Replace <project_name> with the desired name for your project. This command will create a project directory with the essential files for your Django application.
Creating a Django App:
- Navigate to Project Directory: Ensure you are in the root directory of your Django project, where the
manage.pyfile resides. - Create a Django App: Create a Django app for your specific application logic using the following command:
Bash
   python manage.py startapp <app_name>
Code language: HTML, XML (xml)
Replace <app_name> with the desired name for your app. This command will create an app directory with the necessary files for your application’s models, views, and templates.
Defining Models:
- Open Models File: Open the
models.pyfile located in your app directory. - Define Models: Define the models for your application using Django’s model syntax. Models represent the data structures that will be stored in your database.
For example, to create a model for storing information about books, you might add the following code to your models.py file:
   from django.db import models

   class Book(models.Model):
    title = models.CharField(max_length=255)
    author = models.CharField(max_length=255)
    publication_date = models.DateField()
    genre = models.CharField(max_length=50)
This code defines a Book model with attributes for the book’s title, author, publication date, and genre.
Configuring Database Settings:
- Open Settings File: Open the
settings.pyfile located in your project directory. - Configure Databases: Modify the
DATABASESsetting to provide the necessary information for connecting to your database. This typically includes the database engine, database name, username, password, host, and port.
   DATABASES = {
       'default': {
          'ENGINE': 'django.db.backends.postgresql_psycopg2',
          'NAME': '<database_name>',
          'USER': '<database_user>',
          'PASSWORD': '<database_password>',
          'HOST': 'localhost',
          'PORT': '5432',
       }
   }
Code language: JavaScript (javascript)
Remember to restore the placeholder values with your actual database details.
Running Migrations:
- Apply Migrations: Apply the database migrations to create the tables required for your models:
Bash
   python manage.py makemigrations <app_name>
   python manage.py migrate
Code language: CSS (css)
This will create the tables in your database according to your defined models.
Creating Views:
- Open Views File: Open the
views.pyfile located in your app directory. - Define Views: Define the views for your application using Django’s view functions. Views handle the processing of requests and generating responses.
For example, to create a view to display a list of all books, you might add the following code to your views.py file:
   from django.shortcuts import render

   from .models import Book

   def book_list(request):
       books = Book.objects.all()
       context = {'books': books}
       return render(request, 'books/book_list.html', context)
Code language: JavaScript (javascript)
This code defines a book_list view that retrieves all books from the database and renders an HTML template named book_list.html.
Creating Templates:
- Create Templates Directory: Create a directory named
templatesin your app directory if it doesn’t already exist. - Create Template Files: Create HTML template files within the
templatesdirectory. Each template file corresponds to a specific view and defines the presentation of the data.

Find Trusted Cardiac Hospitals
Compare heart hospitals by city and services — all in one place.
Explore Hospitals