What is Eclipse?

Eclipse is an open-source, integrated development environment (IDE) that provides a robust platform for software development. Originally developed by the Eclipse Foundation, Eclipse has become a widely used and extensible IDE that supports various programming languages through plugins. The core of Eclipse is built in Java, and it is designed to be highly customizable to accommodate different development needs.
Key Features of Eclipse:
- Extensibility: Eclipse is highly extensible through the use of plugins. Developers can add or remove plugins to tailor the IDE to their specific needs, making it suitable for a wide range of programming languages and frameworks.
- Integrated Development Environment: Eclipse provides a comprehensive set of tools for software development, including code editors, debuggers, compilers, and project management features.
- Rich Text Editors: Eclipse includes advanced text editors with features such as syntax highlighting, code completion, and intelligent code analysis.
- Debugging Support: Eclipse offers robust debugging capabilities, allowing developers to step through code, set breakpoints, inspect variables, and analyze program behavior.
- Version Control Integration: Eclipse integrates with version control systems like Git, CVS, and SVN, providing tools for version control, branch management, and code collaboration.
- Build and Deployment Tools: Eclipse supports build automation and provides tools for building, testing, and deploying applications.
- Code Refactoring: Eclipse includes tools for code refactoring, making it easier to improve code structure, readability, and maintainability.
- User Interface Design: Eclipse supports the development of graphical user interfaces (GUIs) through tools like WindowBuilder, making it suitable for desktop and web application development.
- Cross-Platform Compatibility: Eclipse is designed to run on various operating systems, including Windows, macOS, and Linux, making it a versatile choice for developers using different platforms.
What is top use cases of Eclipse?
Top Use Cases of Eclipse:
- Java Development:
- Eclipse is widely used for Java development. It provides robust tools for Java coding, debugging, and project management. The Eclipse Java Development Tools (JDT) plugin is a key component for Java developers.
- Web Development:
- Eclipse supports web development using plugins like Eclipse Web Tools Platform (WTP) and others. It is commonly used for developing web applications using languages such as HTML, CSS, JavaScript, and frameworks like JavaServer Faces (JSF) and Spring.
- C/C++ Development:
- Eclipse CDT (C/C++ Development Tools) is a popular plugin for C and C++ development. It includes features like syntax highlighting, code completion, and debugging tools for C/C++ projects.
- Python Development:
- Eclipse can be extended with plugins like PyDev to support Python development. It provides features such as code completion, debugging, and integrated testing for Python projects.
- Mobile App Development:
- Eclipse can be used for mobile app development, particularly for Android applications. The Eclipse IDE for Java Developers with the Android Development Tools (ADT) plugin was a common choice for Android development (note: Android Studio has become the official IDE for Android development).
- Scientific and Data Analysis:
- Eclipse is used in scientific and data analysis projects. Plugins like the Eclipse Science project provide tools for data visualization, analysis, and modeling.
- Embedded Systems Development:
- Eclipse is utilized for embedded systems development, supporting languages like C and C++. Platforms like Eclipse Embedded CDT provide features for embedded software development.
- Modeling and UML:
- Eclipse Modeling Framework (EMF) and Eclipse UML2 are used for modeling and designing applications using the Unified Modeling Language (UML).
- Enterprise Java Development:
- Eclipse is commonly used in enterprise environments for developing Java EE (Enterprise Edition) applications. Plugins like Eclipse Enterprise for Java (EE4J) provide support for Java EE technologies.
Overall, Eclipse’s flexibility and extensibility make it suitable for a wide range of development tasks, and its popularity is evident across various programming communities.
What are feature of Eclipse?
Features of Eclipse:
- Extensibility: Eclipse is highly extensible, allowing developers to add or remove plugins to customize the IDE based on their specific needs. This makes it suitable for a wide range of programming languages and frameworks.
- Integrated Development Environment (IDE): Eclipse provides a comprehensive set of tools for software development, including code editors, debuggers, compilers, and project management features, all integrated into a single environment.
- Rich Text Editors: Eclipse includes advanced text editors with features such as syntax highlighting, code completion, and intelligent code analysis to enhance the coding experience.
- Debugging Support: Eclipse offers robust debugging capabilities, enabling developers to step through code, set breakpoints, inspect variables, and analyze program behavior.
- Version Control Integration: Eclipse integrates with various version control systems like Git, CVS, and SVN. It provides tools for version control, branch management, and code collaboration.
- Build and Deployment Tools: Eclipse supports build automation and provides tools for building, testing, and deploying applications. It integrates with build tools like Apache Maven.
- Code Refactoring: Eclipse includes tools for code refactoring, making it easier for developers to improve code structure, readability, and maintainability without introducing bugs.
- User Interface Design: Eclipse supports the development of graphical user interfaces (GUIs) through tools like WindowBuilder. This makes it suitable for desktop and web application development.
- Cross-Platform Compatibility: Eclipse is designed to run on various operating systems, including Windows, macOS, and Linux, making it a versatile choice for developers using different platforms.
- Plug-in Development: Eclipse itself is built on a plug-in architecture, allowing developers to create and share their own plugins to extend or enhance the functionality of the IDE.
What is the workflow of Eclipse?
Workflow of Eclipse:
The workflow in Eclipse varies based on the type of development being undertaken, but here is a general workflow for Java development:
- Installation:
- Download and install Eclipse IDE from the official website.
- Choose the Eclipse IDE package that corresponds to your development needs (e.g., Eclipse IDE for Java Developers).
- Workspace Setup:
- Open Eclipse and set up a workspace, which is a directory where your projects and files will be stored.
- Create a New Project:
- Create a new project by selecting the appropriate project type (e.g., Java Project).
- Specify project settings and configurations.
- Coding:
- Write code using the integrated text editor. Take advantage of features such as syntax highlighting, code completion, and intelligent code analysis.
- Build and Compile:
- Use Eclipse’s build tools to compile your code into executable files or libraries.
- Debugging:
- Set breakpoints and use the debugger to step through your code, inspect variables, and identify and fix issues.
- Version Control:
- Integrate with version control systems like Git or SVN to manage source code versions and collaborate with team members.
- Testing:
- Implement and run tests using Eclipse’s testing tools or integrate with external testing frameworks.
- Refactoring:
- Use Eclipse’s code refactoring tools to improve code quality, readability, and maintainability.
- Deployment:
- Deploy your application locally or to a server, depending on your development requirements.
- Documentation:
- Create and maintain documentation for your project using integrated tools or external documentation systems.
- Monitoring and Optimization:
- Monitor your application’s performance and optimize code using profiling tools if needed.
- Continuous Integration (CI):
- Integrate with CI/CD tools to automate the build, test, and deployment processes.
- Plug-in Management (Optional):
- Explore and install additional plugins from the Eclipse Marketplace to enhance the IDE with additional features.
This workflow can be adapted based on the specific requirements of different development projects, such as web development, mobile app development, or other application types. The flexibility of Eclipse allows developers to tailor their workflows to suit their needs and preferences.
How Eclipse Works & Architecture?
Eclipse is a popular open-source IDE (Integrated Development Environment) used for building various applications. Here’s a breakdown of how it works and its architecture:
1. Plugin-based Architecture:
Eclipse is built on a modular architecture with a core platform and numerous plugins. Plugins extend the core functionality, providing specific features and tools for different development needs. This allows for customization and flexibility based on your project requirements.
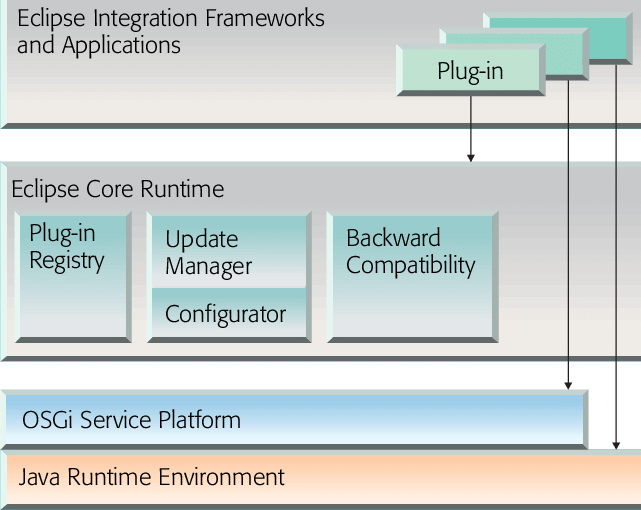
2. Eclipse Platform Components:
The core platform is responsible for basic functionalities like the user interface, editing features, debugging tools, and resource management. Key components include:
- Workbench: Provides the main UI for interacting with Eclipse and managing projects.
- Workspace: Stores project files and resources.
- Perspectives: Customized layouts for different development tasks.
- Views: Panels displaying specific information like project files, code editors, and debugging output.
- Editors: Tools for editing code and other resources.
3. Plugins:
Plugins are developed using Java and contribute various functionalities to Eclipse. Some popular plugins include:
- Java Development Tools (JDT): For Java development.
- C/C++ Development Tools (CDT): For C/C++ development.
- PyDev: For Python development.
- Subversion: Version control system integration.
- Git: Version control system integration.
4. Eclipse Runtime:
The Eclipse runtime provides a framework for plugins to run and interact with each other. It handles tasks like managing plugin lifecycle, communication, and resource access.
5. Extension Points:
Extension points allow plugins to hook into the core platform and other plugins, extending their functionalities without modifying their code. This enables seamless integration and collaboration between different plugins.
Benefits of Eclipse Architecture:
- Flexibility and Customization: The plugin-based architecture allows for tailoring the IDE to specific development needs.
- Open-Source and Extensible: Anyone can create and contribute plugins, expanding Eclipse’s capabilities.
- Large Community and Ecosystem: A vast community provides support, resources, and plugins for various tasks.
Challenges of Eclipse Architecture:
- Complexity: Managing plugins and ensuring compatibility can be challenging.
- Performance Overhead: Loading and managing numerous plugins can affect performance.
Understanding Eclipse’s architecture helps developers effectively leverage its features and customize it for their specific development needs.
How to Install and Configure Eclipse?
Following is a step-by-step guide on how to install and configure Eclipse:
1. Download Eclipse:
- Go to the official Eclipse website.
- Choose the appropriate download package based on your operating system (Windows, Mac, Linux).
- Download the compressed file (e.g.,
.zip,.tar.gz).
2. Extract the Files:
- Extract the downloaded file to a desired location on your system.
- There’s no installation process; you can directly launch the Eclipse executable (e.g.,
eclipse.exeon Windows).
3. Start Eclipse:
- Double-click the extracted Eclipse executable to launch the IDE.
- The first time you run Eclipse, it will ask you to choose a workspace directory. This directory will store your projects and settings.
4. Install Plugins (Optional):
- Eclipse comes with a basic set of tools, but you can install additional plugins for specific development needs.
- Go to Help > Eclipse Marketplace to browse and install available plugins.
- Plugins can extend functionalities like adding support for different programming languages, frameworks, and tools.
5. Configure Preferences:
- You can customize various aspects of Eclipse to suit your preferences.
- Go to Window > Preferences to access a wide range of settings like appearance, keyboard shortcuts, editors, and more.
- Configure these settings based on your individual preferences and development workflow.
6. Create a New Project:
- Once you’ve configured your environment, you can start creating projects.
- Go to File > New > Project to choose a project type based on your development needs (e.g., Java project, Python project, etc.).
- Follow the wizard steps to configure the project settings and create your project files.
7. Start Coding:
- You can start writing code in the provided editors.
- Eclipse provides syntax highlighting, code completion, and other features to enhance your coding experience.
- Utilize various tools like debugger, console, and output viewers to effectively develop and debug your code.
Important Tips:
- Explore online tutorials and resources to learn more about specific features and functionalities of Eclipse.
- Join the Eclipse community forums for support, troubleshooting, and discussions.
- Regularly update Eclipse and your plugins for bug fixes, security improvements, and new features.
By following these steps and exploring the available resources, you can successfully install, configure, and start using Eclipse for your development projects.
Fundamental Tutorials of Eclipse: Getting started Step by Step

Following is a Step by Step Basic Tutorials of Eclipse:
1. Installation and Setup:
- Download Eclipse: Visit the official website of Eclipse and choose the appropriate version for your operating system.
- Extract the Files: Unzip the downloaded file to a desired location.
- Launch Eclipse: Run the extracted executable file (e.g., eclipse.exe).
- Choose a Workspace: Select a directory to store your projects and settings.
2. User Interface:
- Explore the Workbench: Familiarize yourself with the menus, toolbar, views, and editors.
- Switching Perspectives: Discover perspectives like “Java” and “Debug” for specific tasks.
- File Navigation: Learn how to open files, switch between views, and manage your project files.
3. Creating a Project:
- Project Types: Understand different project types available (e.g., Java, Web, C/C++).
- Creating a New Project: Follow the wizard steps to create a project, choosing its type and configuring settings.
- Project Structure: Explore the project structure, including source files, libraries, and configuration files.
4. Writing and Editing Code:
- Code Editor Features: Utilize features like syntax highlighting, code completion, error checking, and refactoring.
- Basics of Java Code: Learn to write simple Java code with variables, methods, and control flow statements.
- Building and Running: Build your project and run the code to see the results.
5. Debugging:
- Understanding the Debugger: Explore the debugger tool for line-by-line execution and error identification.
- Setting Breakpoints: Pause execution at specific lines to inspect variables and program state.
- Debugging Techniques: Practice techniques like inspecting variables, evaluating expressions, and modifying state to fix bugs.
6. Resources and Plugins:
- Managing Resources: Learn how to handle libraries, JAR files, and other project resources.
- Version Control: Integrate version control systems like Git to track changes and collaborate with others.
- Exploring Plugins: Install and use plugins to extend functionalities and customize your development environment.
7. Advanced Topics (Optional):
- Customizing Perspectives: Create custom perspectives for specific tasks and workflows.
- Advanced Customization: Change themes, keyboard shortcuts, and even develop your own plugins.
- Community Resources: Join the online community and explore tutorials, forums, and documentation for further learning.
Important Tips:
- Practice regularly to solidify your understanding.
- Utilize online resources and tutorials for specific tasks.
- Join the community for support and discussions.
- Begin with simple projects and gradually progress to more complex ones.
- Experiment with different features and plugins to customize your development experience.
Mastering Eclipse takes time and practice. By following these tutorials, exploring further resources, and practicing consistently, you can become proficient in using this powerful IDE for your development projects.

Find Trusted Cardiac Hospitals
Compare heart hospitals by city and services — all in one place.
Explore Hospitals