What is Flood ?
Flood is a cloud-based performance testing platform designed to help teams conduct load testing for their web applications and APIs. It provides users with the infrastructure and tools needed to simulate thousands or even millions of virtual users accessing their applications simultaneously, allowing them to assess how their systems perform under various traffic loads.
Top 10 use cases of Flood ?
Let’s delve into its details and explore its top use cases:
- Load Testing:
- The primary purpose of the Flood Tool is load testing, which involves simulating user behavior and measuring how an application or system performs under different loads.
- It helps assess performance, availability, reliability, scalability, and security.
- Response Time Metrics:
- Load testing focuses on response time metrics, such as the elapsed time for specific actions within the test.
- It measures network timing (connection time, latency, etc.) and browser-level navigation timings.
- Concurrency Measurement:
- Concurrent users—those actively using a resource within a predefined period—are a standard performance metric.
- Load tests evaluate the total number of users accessing an application simultaneously.
- Throughput Analysis:
- Throughput metrics express rates, such as network throughput in bits per second or transaction counts.
- Observing response time, concurrency, and throughput together reveals system behavior and bottlenecks.
- Availability Monitoring:
- While not directly related to response time, availability concerns server uptime.
- Ensuring an application remains available during load is crucial.
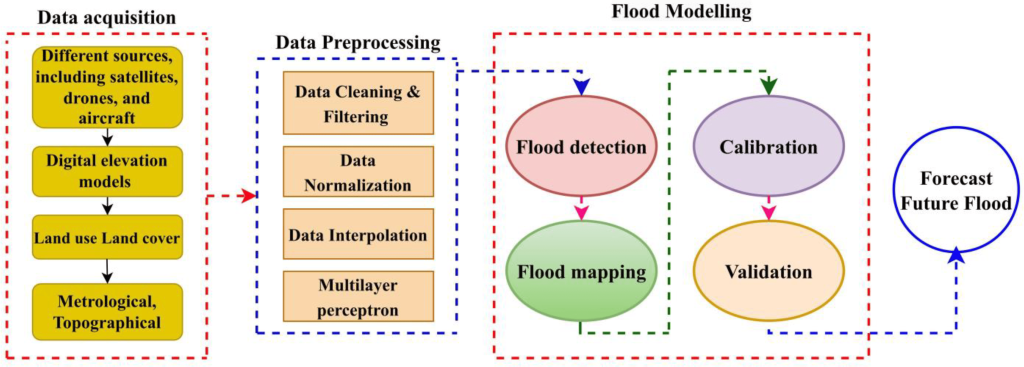
- Urban Flood Prediction:
- The Flood Tool predicts flood levels and inundation patterns in urban areas.
- It aids in emergency planning and response.
- Hydropower and Irrigation Planning:
- Load testing assists in planning hydropower generation by controlling dam water releases.
- It also simulates flood scenarios for irrigation in agricultural fields.
- Emergency Response Preparedness:
- Emergency planners use load testing data to prepare for flood events.
- Critical information helps formulate effective response strategies.
- Urban Drainage System Design:
- Designers optimize urban drainage systems to prevent flooding.
- Load testing evaluates drainage capacity and effectiveness.
- Risk Assessment and Research:
- Comparing load test metrics with real-time analytics and application performance management tools.
- Conducting research to enhance disaster resilience.
The Flood Tool provides insights into system behavior and helps manage performance in various contexts.
What are the feature of Flood ?
Let’s explore the features of the Flood Tool, which is designed for load testing and performance analysis:
- Unified Experience:
- Flood offers a consistent experience across all tools, whether you’re doing stress testing, spike testing, or general performance testing.
- Real-time reporting, APM (Application Performance Monitoring) integrations, and simultaneous deployment are part of this unified experience.
2. Browser-Based Tools:
- Element: Flood’s flagship real browser load testing tool.
- Accurately simulates user interactions with your application.
- Written in TypeScript, it includes inline documentation and correctness checking.
- Supports actions similar to Selenium webdriver but with modern enhancements2.
- Selenium Webdriver: Reuse functional test scripts for non-functional performance testing.
- Supports Chrome and Firefox-based Selenium tests on Flood1.
3. Protocol-Based Tools:
- Flood supports two popular and high-performing protocol-based load testing tools:
4. Flexible Deployment:
- Start as many load generators (nodes) as needed, scaling up or down dynamically.
- Use virtual machines on the cloud or your existing infrastructure.
- Ensure consistent tool versions, scripts, and data files across all nodes3.
5. Realistic Results:
- Browser-based testing (e.g., Element) provides more realistic results based on true browser performance rather than just API responses.
- Test all components of your web app, including JavaScript rendered via the browser.
Flood combines browser-based and protocol-based testing, making it a versatile tool for assessing system performance and optimizing applications.
How Flood works and Architecture?
The Flood Tool, specifically designed for performance analysis of RPC (Remote Procedure Call) endpoints, is a powerful load testing tool. Let’s explore how it works and its architecture:
- What Is Load Testing?:
- Load testing involves measuring how a system’s performance characteristics change under different workloads.
- Metrics like throughput, latency, and error rates are observed as the system experiences increasing loads.
- Load testing helps identify bottlenecks, failure modes, and overall performance capacity.
2. Why Load Test Blockchain Nodes?:
- In the context of blockchain nodes, RPC (used for data extraction) performance is crucial.
- Traditional latency testing doesn’t reveal how systems behave under load.
- Load testing provides a more comprehensive view of system performance.
3. Introducing Flood:
- Flood is a benchmarking tool developed by Paradigm specifically for RPC endpoints.
- It optimizes performance analysis for various crypto infrastructure components.
- Flood is open-source (Apache/MIT license) and available on GitHub.
4. Components of Flood:
- Command Line or Python Library:
- Flood can be used either from the command line or as a Python library.
- Developers can integrate it into their workflows seamlessly.
- Docker Image:
- A Docker image of Flood facilitates easy integration into CI/CD pipelines.
- It simplifies deployment and scalability.
5. How Flood Works:
- Load Testing Approach:
- Flood emphasizes load testing over latency testing.
- It simulates various workloads to stress the system.
- Test Coverage:
- Flood covers all relevant RPC methods, providing a comprehensive view.
- It assesses performance across different endpoints.
6. Benefits of Flood:
- Insightful Metrics:
- Flood reveals throughput, latency, and error rates under load.
- Developers gain insights into system behavior.
- Optimization and Comparison:
- Identify bottlenecks and areas for improvement during active development.
- Compare different systems or configurations.
- Blockchain-Specific Focus:
- Flood’s focus on RPC endpoints benefits blockchain infrastructure.
Flood combines load testing principles with RPC-specific analysis, making it a valuable tool for optimizing system performance and resilience.
How to Install Flood it?
The Flood Tool can refer to different tools or systems, so I’ll provide installation instructions for a couple of them:
- Flood Light Installation: If you’re looking to install outdoor flood lights, follow these steps:
- Turn the Power Off:
- Before starting any electrical work, turn off the power at the circuit breaker or fuse box for safety.
- Decide on the Location:
- Choose the ideal location for your flood lights. Consider factors like coverage area and angles.
- Connect to Power:
- Wire the flood lights to the power source. Follow proper electrical connections.
- Install the Flood Lights:
- Mount the lights securely using appropriate fixtures.
- Connect the Light Switch:
- Connect the light switch to control the flood lights.
- Turn the Power Off:
- AWARE Flood Node Installation: If you’re referring to the AWARE Flood Node, here are the installation steps:
- The AWARE Flood Installation Guide provides detailed instructions for setting up the AWARE Flood Node, water pressure sensor, and waterproof camera on various platforms and surfaces.
- You can download the full installation guide from the AWARE Flood Installation Guide page.
- The guide covers everything from hardware setup to configuration.
Basic Tutorials of Flood: Getting Started

Flood is a cloud-based load testing platform that helps teams conduct performance testing for their web applications and APIs. Below is a step-by-step basic tutorial to get started with Flood:
Step 1: Sign Up for Flood
- Go to the Flood website and sign up for an account.
- Follow the instructions to create your Flood account.
Step 2: Create a New Flood Project
- Once logged in, click on “Projects” in the navigation menu.
- Click on the “New Project” button to create a new project.
- Enter a name for your project and any optional project settings.
- Click on “Create Project” to create the project.
Step 3: Record or Import Your Test Script
- In your project dashboard, click on “Create New Test” to start creating a new test.
- Choose whether you want to record a test script or import an existing test script.
- To record a test script, follow the instructions provided by Flood for recording a test using your web browser.
- To import an existing test script, upload your JMeter, Gatling, or Selenium script.
Step 4: Configure Test Settings
- Once you have recorded or imported your test script, you’ll be prompted to configure your test settings.
- Specify the test duration, number of virtual users (VUs), ramp-up time, and any other test parameters.
- Click on “Save and Configure” to save your test settings.
Step 5: Start Your Load Test
- After configuring your test settings, you’ll be taken to the test dashboard.
- Review your test settings and click on the “Start Test” button to start your load test.
- Flood will provision the required infrastructure and start executing your load test.
Step 6: Monitor Test Execution
- While your load test is running, you can monitor its progress in real-time from the test dashboard.
- View metrics such as response times, error rates, throughput, and more to assess the performance of your application.
- Use Flood’s reporting and analytics features to analyze test results and identify performance bottlenecks.
Step 7: Analyze Results and Take Action
- Once your load test has completed, review the test results and analyze any performance issues that were identified.
- Use Flood’s reporting and analysis tools to generate detailed reports and insights into your application’s performance.
- Take appropriate actions based on the test results, such as optimizing your application code, scaling infrastructure resources, or implementing caching strategies.
Step 8: Iterate and Improve
- Use the insights gained from your load test to iterate and improve your application’s performance.
- Repeat the load testing process regularly to monitor performance improvements and ensure that your application can handle expected traffic loads.
By following these steps, you can get started with Flood and conduct performance testing for your web applications and APIs effectively.

Find Trusted Cardiac Hospitals
Compare heart hospitals by city and services — all in one place.
Explore Hospitals