What is Gradle?
Gradle is an open-source build automation tool that is designed to be flexible, powerful, and highly customizable. It is often used for building, testing, and deploying software projects. Gradle uses a Groovy or Kotlin-based domain-specific language (DSL) for build script development, allowing developers to express the build process in a concise and readable manner.
What is top use cases of Gradle?
Top Use Cases of Gradle:
- Build Automation:
- Gradle is primarily used for automating the build process of software projects. It can compile source code, run tests, package artifacts, and perform various other tasks required for building an application.
- Dependency Management:
- Gradle handles dependency resolution and management efficiently. It can automatically download and manage dependencies from repositories such as Maven Central, JCenter, or custom repositories, simplifying the process of managing external libraries and components.
- Multi-Project Builds:
- Gradle supports multi-project builds, allowing developers to manage multiple related projects within a single build. This is useful for organizing and building large codebases with interconnected modules or libraries.
- Java Development:
- Gradle is widely used for building Java applications. It supports the compilation, testing, and packaging of Java projects, making it a popular choice in the Java development ecosystem.
- Android App Development:
- Gradle is the official build tool for Android app development. Android Studio, the official Android IDE, uses Gradle for building, testing, and packaging Android applications.
- Web Development:
- Gradle can be used in web development projects to manage the build process for web applications. It supports tasks such as minification, bundling, and deployment of web assets.
- Continuous Integration (CI):
- Gradle is integrated with popular CI/CD (Continuous Integration/Continuous Deployment) systems like Jenkins and TeamCity. It plays a crucial role in automating the build and test processes in CI pipelines.
- Plugin Ecosystem:
- Gradle has a rich ecosystem of plugins that extend its functionality. These plugins cover various domains, including code quality checks, code coverage, static analysis, and integration with other tools and platforms.
- Custom Workflows:
- Gradle allows developers to define custom workflows and tasks tailored to the specific needs of a project. This flexibility makes it suitable for a wide range of project types and configurations.
- Microservices:
- Gradle is used in microservices architectures for building and managing individual services. It supports the creation of Docker images, deployment to container orchestration platforms, and other tasks relevant to microservices development.
- Scala and Groovy Projects:
- Gradle supports projects written in languages other than Java, such as Scala and Groovy. It provides a versatile build system for polyglot projects.
- Data Science and Machine Learning:
- Gradle is used in data science and machine learning projects for managing dependencies, building models, and orchestrating workflows. It can integrate with popular machine learning libraries and tools.
- .NET Development:
- Gradle can be used for building and managing .NET projects. It supports tasks related to compiling, testing, and packaging .NET applications.
- Custom Tasks and Plugins:
- Developers can define custom tasks and plugins in Gradle to automate project-specific tasks. This extensibility allows for the creation of tailored build processes.
- Integration with IDEs:
- Gradle integrates seamlessly with famous integrated development environments (IDEs) such as IntelliJ IDEA and Eclipse. It provides a consistent build experience for developers working within their preferred IDE.
Gradle’s versatility and extensibility make it suitable for a wide range of use cases, from building small projects to large-scale enterprise applications. It is adopted across various industries and development stacks due to its flexibility, performance, and strong integration capabilities.
What are feature of Gradle?
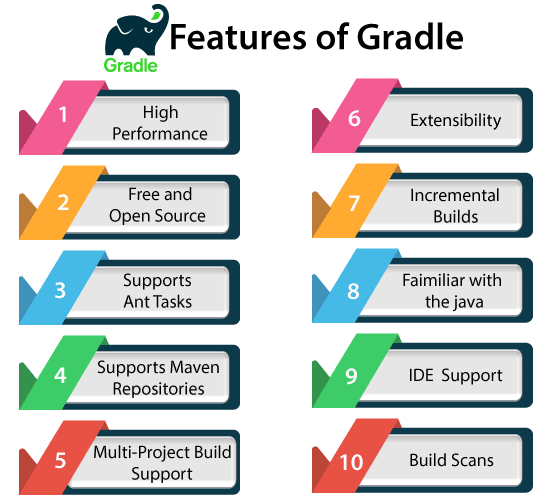
Features of Gradle:
- Declarative Build Scripts:
- Gradle uses a declarative syntax for build scripts, allowing developers to define what needs to be done without specifying how. This makes build scripts concise and readable.
- Domain-Specific Language (DSL):
- Gradle build scripts are written in either Groovy or Kotlin, providing a DSL that simplifies the definition of tasks, dependencies, and configurations.
- Incremental Builds:
- Gradle supports incremental builds, where only the necessary tasks are executed based on changes in source code or dependencies. This helps improve build performance.
- Dependency Management:
- Gradle handles dependency resolution and management seamlessly. It can resolve dependencies from repositories like Maven Central, JCenter, or custom repositories.
- Multi-Project Builds:
- Gradle supports multi-project builds, allowing developers to manage and build multiple related projects within a single build. This is useful for large codebases with modular structures.
- Plugin System:
- Gradle has a powerful plugin system that extends its functionality. There are a variety of plugins available for tasks such as code quality checks, testing, code coverage, and integration with other tools.
- Task Customization:
- Developers can define custom tasks in Gradle, allowing for the creation of specific build steps tailored to project requirements.
- Convention over Configuration:
- Gradle follows the convention over configuration principle, providing sensible defaults for common scenarios. This reduces the amount of configuration required in build scripts.
- Dependency Substitution:
- Gradle allows developers to substitute dependencies with alternate versions or implementations. This is useful for testing different library versions or replacing dependencies for specific builds.
- Extensibility:
- Gradle is highly extensible, enabling developers to create custom plugins and tasks. This extensibility makes it adaptable to a wide range of project types and requirements.
- Build Cache:
- Gradle includes a build cache feature that caches task outputs. This can significantly improve build times by avoiding redundant work.
- Parallel and Parallelized Builds:
- Gradle supports parallel execution of tasks, leveraging the full power of multicore systems. It also allows developers to parallelize builds across different projects.
- Incremental Test Execution:
- Gradle can execute only the tests affected by code changes, reducing the time needed for testing during development.
- Gradle Wrapper:
- The Gradle Wrapper is a script that allows projects to be built with a specific version of Gradle, ensuring consistent builds across different environments without requiring a globally installed Gradle.
- Integration with Continuous Integration (CI) Systems:
- Gradle integrates seamlessly with popular CI systems like Jenkins, TeamCity, and Travis CI, enabling automated builds and tests in CI pipelines.
What is the workflow of Gradle?
Workflow of Gradle:
- Project Initialization:
- Create a new Gradle project or initialize an existing project with a
build.gradlefile.
- Create a new Gradle project or initialize an existing project with a
- Define Dependencies:
- Specify project dependencies, including external libraries, plugins, and other modules within a multi-project build.
- Configure Tasks:
- Configure build tasks by defining the necessary settings, options, and dependencies for each task. This includes tasks for compiling, testing, packaging, and more.
- Run Gradle Tasks:
- Execute Gradle tasks using the command line or integrated development environment (IDE). Common tasks include
gradle build,gradle test, andgradle run.
- Execute Gradle tasks using the command line or integrated development environment (IDE). Common tasks include
- Dependency Resolution:
- Gradle resolves project dependencies and downloads required libraries from specified repositories.
- Compile Source Code:
- Compile source code using the specified compiler settings and dependencies.
- Run Tests:
- Execute unit tests or integration tests to verify the correctness of the code.
- Package Artifacts:
- Package the application or library into distributable artifacts, such as JAR or WAR files.
- Generate Documentation:
- Generate documentation, Javadoc, or other artifacts required for documentation purposes.
- Build Cache (Optional):
- Utilize the build cache to cache task outputs for faster incremental builds.
- Custom Tasks (Optional):
- Execute custom tasks defined in the build script or plugins. These tasks can be specific to the project’s requirements.
- Continuous Integration (CI) Integration:
- Integrate Gradle with CI systems to automate builds, tests, and deployments in a continuous integration workflow.
- Version Control:
- Commit the
build.gradlefile,gradlew, and other necessary files to version control systems to maintain consistency across development environments.
- Commit the
- Collaboration and Deployment:
- Collaborate with team members using the same Gradle build configuration. Deploy artifacts to repositories or distribution channels as needed.
- Gradle Wrapper (Optional):
- Consider using the Gradle Wrapper for projects to ensure that the build is executed with a specific Gradle version.
The Gradle workflow is adaptable to various project types, and the flexibility of the build system allows developers to customize the process according to specific project requirements. Gradle’s incremental builds and support for dependency management contribute to efficient and maintainable build processes.
How Gradle Works & Architecture?
Gradle is a powerful build automation tool commonly used for Java and Android projects. It helps automate repetitive tasks like compiling code, running tests, building JARs, and deploying applications. Gradle excels with its flexible build scripts, multi-project support, and excellent plugin ecosystem.
Core principles:
- Object-oriented: Build logic is defined in Groovy-based scripts using classes and methods.
- Task-based: Projects are composed of tasks like “compileJava” or “runTests” with dependencies between them.
- Declarative: You define what needs to be done, not how it’s done, leaving implementation details to Gradle.
- Convention-based: Gradle follows conventions for file structure and task names, simplifying build scripts.
- Extensible: Plugins provide additional functionality, like integration with external tools or building different types of projects.
Workflow:
- Define build script: A
build.gradlefile defines tasks, dependencies, and project configuration. - Run tasks: Use the command line (
gradle <taskName>) to execute specific tasks. - Execute plugins: Plugins handle specific tasks like publishing artifacts or running tests.
- Daemon: A Gradle daemon keeps running in the background to speed up subsequent builds.
Architecture:
- Project: The basic unit of build, containing source code, resources, and the
build.gradlefile. - Tasks: Units of work within a project, like compiling code, running tests, or assembling JARs.
- Dependencies: Relationships between tasks and external libraries required for building the project.
- Plugins: Extend Gradle’s functionality with features like code coverage or Android app building.
- Build script DSL: Domain-specific language within
build.gradlefor defining projects and tasks.
Benefits:
- Faster builds: Gradle caches tasks and dependencies, resulting in faster incremental builds.
- Multi-project management: Easily manage complex projects with multiple subprojects and dependencies.
- Flexibility: Adaptable to different project types and needs through plugins and scripting.
- Reproducible builds: Build results are consistent regardless of environment or machine.
- Large community and resources: Extensive documentation, tutorials, and plugins available.
Use cases:
- Java and Android project building: Compile, test, and package Java and Android applications.
- Multi-module projects: Manage complex projects with dependencies between modules.
- Continuous integration and deployment (CI/CD): Automate build and deployment pipelines.
- Custom build tasks: Define custom tasks for specific needs using the build script DSL.
Important Tips:
- Gradle has a learning curve, but its flexibility and power make it valuable for large and complex projects.
- Don’t hesitate to ask for help from the extensive community resources available.
- Embrace experimentation and explore the vast capabilities of Gradle to streamline your build processes.
How to Install and Configure Gradle?
Here’s how to install and configure Gradle:
1. Download the Installer:
- Visit the official Gradle website.
- Choose the appropriate version for your operating system and download the ZIP file.
2. Extract the Distribution:
- Unzip the downloaded file to a desired location on your system. This will create a Gradle distribution directory.
3. Set Environment Variables:
- Windows:
- Add a new system variable named “GRADLE_HOME” and set its value to the path of your Gradle distribution directory.
- Edit the “Path” system variable and append
%GRADLE_HOME%\binto it.
- macOS/Linux:
- Open a terminal and edit your shell profile (e.g.,
.bash_profile,.zshrc). - Add the following line, replacing
/path/to/gradlewith the actual path:export PATH=$PATH:/path/to/gradle/bin
- Open a terminal and edit your shell profile (e.g.,
4. Verify Installation:
- Open a terminal or command prompt and type
gradle -v. If installed correctly, you’ll see the Gradle version information.
Additional Configuration (optional):
- Project-specific settings: Configure Gradle for specific projects using a
gradle.propertiesfile within the project directory. - Global settings: Adjust global Gradle behavior by editing
GRADLE_USER_HOME/gradle.properties(usually in~/.gradleon Unix-like systems). - Proxy settings: Configure proxy settings if needed for internet access.
- Memory allocation: Adjust memory allocation for Gradle processes using environment variables or command-line options.
Key Points:
- Multiple installations: Manage different Gradle versions side-by-side using tools like
gradlew(Gradle Wrapper). - Updating Gradle: Download and extract a newer version to update.
I’m ready to assist with any specific configuration questions or tasks you have within Gradle!
Fundamental Tutorials of Gradle: Getting started Step by Step

I’m thrilled you’re ready to dive into Gradle! Let’s start with a classic beginner project: Building a “Hello World” application! This will introduce you to essential concepts like setting up a project, writing build scripts, and running tasks.
Step 1: Generate the Project Directory and File:
- Open a terminal or command prompt.
- Create a new directory for your project (e.g.,
gradle-hello-world). - Inside the directory, create a file named
build.gradle.
Step 2: Write the Build Script:
- Paste the following code into
build.gradle:
Groovy
task helloWorld {
  doLast {
    println "Hello, World!"
  }
}
Code language: JavaScript (javascript)
This script defines a task named helloWorld that prints “Hello, World!” to the console when executed.
Step 3: Run the Task:
- In the terminal, navigate to your project directory (
gradle-hello-world). - Run the
gradle helloWorldcommand.
Step 4: See the Result:
- If everything is configured correctly, you should see “Hello, World!” printed in the terminal.
Congratulations! You’ve built your first Gradle project and executed a task!
Here’s what you learned:
- You created a project directory and a
build.gradlefile. - You wrote a simple build script that defines a task.
- You ran the task using the
gradlecommand with the task name.
This is just the beginning! To further explore Gradle, consider these next steps:
- Modify the task: Change the printed message or add code to perform other actions.
- Learn about dependencies: Include external libraries like JUnit and run tests.
- Build JAR files: Package your code into a distributable format.
- Explore plugins: Enhance Gradle’s functionality with plugins for specific tasks.
Don’t hesitate to ask if you have any questions or need help with specific aspects of Gradle. Remember, practice and experimentation are key to mastering this powerful build tool!

Find Trusted Cardiac Hospitals
Compare heart hospitals by city and services — all in one place.
Explore Hospitals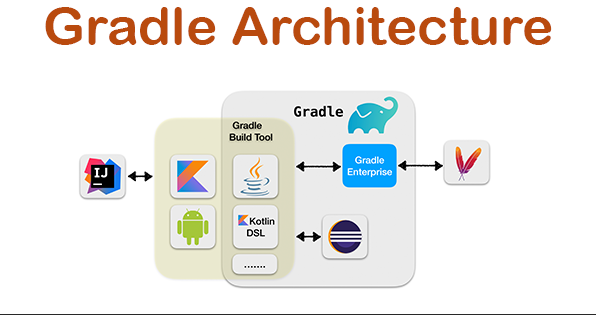


Gradle is powerful for build automation, but long-term maintainability depends on dependency management, build optimization, and avoiding overly complex custom scripts.