
What is MapR?
Have you ever heard of MapR? It’s a data platform that is designed to help organizations manage their big data needs. In this article, we’ll explore the top 10 use cases of MapR, its features, and how to install it. But first, let’s dive into what MapR is all about.
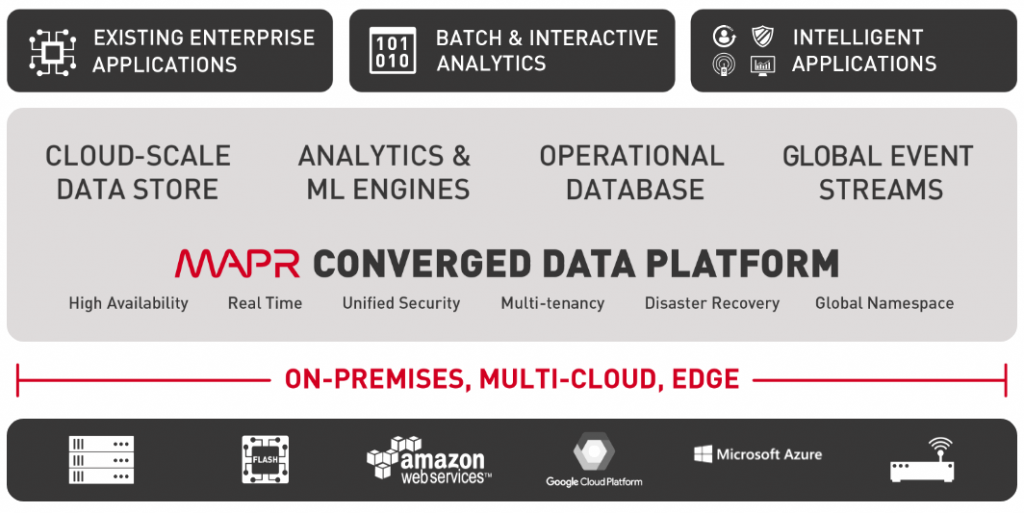
MapR is a platform for managing big data that offers a wide range of features and capabilities. It is designed to help organizations store, process, and analyze their data more efficiently and effectively. MapR has been used by many organizations across various industries, and it has become a popular choice for many businesses that have a lot of data to manage.
Top 10 use cases of MapR
There are many use cases for MapR, but here are the top 10:
- Real-time analytics: With MapR, organizations can perform real-time analytics on their data, allowing them to make informed decisions quickly.
- Internet of Things (IoT): MapR is ideal for managing data from IoT devices as it can handle massive amounts of data in real-time.
- Machine learning: MapR’s machine learning capabilities allow organizations to automate tasks and predict outcomes more accurately.
- Fraud detection: MapR can be used to detect fraud in real-time, helping organizations prevent financial losses.
- Customer analytics: MapR can help organizations analyze customer data to gain insights into their behavior and preferences.
- Healthcare: MapR can be used in the healthcare industry to manage and analyze patient data more effectively.
- Finance: MapR can help financial institutions manage and analyze large amounts of financial data quickly and accurately.
- Cybersecurity: MapR can be used to detect and prevent cyber attacks, ensuring the security of an organization’s data.
- Retail: MapR can help retailers analyze customer data to improve their marketing and sales strategies.
- Media and entertainment: MapR can help media and entertainment companies manage and analyze large amounts of data related to their content and audience.
What are the features of MapR?
MapR has a wide range of features that make it a popular choice for managing big data. Here are some of its key features:
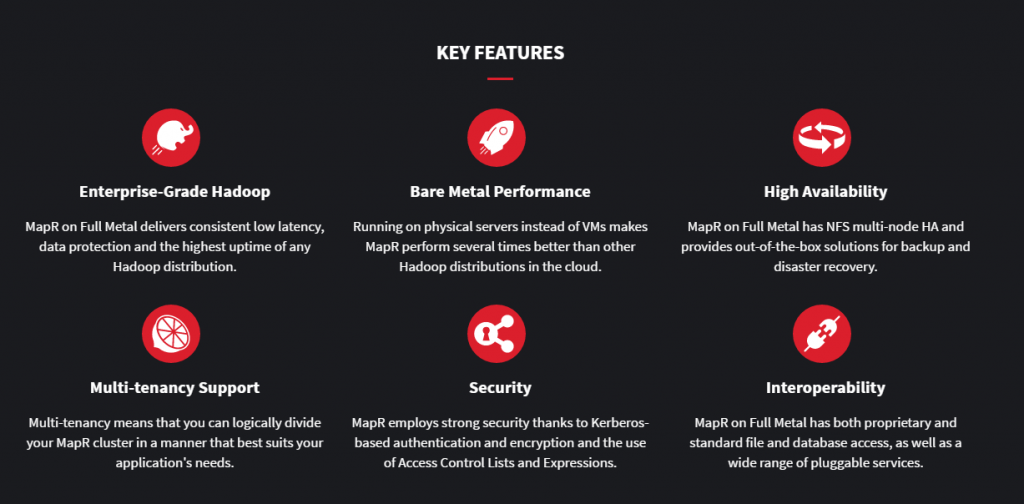
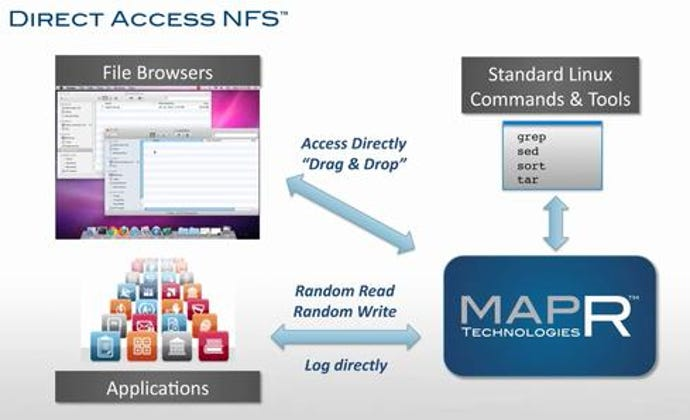
- Distributed file system: MapR’s distributed file system allows for faster and more efficient data processing.
- Real-time data processing: MapR can process data in real-time, allowing organizations to make informed decisions quickly.
- Multi-tenancy: MapR supports multi-tenancy, allowing organizations to share resources while maintaining data privacy and security.
- Data protection: MapR has built-in data protection features that ensure the security and integrity of an organization’s data.
- Scalability: MapR can scale to meet the needs of organizations of all sizes, from small businesses to large enterprises.
- Analytics: MapR has built-in analytics capabilities that allow organizations to gain insights from their data more easily.
How MapR Worked and Architecture?
MapR’s architecture was based on the Hadoop Distributed File System (HDFS) and included the following components:
- MapR-FS: The distributed file system that provided scalable and reliable storage.
- Data Nodes: Servers that hosted data and performed data storage and processing.
- Name Nodes: Nodes responsible for managing the file system namespace and metadata.
- ZooKeeper: A distributed coordination service used for cluster management.
- MapR Streams: A publish-subscribe messaging system for real-time event processing.
- MapR-DB: A NoSQL database for real-time operational applications.
How to Install MapR?
Installing MapR is a straightforward process. Here are the steps:
- Download the MapR installer from the MapR website.
- Run the installer and select the components that you want to install.
- Follow the on-screen prompts to configure the installation.
- Once the installation is complete, you can start using MapR to manage your data.
In conclusion, MapR is a powerful platform for managing big data that offers many features and capabilities. Its real-time analytics, machine learning, and cybersecurity capabilities make it a popular choice for organizations across various industries. With the steps provided, installing MapR is an easy process.
Basic Tutorials of MapR: Getting Started
Are you looking to learn about MapR? Look no further! we will guide you through basic tutorials of MapR step by step. Don’t worry if you have no prior knowledge of MapR; we will explain everything in detail.
Installing MapR
Before we dive into the tutorials, let’s first talk about how to install MapR. Installing MapR is easy. You can download the installer from the MapR website and follow the instructions to install it on your machine. Once the installation is complete, you will be ready to start using MapR.
Tutorial 1: Creating a MapR Cluster
The first tutorial is about creating a MapR cluster. A cluster is a group of machines that work together to store and process data. To create a MapR cluster, follow these steps:
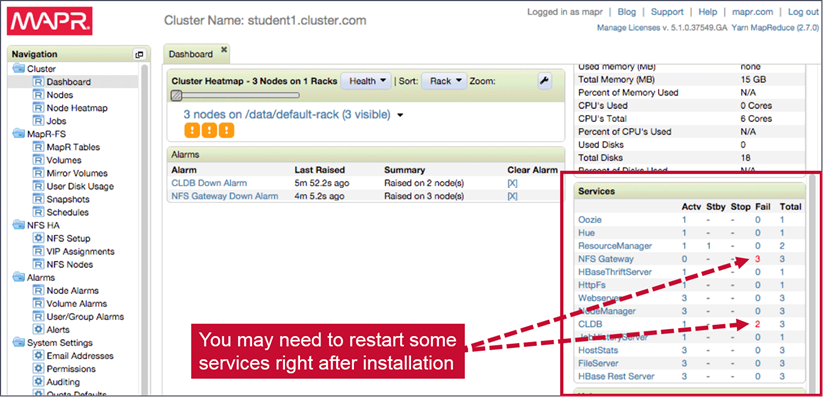
- Open the MapR Control System (MCS).
- Click on the Clusters tab.
- Click on the Create Cluster button.
- Follow the instructions to create a new cluster.
Once the cluster is created, you can start using it to store and process data.
Tutorial 2: Adding Nodes to a MapR Cluster
In this tutorial, we will show you how to add nodes to a MapR cluster. Adding nodes to a cluster is important because it allows you to increase the amount of data that can be stored and processed. To add nodes to a MapR cluster, follow these steps:
- Open the MCS.
- Click on the Nodes tab.
- Click on the Add Node button.
- Follow the instructions to add a new node to the cluster.
Once the node is added, it will start working with the other nodes in the cluster to store and process data.
Tutorial 3: Creating a MapR Volume
A volume is a logical storage unit in MapR. In this tutorial, we will show you how to create a MapR volume. To create a volume, follow these steps:
- Open the MCS.
- Click on the Volumes tab.
- Click on the Create Volume button.
- Follow the instructions to create a new volume.
Once the volume is created, you can start storing data in it.
Tutorial 4: Adding Data to a MapR Volume
In this tutorial, we will show you how to add data to a MapR volume. To add data to a volume, follow these steps:
- Open the MCS.
- Click on the Volumes tab.
- Click on the volume where you want to add data.
- Click on the Add Data button.
- Follow the instructions to add data to the volume.
Once the data is added, it will be stored in the volume and can be processed as needed.
Tutorial 5: Processing Data in MapR
In this tutorial, we will show you how to process data in MapR. MapR provides several tools for processing data, including Hadoop, Spark, and Drill. To process data in MapR, follow these steps:
- Choose the tool you want to use for processing (e.g., Hadoop).
- Write a program to process the data using the chosen tool.
- Run the program on the MapR cluster.
Once the program is run, it will process the data and provide the results.
Conclusion
In this article, we have covered the basic tutorials of MapR step by step. By following these tutorials, you can learn how to create a MapR cluster, add nodes to the cluster, create a volume, add data to the volume, and process data in MapR. With MapR, you can manage your data efficiently and gain insights from it. So, what are you waiting for? Start using MapR today!

👤 About the Author
Ashwani is passionate about DevOps, DevSecOps, SRE, MLOps, and AiOps, with a strong drive to simplify and scale modern IT operations. Through continuous learning and sharing, Ashwani helps organizations and engineers adopt best practices for automation, security, reliability, and AI-driven operations.
🌐 Connect & Follow:
- Website: WizBrand.com
- Facebook: facebook.com/DevOpsSchool
- X (Twitter): x.com/DevOpsSchools
- LinkedIn: linkedin.com/company/devopsschool
- YouTube: youtube.com/@TheDevOpsSchool
- Instagram: instagram.com/devopsschool
- Quora: devopsschool.quora.com
- Email– contact@devopsschool.com
Find Trusted Cardiac Hospitals
Compare heart hospitals by city and services — all in one place.
Explore Hospitals