What is Microsoft Azure Notebooks?
Microsoft Azure Notebooks is a cloud-based service that provides a platform for creating and sharing Jupyter notebooks. It’s part of the Microsoft Azure ecosystem and is designed to simplify the process of creating, running, and sharing interactive code, data analysis, and visualizations using Jupyter notebooks.
Top 10 use cases of Microsoft Azure Notebooks:
Here are the top 10 use cases of Microsoft Azure Notebooks:
- Data Analysis: Azure Notebooks allows users to analyze and explore data using code and visualizations in a collaborative and interactive environment.
- Machine Learning: Data scientists and researchers can use Azure Notebooks to prototype and experiment with machine learning models, from data preprocessing to model training and evaluation.
- Education: Azure Notebooks is useful for teaching programming, data science, and other technical subjects, providing an interactive platform for students to learn and practice coding.
- Data Visualization: Users can create and share interactive visualizations to represent data trends, patterns, and insights.
- Research: Azure Notebooks provides an environment for conducting experiments, simulations, and data analysis in various scientific and research fields.
- Documentation and Reporting: The platform enables users to create documentation with code snippets, explanations, and visualizations, making it easier to document research and findings.
- Collaboration: Teams can collaborate on notebooks, enabling real-time collaboration, code sharing, and discussions within the same environment.
- Dashboard Prototyping: Azure Notebooks can be used to create interactive dashboards and reports, allowing users to manipulate visualizations and parameters in real-time.
- Demonstrations and Presentations: Azure Notebooks can be used to create live code demonstrations and interactive presentations for workshops, conferences, and meetings.
- Experimentation: Developers and data scientists can experiment with new libraries, algorithms, and technologies without installing them locally, making it a sandbox environment for exploration.
- Web Scraping and API Interaction: Azure Notebooks can be used to write code for web scraping, data collection, and API interactions, aiding in data acquisition.
- Automated Workflows: Azure Notebooks can be integrated with other Azure services to create automated data processing workflows using code and notebooks.
Microsoft Azure Notebooks provides an accessible platform for users to create and run Jupyter notebooks in the cloud, without the need for local installations. It’s particularly suitable for projects that involve coding, data analysis, collaboration, and sharing of insights, making it a versatile tool for data professionals, researchers, educators, and developers.
What are the feature of Microsoft Azure Notebooks?
- Cloud-based Platform: Azure Notebooks is a cloud-based service that allows you to create, run, and share Jupyter notebooks without the need for local installations.
- Integrated Jupyter Environment: It offers a familiar Jupyter Notebook interface that supports multiple programming languages, making it easy to create and execute code, visualizations, and documentation.
- Library Integration: Azure Notebooks supports a wide range of libraries and packages, allowing you to use popular data science, machine learning, and visualization tools.
- Collaboration: Users can collaborate on notebooks in real-time, making it suitable for team projects, discussions, and code sharing.
- Integration with Azure Services: Azure Notebooks can be integrated with other Microsoft Azure services, enabling the creation of end-to-end data workflows and analyses.
- Data Visualization: You can create interactive visualizations, graphs, charts, and plots directly within notebooks to represent data insights.
- Educational Use: Azure Notebooks is often used for teaching and learning purposes, providing an interactive environment for coding exercises and demonstrations.
- Integrated Libraries: The platform comes with integrated libraries like NumPy, pandas, Matplotlib, scikit-learn, and more, making it convenient for data analysis and machine learning tasks.
- Version Control: Notebooks can be saved in version control systems like Git, allowing you to track changes and collaborate effectively.
- Custom Environment: Users can create custom environments with specific libraries and dependencies to match their project requirements.
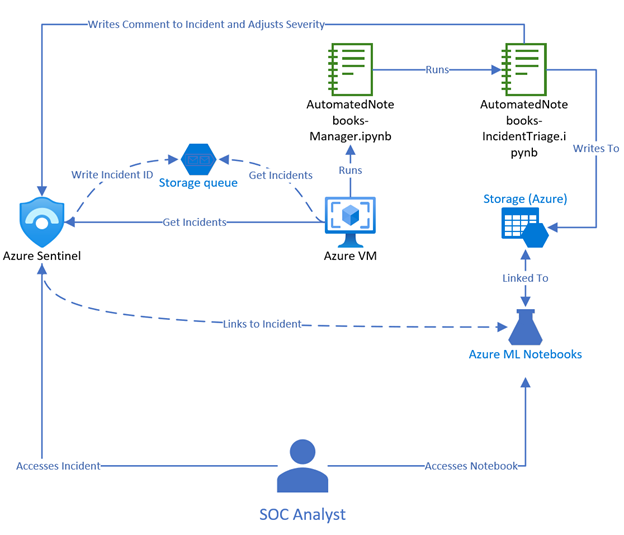
How Microsoft Azure Notebooks Works and Architecture?
1. User Interface:
Azure Notebooks provides a web-based user interface where users can create, edit, and run Jupyter notebooks using their web browsers.
2. Notebook Documents:
A notebook in Azure Notebooks is a document containing code, text, and visualizations organized into cells. Cells can be of two main types: code cells and markdown cells.
3. Kernel Execution:
When you run a code cell, the associated kernel executes the code and produces output, which can include text, visualizations, and error messages.
4. Collaborative Environment:
Multiple users can collaborate on the same notebook simultaneously, making it possible to work on code, share insights, and communicate within the same environment.
5. Integrated Libraries:
Azure Notebooks supports a variety of libraries and packages, allowing users to leverage popular data science tools and frameworks for analysis and modeling.
6. Azure Integration:
Azure Notebooks can be integrated with other Microsoft Azure services, such as Azure Machine Learning and Azure Data Lake, to create comprehensive data workflows.
7. Cloud-based Execution:
Code execution in Azure Notebooks is performed in the cloud, and users don’t need to set up local environments. The platform provides computational resources for running code.
8. Data Storage:
Notebooks and associated data can be stored within Azure Notebooks’ cloud infrastructure, making it accessible from anywhere with an internet connection.
9. Collaboration and Sharing:
Users can share notebooks by generating links, making it easy to collaborate with colleagues or share insights with a wider audience.
10. Client-Server Architecture:
Azure Notebooks follows a client-server architecture. The Azure Notebooks server manages notebook creation, execution, and communication with kernels. Users interact with the server through a web browser.
Overall, Azure Notebooks provides a user-friendly interface for creating, running, and sharing Jupyter notebooks in the cloud. Its architecture allows for interactive coding, documentation, and collaboration while leveraging Azure’s infrastructure for efficient execution and data storage.
How to Install Microsoft Azure Notebooks?
To install Microsoft Azure Notebooks, you need to have a Microsoft Azure subscription. Once you have a subscription, you can follow these steps to install Azure Notebooks:
- Go to the Azure Notebooks website: https://notebooks.azure.com/.
- Click the Sign in button in the top right corner.
- Sign in with your Microsoft Azure account.
- Once you are signed in, you will see a list of your Azure Notebooks.
- To create a new Azure Notebook, click the Create notebook button.
- In the Create notebook dialog box, select the language and kernel you want to use.
- Click the Create button.
Your Azure Notebook will be created and opened in a new tab in your web browser. You can start writing code and running experiments in your Azure Notebook.
Here are some additional things to keep in mind when installing Azure Notebooks:
- Azure Notebooks is a cloud-based service, so you need to have an internet connection to use it.
- Azure Notebooks supports a variety of programming languages, including Python, R, and Julia.
- Azure Notebooks also provides access to a variety of data science tools and libraries.
- Azure Notebooks is a free service, but you can also purchase a premium subscription that includes additional features.
Basic Tutorials of Microsoft Azure Notebooks: Getting Started
The following steps are the basic tutorials of Microsoft Azure Notebooks:
- Create a new Azure Notebook
To create a new Azure Notebook, follow these steps:
 1. Go to the Azure Notebooks website: https://notebooks.azure.com/.
 2. Click the **Create notebook** button.
 3. In the **Create notebook** dialog box, select the language and kernel you want
    to use.
 4. Click the **Create** button.
Code language: PHP (php)- Write code in an Azure Notebook
Azure Notebooks are made up of cells. Each cell can contain either text or code. To write code in a cell, click on the cell and start typing. The cell will be in edit mode. Once you are finished typing, press Shift+Enter to run the code.
- Add text to an Azure Notebook
To add text to an Azure Notebook, click on a cell and start typing. The cell will be in edit mode. You may design your text by using Markdown syntax. For example, to create a heading, you would type:
# This is a heading
Code language: PHP (php)
To add an image, you would type:

Code language: CSS (css)- Run an Azure Notebook
To run an Azure Notebook, click on the cell that contains the code you want to run and press Shift+Enter. The code will be executed and the output will be displayed in the cell below.
- Save an Azure Notebook
To save an Azure Notebook, click on the File menu and select Save. The notebook will be saved in the current directory.
- Share an Azure Notebook
To share an Azure Notebook, you can export it as a PDF or HTML file. You can also publish it to a web server.
- Connect to Azure resources
Azure Notebooks can be used to connect to Azure resources, such as Azure Storage, Azure SQL Database, and Azure Machine Learning. To connect to an Azure resource, you need to create a connection string. You can find the connection string for your Azure resource in the Azure portal.
- Use Azure Notebooks with other tools
Azure Notebooks can be used with other tools, such as Visual Studio Code and JupyterLab. You can use these tools to edit and run Azure Notebooks.
Here are some additional tips for using Azure Notebooks:
- Use the keyboard shortcuts to navigate around the notebook and run code.
- Format your text using Markdown syntax.
- Add images and other media to your notebooks.
- Organize your notebooks into folders.
- Use version control to track changes to your notebooks.

👤 About the Author
Ashwani is passionate about DevOps, DevSecOps, SRE, MLOps, and AiOps, with a strong drive to simplify and scale modern IT operations. Through continuous learning and sharing, Ashwani helps organizations and engineers adopt best practices for automation, security, reliability, and AI-driven operations.
🌐 Connect & Follow:
- Website: WizBrand.com
- Facebook: facebook.com/DevOpsSchool
- X (Twitter): x.com/DevOpsSchools
- LinkedIn: linkedin.com/company/devopsschool
- YouTube: youtube.com/@TheDevOpsSchool
- Instagram: instagram.com/devopsschool
- Quora: devopsschool.quora.com
- Email– contact@devopsschool.com
Find Trusted Cardiac Hospitals
Compare heart hospitals by city and services — all in one place.
Explore Hospitals