What is Nessus?
Nessus is a widely used vulnerability assessment and vulnerability management tool developed by Tenable Network Security. It is designed to help organizations identify and remediate security vulnerabilities within their networks, systems, and applications. Nessus performs automated scans and provides detailed reports, making it an essential tool for maintaining a strong cybersecurity posture.
Top 10 use cases of Nessus?
Here are the top 10 use cases of Nessus:
- Vulnerability Scanning: Nessus scans networks and systems to identify vulnerabilities, including known software vulnerabilities, configuration issues, and potential security weaknesses.
- Patch Management: It helps organizations prioritize and track the application of security patches by providing a comprehensive list of vulnerabilities and their severity levels.
- Compliance Auditing: Nessus can be used to assess compliance with various security standards and regulations, such as PCI DSS, HIPAA, and CIS benchmarks.
- Network Inventory: Nessus provides a detailed inventory of assets on a network, helping organizations keep track of their systems and devices.
- Web Application Scanning: It can scan web applications for vulnerabilities, including common web application security issues like SQL injection, cross-site scripting (XSS), and CSRF.
- Configuration Auditing: Nessus checks system configurations against security best practices and standards, helping organizations ensure that systems are properly configured for security.
- Malware Detection: It can identify signs of malware infections or potentially malicious activity on scanned systems.
- Threat Detection: Nessus can identify systems that may be vulnerable to emerging threats and vulnerabilities, enabling proactive security measures.
- Network Monitoring: It offers continuous monitoring capabilities to detect changes in the security posture of your network and systems.
- Customizable Reporting: Nessus generates detailed reports that can be customized to provide the necessary information for various stakeholders, including IT administrators, security teams, and executives.
Nessus is a versatile tool that can be used in a wide range of scenarios to improve an organization’s security posture. It is particularly valuable for organizations looking to proactively identify and address vulnerabilities and compliance issues, which are crucial aspects of a robust cybersecurity strategy.
What are the feature of Nessus?
Nessus is a robust vulnerability assessment tool with a wide range of features designed to help organizations identify and manage security vulnerabilities effectively. Here are some key features of Nessus:
- Vulnerability Scanning: Nessus can scan networks, systems, and applications to identify vulnerabilities, misconfigurations, and security weaknesses.
- Plugin-Based Architecture: Nessus uses a plugin-based system to perform various types of scans. There are thousands of pre-built plugins that cover a wide array of vulnerabilities and configurations.
- Compliance Checking: It offers compliance scanning against various industry standards and regulatory frameworks, helping organizations ensure they meet specific security and compliance requirements.
- Web Application Scanning: Nessus can scan web applications for common vulnerabilities like SQL injection, cross-site scripting (XSS), and insecure authentication.
- Customizable Scans: Users can configure scans to fit their needs, including specifying target hosts, scan policies, and scan schedules.
- Agent-Based Scanning: Nessus offers agent-based scanning, which allows you to scan hosts that may not be reachable from the central scanning server. Agents collect data locally and report back to the Nessus server.
- Credentials-Based Scanning: It supports scanning with credentials, which allows for more detailed and accurate assessments of hosts, including software inventory and configuration checks.
- Prioritization of Vulnerabilities: Nessus assigns severity levels to identified vulnerabilities, helping organizations prioritize and focus on the most critical issues first.
- Integration: Nessus can integrate with other security tools and platforms, such as Security Information and Event Management (SIEM) systems, to provide a comprehensive security ecosystem.
- Detailed Reporting: It generates detailed reports that include vulnerability descriptions, severity scores, and remediation recommendations. These reports can be customized for different stakeholders.
How Nessus works and Architecture?
Nessus works by conducting scans on target systems and then analyzing the results to identify vulnerabilities and potential security issues. Here’s a simplified overview of how Nessus works:
- Scan Configuration: Users configure Nessus scans by defining target hosts, specifying scan policies (e.g., which types of vulnerabilities to check), and setting other scan parameters.
- Scanning: Nessus conducts scans on the target systems based on the configured policies. It sends various probes and checks to detect vulnerabilities, misconfigurations, and potential security risks.
- Vulnerability Detection: During the scan, Nessus identifies vulnerabilities by comparing its findings with a constantly updated database of vulnerability checks (plugins).
- Data Analysis: Nessus analyzes the scan results and assigns severity levels to each identified vulnerability, helping organizations prioritize remediation efforts.
- Reporting: Nessus generates detailed reports that include a list of vulnerabilities, their descriptions, severity ratings, and recommendations for mitigation.
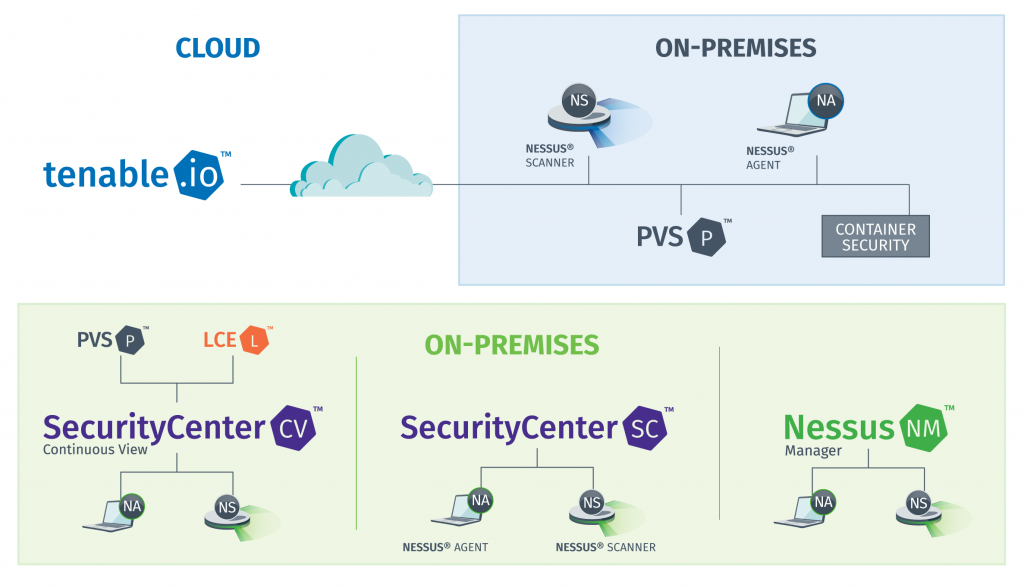
Nessus has a client-server architecture with the following components:
- Nessus Scanner: This is the scanning engine responsible for conducting scans on target systems. It communicates with the Nessus server to fetch scan configurations and report results.
- Nessus Server: The server manages scan configurations, schedules, and results. It stores the vulnerability database and provides the user interface for managing scans and viewing reports.
- Nessus Client: The client is a graphical user interface (GUI) or command-line interface (CLI) used to interact with the Nessus server. Users use the client to configure scans, view scan results, and generate reports.
- Nessus Agents: Agents are optional components that can be installed on target systems to collect data and conduct scans locally. They report back to the Nessus server.
The Nessus server and scanner can run on different machines, allowing for scalability and distributed scanning. Communication between these components is secured to protect sensitive scan data.
Nessus is a versatile tool that plays a crucial role in identifying and managing vulnerabilities in an organization’s infrastructure, contributing to improved cybersecurity.
How to Install Nessus?
To install Nessus, you will need to first download the Nessus installer for your operating system from the Tenable website. Once you have downloaded the installer, follow these steps to install Nessus:
On Linux:
- Open a terminal window.
- Navigate to the directory where you downloaded the Nessus installer.
- Run the following command to install Nessus:
sudo dpkg -i Nessus-<version number>-debian6_amd64.debCode language: HTML, XML (xml)On Windows:
- Double-click on the Nessus installer to start the installation process.
- Apply the on-screen instructions to accomplish the installation.
Once Nessus is installed, you will need to start the Nessus service:
On Linux:
sudo service nessusd startOn Windows:
- Open the Windows Services console.
- Locate the Nessus service.
- Right-click on the Nessus service and select “Start”.
Once the Nessus service is started, you can access the Nessus web interface at https://localhost:8834.
If you are installing Nessus on a remote server, you will need to replace localhost with the IP address or hostname of the server.
To complete the Nessus installation, you will need to create a Nessus account and register your Nessus instance.
To create a Nessus account, click on the “Create Account” link on the Nessus login page.
To register your Nessus instance, click on the “Register” link on the Nessus login page.
Once you have registered your Nessus instance, you will be able to start using Nessus to scan your networks for vulnerabilities.
Here are some additional tips for installing Nessus:
- Make sure that you have enough disk space to install Nessus. Nessus requires at least 10 GB of free disk space.
- Make sure that you have the necessary permissions to install Nessus. Nessus needs to be installed as a root user on Linux and as an administrator on Windows.
- If you are installing Nessus on a remote server, you will need to open port 8834 on the server’s firewall.
- If you are having trouble installing Nessus, please consult the Tenable documentation for assistance.
Basic Tutorials of Nessus: Getting Started

The following is the step-by-step basic tutorial of Nessus:
1. Launch Nessus.
- On Linux: Open a terminal and navigate to the directory where Nessus is installed. Then, run the following command:
sudo service nessusd start
- On Windows: Open the Windows Services console and start the Nessus service.
2. Log in to the Nessus web interface.
- Open a web browser and navigate to https://localhost:8834.
- Enter your Nessus username and password.
3. Create a new scan.
- Click on the Scans tab.
- Click on the New Scan button.
4. Select a scan target.
- In the Scan Targets section, select the targets that you want to scan. You can select individual targets, target groups, or upload a list of targets.
5. Configure the scan settings.
- In the Scan Settings section, you can configure the scan settings, such as the scan type, the scan plugins, and the scan credentials.
- For a basic scan, I recommend using the Basic Network Scan scan type and the Default scan profile.
6. Start the scan.
- Click on the Start Scan button to start the scan.
7. Review the scan results.
- Once the scan is complete, you can review the scan results by clicking on the Reports tab.
- The scan results will show you a list of all the vulnerabilities that were found on the scan targets.
8. Remediate the vulnerabilities.
- Once you have reviewed the scan results, you can start remediating the vulnerabilities.
- Nessus provides remediation guidance for each vulnerability.
Some additional tips for using Nessus:
- You can use Nessus to scan a variety of targets, including networks, hosts, and web applications.
- Nessus offers a variety of scan types, such as basic scans, compliance scans, and penetration tests.
- You can use Nessus plugins to scan for specific vulnerabilities.
- You can use Nessus credentials to scan targets that require authentication.
- Nessus generates a variety of reports, such as vulnerability reports, compliance reports, and executive reports.
If you are new to Nessus, I recommend starting with a basic scan of your network. This will give you a good overview of the vulnerabilities that are present on your network. You can then use the scan results to prioritize your remediation efforts.

👤 About the Author
Ashwani is passionate about DevOps, DevSecOps, SRE, MLOps, and AiOps, with a strong drive to simplify and scale modern IT operations. Through continuous learning and sharing, Ashwani helps organizations and engineers adopt best practices for automation, security, reliability, and AI-driven operations.
🌐 Connect & Follow:
- Website: WizBrand.com
- Facebook: facebook.com/DevOpsSchool
- X (Twitter): x.com/DevOpsSchools
- LinkedIn: linkedin.com/company/devopsschool
- YouTube: youtube.com/@TheDevOpsSchool
- Instagram: instagram.com/devopsschool
- Quora: devopsschool.quora.com
- Email– contact@devopsschool.com
Find Trusted Cardiac Hospitals
Compare heart hospitals by city and services — all in one place.
Explore Hospitals
This article provides a clear and practical overview of Nessus and its key use cases in vulnerability scanning! I especially liked how the guide explains real‑world applications and benefits — very helpful for anyone learning about cybersecurity tools.