What is Netskope?
What is Netskope?
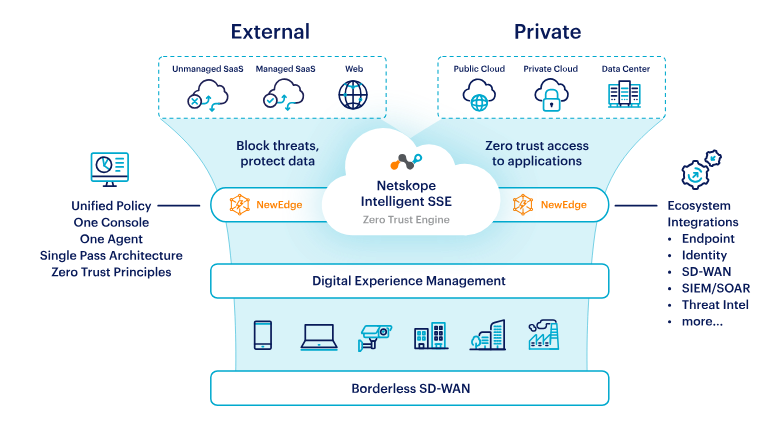
Netskope is a leading cloud security platform that helps organizations secure their web and cloud usage at the Service Edge. It functions as a unified platform for data and threat protection, along with secure private access. Here’s a breakdown of its key aspects:
- Provides real-time visibility and control over user activity, data movement, and threats across cloud services, websites, and private applications.
- Offers unified data and threat protection, safeguarding sensitive information in the cloud and preventing malware, ransomware, and other threats.
- Enables secure private access to corporate resources for remote users and devices, regardless of location or device type.
- Integrates with various security tools and cloud platforms for a comprehensive security posture.
Top 10 use cases of Netskope?
Top 10 Use Cases of Netskope:
- Reduce Cloud Sprawl and Shadow IT: Gain visibility into all cloud apps and services being used, minimizing unauthorized use and potential risks.
- Prevent Data Loss and Exfiltration: Enforce data security policies to control how sensitive information is accessed and shared across the cloud.
- Block Malware and Web Threats: Protect users from malicious websites, phishing attacks, and malware downloads before they cause harm.
- Secure Remote Access: Provide secure access to corporate applications and resources for remote users from any device or location.
- Simplify Compliance: Streamline compliance reporting and demonstrate adherence to various regulations like PCI-DSS, GDPR, and HIPAA.
- Accelerate Cloud adoption: Enable secure and efficient use of cloud services for improved productivity and business agility.
- Improve User Experience: Optimize app performance and minimize latency for a seamless user experience with cloud resources.
- Detect and Respond to Insider Threats: Monitor user activity and identify suspicious behavior to prevent data breaches and security incidents.
- Protect against Zero-Day Attacks: Leverage advanced threat intelligence and analytics to stay ahead of emerging threats and vulnerabilities.
- Reduce Security Costs: Consolidate multiple security tools into a single platform, simplifying management and optimizing resource allocation.
Benefits of using Netskope:
- Enhanced Security Posture: Reduce your risk of data breaches, malware infections, and other security threats.
- Improved Visibility and Control: Gain centralized visibility and control over all your cloud and web activity.
- Simplified Compliance: Streamline compliance efforts and demonstrate adherence to regulations.
- Increased User Productivity: Enable secure and efficient access to cloud resources for remote users.
- Reduced Security Costs: Consolidate multiple security tools and optimize resource allocation.
What are the feature of Netskope?
To best explain the features of Netskope, I need to understand what aspects of its functionality you’re most interested in. Would you like to know about:
1. Core functionalities:
- Cloud Access Security Broker (CASB): Discover how Netskope controls and protects user access to cloud services and applications.
- Data Loss Prevention (DLP): Learn how Netskope prevents sensitive data from leaking through unauthorized channels.
- Threat Protection: Explore how Netskope defends against malware, ransomware, phishing attacks, and other threats.
- Secure Private Access: Understand how Netskope provides secure access to corporate resources for remote users.
2. Advanced features:
- Zero Trust Network Access (ZTNA): Learn how Netskope enables secure access to applications without the need for traditional VPNs.
- Cloud Threat Intelligence: Explore how Netskope leverages real-time threat intelligence to stay ahead of emerging threats.
- Security Analytics and User Activity Monitoring: Understand how Netskope provides insights into user behavior and potential security risks.
- API Integration and Automation: Discover how Netskope integrates with other security tools and workflows for increased efficiency.
3. Specific capabilities:
- Web Traffic Filtering: Learn how Netskope filters web traffic to block malicious websites and inappropriate content.
- Sandboxing: Explore how Netskope isolates suspicious files and code to prevent malware execution.
- Data Encryption: Understand how Netskope encrypts data at rest and in transit to protect against unauthorized access.
- Mobile Security: Discover how Netskope extends security controls to mobile devices and endpoints.
4. Integration and extensibility:
- Integration with other security tools: Learn how Netskope integrates with SIEM, SOAR, and other security solutions for a unified security posture.
- Open APIs and scripting: Explore how Netskope’s open APIs and scripting capabilities enable custom integrations and automation of workflows.
- Cloud platform integrations: Understand how Netskope integrates seamlessly with leading cloud platforms like AWS, Microsoft Azure, and Google Cloud Platform.
By understanding your specific interests, I can tailor my explanation of Netskope’s features to be more relevant and informative, ensuring you get the most out of this powerful cloud security platform.
How Netskope works and Architecture?
To best explain the features of Netskope, I need to understand what aspects of its functionality you’re most interested in. Would you like to know about:
1. Core functionalities:
- Cloud Access Security Broker (CASB): Discover how Netskope controls and protects user access to cloud services and applications.
- Data Loss Prevention (DLP): Learn how Netskope prevents sensitive data from leaking through unauthorized channels.
- Threat Protection: Explore how Netskope defends against malware, ransomware, phishing attacks, and other threats.
- Secure Private Access: Understand how Netskope provides secure access to corporate resources for remote users.
2. Advanced features:
- Zero Trust Network Access (ZTNA): Learn how Netskope enables secure access to applications without the need for traditional VPNs.
- Cloud Threat Intelligence: Explore how Netskope leverages real-time threat intelligence to stay ahead of emerging threats.
- Security Analytics and User Activity Monitoring: Understand how Netskope provides insights into user behavior and potential security risks.
- API Integration and Automation: Discover how Netskope integrates with other security tools and workflows for increased efficiency.
3. Specific capabilities:
- Web Traffic Filtering: Learn how Netskope filters web traffic to block malicious websites and inappropriate content.
- Sandboxing: Explore how Netskope isolates suspicious files and code to prevent malware execution.
- Data Encryption: Understand how Netskope encrypts data at rest and in transit to protect against unauthorized access.
- Mobile Security: Discover how Netskope extends security controls to mobile devices and endpoints.
4. Integration and extensibility:
- Integration with other security tools: Learn how Netskope integrates with SIEM, SOAR, and other security solutions for a unified security posture.
- Open APIs and scripting: Explore how Netskope’s open APIs and scripting capabilities enable custom integrations and automation of workflows.
- Cloud platform integrations: Understand how Netskope integrates seamlessly with leading cloud platforms like AWS, Microsoft Azure, and Google Cloud Platform.
By understanding your specific interests, I can tailor my explanation of Netskope’s features to be more relevant and informative, ensuring you get the most out of this powerful cloud security platform.
How to Install Netskope it?
Installing Netskope depends on your chosen deployment method and existing infrastructure. To guide you efficiently, I need some additional information:
1. Choose your deployment method:
- Cloud-based: Most common method, leveraging Netskope cloud infrastructure for all processing and data storage.
- Hybrid deployment: A combination of cloud and on-premises components for specific needs like data residency or high-bandwidth connections.
- On-premises deployment: Entire solution installed and managed within your own data center (less common due to its complexity).
2. Determine your network configuration:
- DNS forwarding: Configure your DNS servers to direct relevant traffic to Netskope POPs.
- Network ACLs: Define firewall rules to allow traffic flow to and from Netskope servers.
- Authentication integration: Choose your preferred method for user authentication with Netskope (LDAP, SAML, etc.).
3. Follow the appropriate guide:
- Netskope provides detailed installation guides for each deployment scenario and configuration option.
- These guides offer step-by-step instructions for configuring your network, deploying agents/connectors, setting up policies, and connecting to the Netskope cloud.
Tip: Before installation, consult with Netskope Support or a qualified IT professional if you need assistance or have specific requirements.
Basic Tutorials of Netskope: Getting Started
Now, I’ve expressed in both getting started and exploring specific features, I’ve curated a two-part tutorial roadmap for you:
Part 1: Netskope Essentials – Getting Started:
1. Setting Up Basic Policies:
- Learn: Navigate the Netskope policy management interface and understand core policy components like conditions, actions, and exclusions.
- Step-by-Step:
- Go to Policies > Add Policy.
- Choose a Template: “Web Filtering – Block Malicious Sites” is a good starting point.
- Customize the Target Users/Groups and Target Applications/Websites.
- Review and Save the policy.
2. Adding Cloud Apps and Websites:
- Learn: Discover how to manually add cloud apps and websites not automatically detected by Netskope.
- Step-by-Step:
- Go to Settings > Global Configuration > Cloud Inventory.
- Click Add Manually.
- Enter the Cloud App Name, URL, and Category.
- Click Save.
3. Deploying Netskope Client (optional):
- Learn: Understand the benefits of the optional client for endpoint protection and advanced visibility.
- Step-by-Step:
- Download the client installer from the Netskope portal.
- Distribute the installer to target devices.
- Configure deployment settings (optional).
- Monitor client deployment status in the Netskope console.
4. Viewing Basic Reports:
- Learn: Access and interpret key reports like web traffic activity, user access logs, and identified threats.
- Step-by-Step:
- Go to Reports and choose a report category (e.g., Web Security).
- Select a specific report (e.g., Top Blocked Websites).
- Apply filters and customize the report view.
- Export data for further analysis.
Part 2: Deep Diving into Netskope Features:
1. Advanced Policy Creation:
- Learn: Build custom policies with complex rules and conditions for specific security needs.
- Step-by-Step:
- In Policies > Add Policy, choose “Custom Policy”.
- Use “Logical Operators” (AND/OR) to combine multiple conditions.
- Leverage advanced features like Data Loss Prevention rules and URL categorization.
- Test and refine your policy before deployment.
2. Data Loss Prevention Best Practices:
- Learn: Implement effective strategies to prevent sensitive data exfiltration through various channels.
- Step-by-Step:
- Identify sensitive data types in your organization.
- Configure DLP policies based on data types and detection patterns.
- Define actions like file encryption, blocking downloads, or user notifications.
- Monitor DLP alerts and investigate potential data leaks.
3. Threat Protection in Action:
- Learn: Understand how Netskope identifies and blocks malware, phishing attacks, and other threats.
- Step-by-Step:
- Review the Threat Protection dashboard for detected threats and incidents.
- Analyze details like attack type, affected users, and targeted websites.
- Take remediation actions like quarantining files, blocking domains, or isolating devices.
- Update your policies based on ongoing threat intelligence.
4. Secure Private Access Setup:
- Learn: Configure secure access to internal applications for remote users without traditional VPNs.
- Step-by-Step:
- Go to Settings > Secure Private Access.
- Define the internal applications and resources you want to expose.
- Configure user authentication and access control settings.
- Test and refine your Secure Private Access configuration.
These are just starting points, and each step can be further expanded with screenshots, additional explanations, and relevant resources. Remember, these tutorials are tailored to your basic needs. As you progress and your comfort level increases, we can delve deeper into advanced features and customize the tutorials to address your specific challenges and goals.

Find Trusted Cardiac Hospitals
Compare heart hospitals by city and services — all in one place.
Explore Hospitals
This article provides a clear and informative explanation of what Netskope is and why it matters for modern organizations managing cloud and network security. The use-case examples make it easy to understand how Netskope helps enterprises monitor cloud traffic, enforce data-security policies, and protect sensitive information across various SaaS and cloud environments. I appreciate how the post balances technical clarity with real-world relevance — making the case that adopting Netskope is not just a security upgrade but a smart business move for companies prioritizing compliance and data protection. For any IT or security-conscious organization exploring cloud-security tools, this article is a very useful read.
This article offers a clear and informative overview of Netskope — outlining not only what the platform is, but also real‑world use cases that highlight its relevance in today’s cloud‑centric environments. By explaining how Netskope helps with secure web gateways, data loss prevention, cloud access security brokerage, and visibility across cloud apps, the post helps readers understand why it’s essential for organizations aiming to enforce security without hampering productivity. The practical examples make it easier for IT and security teams to evaluate whether Netskope fits their needs, especially in hybrid‑cloud or remote‑work setups. Overall — a valuable resource for anyone interested in modern cloud security and governance.