What is NeuVector?
NeuVector is a container security platform designed to protect containerized applications and microservices in runtime. It offers a range of features and capabilities to ensure the security of containers and Kubernetes environments.
NeuVector is designed to address the evolving security challenges in containerized and Kubernetes environments, offering comprehensive security and compliance capabilities for modern cloud-native applications.
Top 10 use cases of NeuVector:
Here are the top 10 use cases for NeuVector:
- Runtime Container Security: NeuVector provides runtime security for containers, continuously monitoring and protecting running containers against threats and vulnerabilities.
- Container Image Scanning: It scans container images for vulnerabilities and compliance issues during the CI/CD pipeline, ensuring that only secure images are deployed.
- Vulnerability Management: NeuVector helps organizations manage vulnerabilities in containerized applications by identifying and prioritizing issues based on their severity.
- Compliance Assurance: Organizations can enforce compliance policies and maintain adherence to industry regulations by using NeuVector’s compliance checks and reporting.
- Kubernetes Security: NeuVector offers Kubernetes-specific security features, including network segmentation, policy enforcement, and threat detection for Kubernetes clusters.
- Threat Detection and Anomaly Detection: It detects suspicious activities and anomalies within containerized environments, helping organizations identify potential security threats.
- Incident Response: In the event of a security incident, NeuVector provides incident response capabilities, allowing organizations to investigate, contain, and remediate threats.
- Network Security: NeuVector enforces network segmentation policies to control communication between containers and microservices, reducing the risk of lateral movement by attackers.
- CI/CD Pipeline Integration: It integrates into CI/CD pipelines to automate security checks during image builds and deployments, ensuring security is part of the development process.
- Custom Security Policies: Organizations can define custom security policies tailored to their specific security and compliance requirements.
- Serverless Security: NeuVector extends its security capabilities to serverless functions, protecting event-driven serverless applications.
- Microservices Security: Organizations can secure individual microservices within their containerized applications, implementing fine-grained access controls and network policies.
- Container Forensics: NeuVector provides forensic analysis capabilities to investigate security incidents, identify root causes, and trace container activities.
- Alerting and Notifications: The platform offers real-time alerting and notifications for security incidents and policy violations, enabling timely responses.
- API Security: NeuVector helps protect container APIs from vulnerabilities and unauthorized access.
What are the feature of NeuVector?
NeuVector is a container security platform that provides a range of features and capabilities to secure containerized applications and microservices. Here are the key features of NeuVector, along with an overview of how it works and its architecture:
Key Features of NeuVector:
- Runtime Container Security: NeuVector offers runtime security for containers, continuously monitoring and protecting running containers against threats, vulnerabilities, and policy violations.
- Container Image Scanning: It scans container images for vulnerabilities, malware, and compliance issues during the CI/CD pipeline, ensuring that only secure images are deployed.
- Vulnerability Management: NeuVector helps organizations manage vulnerabilities by identifying and prioritizing issues based on their severity, allowing for effective remediation.
- Compliance Assurance: Organizations can enforce compliance policies and maintain adherence to industry regulations with NeuVector’s compliance checks and reporting.
- Kubernetes Security: NeuVector provides Kubernetes-specific security features, including network segmentation, policy enforcement, and threat detection for Kubernetes clusters.
- Threat Detection and Anomaly Detection: It detects suspicious activities and anomalies within containerized environments, helping organizations identify potential security threats.
- Incident Response: In the event of a security incident, NeuVector offers incident response capabilities, allowing organizations to investigate, contain, and remediate threats.
- Network Security: NeuVector enforces network segmentation policies to control communication between containers and microservices, reducing the risk of lateral movement by attackers.
- CI/CD Pipeline Integration: It integrates into CI/CD pipelines to automate security checks during image builds and deployments, ensuring security is an integral part of the development process.
- Custom Security Policies: Organizations can define custom security policies tailored to their specific security and compliance requirements.
How NeuVector works and Architecture?
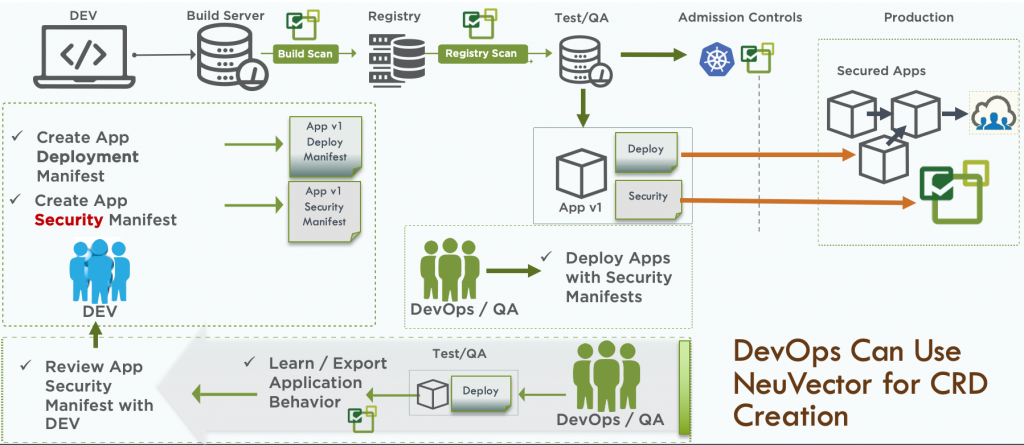
- Agent Deployment: NeuVector deploys lightweight agents on container hosts, where they collect data on container activities, system calls, and network traffic.
- Image Scanning: Container images are scanned for vulnerabilities, malware, and compliance issues during the CI/CD pipeline. NeuVector provides recommendations for remediation.
- Policy Enforcement: Organizations can define security and compliance policies, which are enforced during image scanning and at runtime. Policy violations trigger alerts and remediation actions.
- Runtime Protection: NeuVector continuously monitors running containers in real-time, detecting and responding to security threats, anomalies, and policy violations.
- Alerting and Notifications: The platform offers real-time alerting and notifications for security incidents and policy violations, enabling timely responses.
- Centralized Management: NeuVector provides a centralized management console where users can configure policies, view security findings, and perform compliance checks.
NeuVector’s architecture is designed to provide comprehensive container security capabilities:
- NeuVector Agents: These lightweight agents are deployed on container hosts to collect data on container activities, system calls, and network traffic.
- NeuVector Management Console: The management console provides a user interface for configuring security policies, viewing security findings, and managing compliance checks.
- NeuVector Controller: The controller is responsible for analyzing data collected by agents and enforcing security policies during runtime.
- Data Storage: NeuVector stores collected data in a scalable storage layer, making it accessible for historical analysis and reporting.
- Integration Points: NeuVector integrates with CI/CD pipelines, container orchestration platforms, container registries, and other security tools to provide seamless security and compliance across containerized environments.
NeuVector’s architecture is designed to provide end-to-end container security, from image scanning and build-time checks to runtime protection and incident response. It helps organizations ensure the security, compliance, and reliability of their containerized applications and microservices.
How to Install NeuVector?
There are two ways to install NeuVector: using Helm or using the NeuVector Operator.
Using Helm
To install NeuVector using Helm, you will need to have Helm installed on your system. Once Helm is installed, you can add the NeuVector Helm chart repository:
  helm repo add neuvector https://helm.neuvector.com/
  helm repo updateCode language: JavaScript (javascript)
Once the Helm chart repository has been added, you can install NeuVector using the following command:
helm install neuvector neuvector/neuvector --namespace neuvectorCode language: PHP (php)This will install NeuVector into the neuvector namespace. You can override any of the default Helm chart values by passing them to the helm install command. For example, to change the port that the NeuVector web UI is exposed on, you would pass the following value:
helm install neuvector neuvector/neuvector --namespace neuvector --values values.yamlThe values.yaml file would contain the following value:
  ui:
    service:
      port: 8080
Using the NeuVector Operator
To install NeuVector using the NeuVector Operator, you will need to have the OperatorHub installed on your Kubernetes cluster. Once the OperatorHub is installed, you can search for the NeuVector Operator and install it.
Once the NeuVector Operator is installed, you can create a NeuVector instance by creating a NeuVector Custom Resource Definition (CRD). The CRD will specify the NeuVector version that you want to install and the resources that you want NeuVector to monitor.
Example of a NeuVector CRD:
  apiVersion: neuvector.com/v1
  kind: NeuVector
  metadata:
    name: neuvector
  spec:
    version: "5.0.0"
    resources:
      - pods
      - deployments
      - servicesCode language: JavaScript (javascript)
Once you have created the NeuVector CRD, the NeuVector Operator will create the NeuVector deployment and start monitoring your resources.
Accessing the NeuVector Web UI
Once NeuVector is installed, you can access the web UI by port forwarding to the NeuVector UI service:
kubectl port-forward service/neuvector-ui 8080:8080Once you have port forwarded to the NeuVector UI service, you can open a web browser and navigate to http://localhost:8080. You will need to create an account and log in to access the web UI.
Starting to Protect Your Applications!
Once you have logged into the NeuVector web UI, you can start protecting your applications by creating policies and alerts. NeuVector provides a variety of policies that you can use to control traffic to your applications, detect vulnerabilities, and prevent attacks.
You can also create alerts to notify you of any suspicious activity that NeuVector detects.
Basic Tutorials of NeuVector: Getting Started
Let’s have a look at a basic tutorial of NeuVector:
1. Install NeuVector:
You can install NeuVector on-premises or in the cloud. NeuVector supports a variety of operating systems and cloud platforms.
To install NeuVector using the Helm chart, follow these steps:
- Add the NeuVector Helm repository:
  helm repo add neuvector https://charts.neuvector.com
Code language: JavaScript (javascript)- Update the Helm repository index:
helm repo update
- Install the NeuVector Helm chart:
  helm install neuvector neuvector/neuvector --namespace neuvector
Code language: PHP (php)
Once NeuVector is installed, you can access the NeuVector Console UI at the following URL:
  http://localhost:8080
Code language: JavaScript (javascript)
2. Create a scan policy:
A scan policy defines the types of scans that NeuVector will perform on your images and containers.
To create a scan policy, follow these steps:
- Click Policies in the left-hand menu.
- Click Create Policy.
- Give your policy a name and select the types of scans that you want to perform.
- Click Create.
3. Scan an image:
To scan an image, you can use the NeuVector CLI, the NeuVector Console UI, or the NeuVector API.
To scan an image using the NeuVector CLI:
  neuvector scan image <image-name>
Code language: HTML, XML (xml)
To scan an image using the NeuVector Console UI:
- Click Images in the left-hand menu.
- Click the name of the image that you want to scan.
- Click Scan.
To scan an image using the NeuVector API:
Refer to the NeuVector API documentation for instructions on how to scan an image using the API.
4. View the scan results:
Once the scan is complete, you can view the results in the NeuVector Console UI.
To view the scan results in the NeuVector Console UI, follow these steps:
- Click Images in the left-hand menu.
- Click the name of the image whose scan results you want to view.
- Click Vulnerabilities or Malware to view the scan results.
5. Fix the vulnerabilities:
Once you have viewed the scan results, you can fix the vulnerabilities in your image.
To fix a vulnerability, you need to update the image to use a newer version of the vulnerable package or to patch the vulnerability.
Once you have fixed the vulnerabilities, you can scan the image again to verify that the vulnerabilities have been fixed.
Additional tips:
- You can integrate NeuVector with your CI/CD pipeline to automate security checks.
- NeuVector provides a variety of other features, such as compliance reporting and incident response.

👤 About the Author
Ashwani is passionate about DevOps, DevSecOps, SRE, MLOps, and AiOps, with a strong drive to simplify and scale modern IT operations. Through continuous learning and sharing, Ashwani helps organizations and engineers adopt best practices for automation, security, reliability, and AI-driven operations.
🌐 Connect & Follow:
- Website: WizBrand.com
- Facebook: facebook.com/DevOpsSchool
- X (Twitter): x.com/DevOpsSchools
- LinkedIn: linkedin.com/company/devopsschool
- YouTube: youtube.com/@TheDevOpsSchool
- Instagram: instagram.com/devopsschool
- Quora: devopsschool.quora.com
- Email– contact@devopsschool.com
Find Trusted Cardiac Hospitals
Compare heart hospitals by city and services — all in one place.
Explore Hospitals
This blog provides a clear and practical overview of NeuVector and its key use cases. I like how it explains features like container security, network segmentation, and real‑time threat detection in an easy‑to‑understand way. It’s a useful read for anyone looking to strengthen container and Kubernetes security.