What is Nomad?

Nomad is a flexible workload orchestrator created by HashiCorp. It enables organizations to easily deploy, manage, and scale any containerized or legacy application using a single, unified workflow. Unlike Kubernetes, which is primarily focused on containerized applications, Nomad can handle a wider range of workloads, including:
- Docker containers: Run and manage containerized applications efficiently.
- Non-containerized applications: Deploy and manage legacy applications, static binaries, JARs, and simple OS commands.
- Microservices: Orchestrate complex microservice architectures across diverse environments.
- Batch jobs: Schedule and execute batch jobs with flexible resource allocation.
Nomad stands out with its unique features:
- Bin packing: Optimizes resource utilization by efficiently allocating tasks to available resources.
- Multi-region and multi-cloud support: Deploys workloads across private data centers, multiple clouds, and edge devices.
- Declarative configuration: Simplifies management with infrastructure-as-code (IaC) principles.
- Lightweight and highly available: Offers low resource overhead and distributed architecture for high availability.
Top 10 use cases of Nomad?
Top 10 Use Cases of Nomad:
- Modernizing Legacy Applications: Containerize and deploy legacy applications for improved scalability and portability.
- Building Cloud-Native Microservices: Develop and deploy microservice architectures with flexible scaling and resilience.
- Continuous Integration and Delivery (CI/CD): Automate application builds, tests, and deployments across environments.
- Edge Computing: Deploy resource-efficient applications closer to data sources for faster processing and reduced latency.
- Data Science and Machine Learning: Manage data pipelines and machine learning models at scale.
- High-Performance Computing (HPC): Schedule and orchestrate demanding scientific and engineering workloads.
- Internal Developer Platforms: Create centralized platforms for internal application development within organizations.
- Software Supply Chain Management: Securely manage and track software builds and deployments.
- Containerized DevOps Environments: Establish consistent and secure environments for development and operations teams.
- Managing Diverse Workloads: Handle a wide range of workloads, from traditional applications to cloud-native microservices, in a single platform.
What are the feature of Nomad?
Nomad boasts a diverse feature set catered to diverse needs in application deployment and management. Here are some of its key highlights:
Workload Flexibility:
- Beyond Containers: Handles containerized applications, legacy apps, microservices, batch jobs, and more.
- Cross-Platform Support: Runs on major operating systems (Linux, Windows, macOS) and supports various cloud platforms.
Resource Optimization:
- Bin Packing Algorithm: Intelligently allocates tasks to available resources for efficient utilization.
- Multi-Region and Multi-Cloud Deployment: Scales across diverse environments for better reach and fault tolerance.
Simplified Management:
- Declarative Configuration: Uses Infrastructure as Code (IaC) principles for easy configuration and updates.
- Lightweight and Distributed: Low resource footprint and distributed architecture ensure high availability.
- Flexible Scheduling: Supports cron-style scheduling, event-driven triggers, and manual execution for various workload needs.
Security and Governance:
- Fine-Grained Access Control: Role-Based Access Control (RBAC) ensures users only access authorized resources.
- Secrets Management: Securely stores and manages sensitive application secrets.
- Network Policies: Enforce granular network control for different workloads.
Advanced Features:
- Stateful Applications: Supports stateful applications with persistent storage options.
- Health Checks and Restarting: Monitors application health and restarts failed tasks automatically.
- Custom Tasks and Drivers: Extend functionality with custom tasks and drivers for specialized needs.
Integration and Community:
- API and CLI: Integrates with various tools and workflows through extensive APIs and CLI commands.
- Thriving Community: Backed by a large and active community offering support and resources.
Additional Features:
- Zero Downtime Upgrades: Facilitates rolling upgrades without application downtime.
- Telegraf Integration: Captures performance metrics and sends them to monitoring systems.
- Consul Integration: Leverages Consul for service discovery and configuration management.
Beyond these listed features, Nomad offers more granular controls and functionalities depending on your specific needs and chosen version.
How Nomad works and Architecture?
Nomad’s architecture is designed to be flexible, resilient, and efficient. Here’s a breakdown of the key components and how they work together:
Core Components:
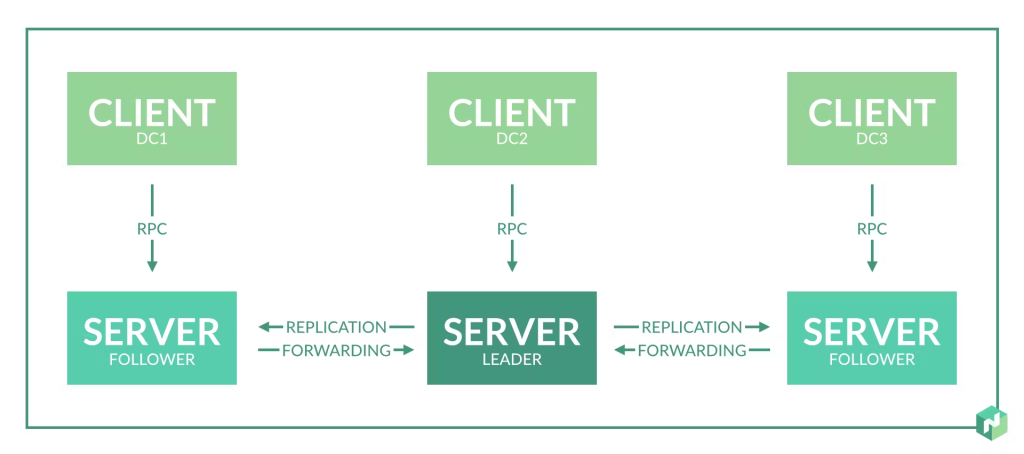
- Servers: Nodes responsible for scheduling and managing tasks. They communicate with each other to maintain a consistent cluster state.
- Clients: Register tasks with the servers and receive allocation information for running them. Clients can be diverse, including containers, VMs, and bare-metal servers.
- Consul: An optional component used for service discovery, configuration management, and leader election.
- Drivers: Modular plugins that enable interaction with specific resources (e.g., container engines, storage systems).
Workflow:
- Client registers a task: A client submits a task specification to a server, defining details like resources needed and the task to be executed.
- Server schedules the task: The server uses its bin-packing algorithm and cluster state to assign the task to an available client with suitable resources.
- Client receives allocation: The server sends the client an allocation containing information about where and how to run the task.
- Client executes the task: The client uses the allocation to deploy and run the task on the designated resource.
- Health checks and monitoring: Nomad continually monitors task health and restarts them if they fail. Metrics and logs are available for further analysis.
Key Architecture Features:
- Distributed and Resilient: No single point of failure ensures high availability even if individual servers fail.
- Decentralized Scheduling: Servers work together efficiently with the bin-packing algorithm for optimized resource allocation.
- Flexible Communication: Nomad can operate using Consul or directly communicate between servers and clients for flexibility.
- Modular Architecture: Drivers allow seamless integration with diverse resources and environments.
- API and CLI: Enables automation and integration with various tools and workflows.
Additional Points:
- Nomad employs optimistic concurrency, meaning servers make scheduling decisions independently but quickly synchronize updates.
- Regions and Zones: Nomad can handle geographically distributed deployments across regions and zones for further resilience.
- Nomad clients run independently and do not require specific operating systems or container engines.
Understanding Nomad’s architecture empowers you to leverage its strengths effectively for orchestrating diverse workloads in various environments.
How to Install Nomad it?
Installing Nomad can be done in various ways, depending on your specific needs and environment. Here’s a breakdown of different methods:
1. Binary Download:
- This is the simplest method for individual servers or testing purposes.
- Download the pre-built binary for your operating system from the Nomad official website.
- Extract the binary and add its location to your system path for easy access.
2. Package Managers:
- For convenient updates and management, use platform-specific package managers:
- Linux: Use distributions like Ubuntu, Debian, and CentOS repositories.
- macOS: Use Homebrew.
- Windows: Download the official package installer.
3. Cloud Provider Installations:
- Major cloud providers (AWS, Azure, GCP) offer managed Nomad services:
- AWS: Use Amazon ECS Anywhere with Nomad driver.
- Azure: Use Azure Stack HCI with Nomad.
- GCP: Use Google Kubernetes Engine (GKE) with Nomad driver.
4. Bare Metal Installation:
- This method involves manual installation on your own hardware infrastructure.
- Requires configuring networking, storage, and security for the cluster.
- More complex but offers full control and customization.
5. Nomad Local:
- For development and testing, use Nomad Local to run a single-node cluster on your local machine.
- Requires minimal resources and offers quick setup.
Choosing the Right Method:
The best installation method depends on:
- Environment: Cloud, on-premises, or local development?
- Technical expertise: Comfortable with system administration?
- Needs: Individual server, testing, production cluster?
Remember, installing Nomad can vary in complexity. Choose the method that aligns with your skills and environment, and consult the official documentation or community resources for specific steps and troubleshooting.
Basic Tutorials of Nomad: Getting Started

Now, Let’s move to the step-by-step tutorial on getting started with Nomad, a popular open-source cluster scheduler and orchestrator developed by HashiCorp:
Step 1: Installation
- Visit the official Nomad website and navigate to the “Downloads” section.
- Choose the appropriate binary package for your operating system and download it.
- Once downloaded, follow the installation instructions provided in the HashiCorp documentation to install Nomad on your machine.
Step 2: Configuration
- Create a new configuration file for Nomad using a text editor of your choice.
- Specify the basic configuration settings such as data directory, log level, and network settings.
- Optionally, you can configure advanced settings like ACL (Access Control List), telemetry, and plugins based on your requirements.
- Save the configuration file with a “.hcl” extension.
Step 3: Starting Nomad
- Open a terminal window and navigate to the directory where you installed Nomad.
- Run the following command to start Nomad with the specified configuration file: nomad agent -config
       nomad agent -config <path_to_config_file>

Code language: HTML, XML (xml)- Nomad will start running and log output will be displayed in the terminal.
Step 4: Interacting with Nomad
- Nomad provides a command-line interface (CLI) to interact with the cluster.
- Open a new terminal window and run the following command to check Nomad’s status: nomad status
nomad status
- This command will display the status of all running jobs, tasks, and allocations in the Nomad cluster.
Step 5: Creating and Running Jobs
- Define a job specification in HCL (HashiCorp Configuration Language) format.
- Save the job file with a “.nomad” extension.
- Run the following command to submit the job to Nomad: nomad job run
      nomad job run <path_to_job_file>
Code language: HTML, XML (xml)- Nomad will schedule the job and start running the tasks defined in the job file.
Step 6: Monitoring and Troubleshooting
- Nomad provides several built-in tools and integrations to monitor and troubleshoot the cluster.
- You can use the Nomad web UI or CLI commands like
nomad status,nomad job status, andnomad alloc statusto monitor the cluster, job, task, and allocation statuses.
These steps should give you a basic understanding of how to get started with Nomad.

Find Trusted Cardiac Hospitals
Compare heart hospitals by city and services — all in one place.
Explore Hospitals