What is Octopus Deploy?
Octopus Deploy is a continuous deployment (CD) tool designed to help software teams automate and manage deployments efficiently. It simplifies and streamlines the release process, enabling organizations to deliver high-quality applications faster and more reliably.
Key Features:
- Automated deployments: Automate deployments across diverse environments (cloud, on-premises, hybrid) with flexible deployment strategies.
- Multi-tenancy support: Deploy to multiple customers or projects independently within a single instance.
- Release management: Plan, coordinate, and execute releases with approvals, rollbacks, and rollback plans.
- Integration with various tools: Integrates seamlessly with popular tools like Git, Jenkins, Kubernetes, and cloud platforms.
- Security and compliance: Enforces security policies and integrates with compliance tools for secure deployments.
- Scalability: Scales to handle large deployments and complex environments with distributed agents.
Top 10 use cases of Octopus Deploy ?
Top 10 Use Cases of Octopus Deploy:
- Streamlining deployments across various environments: Automate deployments to development, staging, production, and other environments with consistent configurations.
- Accelerating software delivery: Reduce release cycles and time-to-market by automating tedious tasks and manual interventions.
- Improving deployment reliability: Minimize errors and ensure consistent deployments with built-in checks, approvals, and rollback mechanisms.
- Enhancing collaboration: Foster collaboration between development and operations teams with shared visibility and control over the deployment process.
- Gaining deployment insights: Track deployment history, analyze performance metrics, and identify bottlenecks for continuous improvement.
- Enforcing security policies: Integrate with security tools and enforce security policies and compliance requirements within deployments.
- Scaling deployments efficiently: Distribute tasks across multiple agents to handle large deployments and complex environments effectively.
- Modernizing legacy applications: Facilitate the modernization and deployment of legacy applications to cloud-native environments.
- Automating infrastructure provisioning: Manage infrastructure provisioning and configuration alongside deployments for a unified workflow.
- Reducing manual deployment effort: Free up developers and operations teams from manual deployment tasks, allowing them to focus on innovation and core responsibilities.
Choosing Octopus Deploy can benefit organizations of various sizes and technology stacks seeking a robust and flexible solution for their continuous delivery needs.
What are the feature of Octopus Deploy ?
Octopus Deploy offers a rich set of features to streamline and automate various aspects of your software delivery process. Here are some key highlights:
Deployment Automation:
- Flexible delivery models: Deploy across diverse environments (cloud, on-premises, hybrid) with push, pull, or tentacle deployment strategies.
- Configuration management: Manage environment-specific configurations efficiently with scoped variables and transforms.
- Deployment scripting: Utilize PowerShell, Bash, or custom scripts for tailored deployment tasks.
- Deployment steps: Create reusable and modular steps for common deployment tasks across projects.
- Rollback and recovery: Implement automatic or manual rollbacks with comprehensive historical tracking.
Release Management:
- Release creation and management: Plan and manage releases with defined lifecycles, approvals, and dependencies.
- Templating and automation: Simplify releases with reusable templates and automation for repetitive tasks.
- Change control: Streamline and manage changes with approvals, version control integration, and audit trails.
- Blue-green and canary deployments: Use advanced deployment strategies for controlled rollouts and risk mitigation.
- Rollback plans and execution: Define and execute rollback plans for various scenarios to ensure reliability.
Security and Compliance:
- Role-based access control (RBAC): Define granular access permissions for users and projects.
- Auditing and logging: Track activities with detailed audit logs for accountability and compliance.
- Security plugins: Integrate with security tools like Azure AD for secure authentication and authorization.
- Compliance automation: Enforce security and compliance policies within deployments.
Integration and Extensibility:
- Extensive plugin ecosystem: Integrate with various tools and platforms like Git, Jenkins, Kubernetes, and cloud providers.
- API access: Programmatically interact with Octopus Deploy using its REST API for automation and scripting.
- Custom steps and plugins: Develop custom steps and plugins for specific functionalities beyond built-in features.
- Configuration as Code (CaC): Store and manage Octopus configuration in Git repositories for version control and collaboration.
Additional Features:
- Scalability: Distribute deployments across multiple agents to handle large workloads efficiently.
- User-friendly interface: Intuitive interfaces and visualizations for ease of use and adoption.
- Deployment dashboards: Track deployment progress, visualize status, and identify issues in real-time.
- Reporting and analytics: Gain insights into deployment performance with customizable reports and dashboards.
How Octopus Deploy works and Architecture?
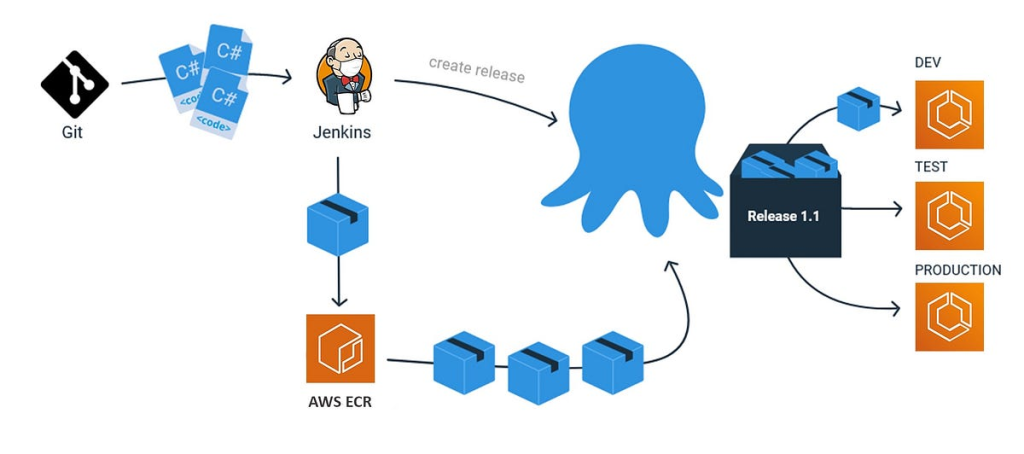
Octopus Deploy operates with a client-server architecture and leverages multiple components to automate your software delivery process. Here’s a breakdown of its key elements:
Components:
- Octopus Server: The central hub managing configurations, projects, releases, and communication with deployment targets.
- Octopus Web Portal: A web-based interface for configuring Octopus, managing releases, and viewing deployment status.
- Tentacles: Agent processes deployed on target machines where actual deployment tasks are executed.
- Lifecycles: Define the stages and steps involved in a deployment process (e.g., build, test, deploy).
- Packages: Represent deployment artifacts (code, scripts, configurations) associated with releases.
- Environments: Group deployment targets (servers, containers) with corresponding configurations for different stages (dev, staging, prod).
- Variables and Scopes: Manage environment-specific configurations using scoped variables for flexibility and security.
Workflow Overview:
- Develop and commit code: Changes trigger releases based on defined configurations.
- Release creation: Define release details in the web portal, selecting packages, environments, and lifecycles.
- Release execution: The server schedules tasks and sends instructions to Tentacles in appropriate environments.
- Tentacle execution: Tentacles download packages, execute deployment steps (scripts, commands), and report status back to the server.
- Success or rollback: Depending on outcome, the deployment is marked as successful or rolled back based on defined rollback strategies.
- Monitoring and reporting: Track deployment progress in real-time using the web portal, dashboards, and reports.
Architectural Highlights:
- Modular design: Components can be scaled independently based on workload.
- Client-server communication: Server orchestrates deployments, while Tentacles handle execution.
- Flexible lifecycles: Define tailored deployment processes for different projects and environments.
- Environment configurations: Manage configurations separately for different environments using variables and scopes.
- Extensibility: Plugins and API access allow integration with various tools and automation pipelines.
Benefits of this Architecture:
- Scalability: Handles large deployments and complex environments by adding more Tentacles and distributing tasks.
- Flexibility: Adapts to diverse deployment workflows with customizable lifecycles and configurations.
- Reliability: Rollback mechanisms and auditing ensure deployment control and accountability.
- Visibility and control: Real-time monitoring and reporting provide clear insights into the deployment process.
- Integration: Plugins and API facilitate seamless integration with existing tools and pipelines.
How to Install Octopus Deploy it?
Installing Octopus Deploy involves several steps depending on your desired approach:
1. Choose your installation method:
- MSI Installer: Ideal for on-premises environments with Windows Server.
- Docker: Suitable for containerized deployments on various platforms.
- Octopus Cloud: Managed service option by Octopus Deploy for cloud-based deployments.
2. Gather necessary information:
- Operating system: Windows, Linux, or macOS (for Tentacle agent installation, if applicable).
- Hardware specifications: Check the documentation for minimum and recommended requirements based on your expected usage.
- License key: Required for all licensed deployments (except Community License).
3. Follow the specific instructions based on your chosen method:
On-Premises with MSI Installer:
- Download the installer from their official site.
- Run the installer: Follow the on-screen instructions, choosing the desired features and destination directory.
- Configure the server: Open a web browser and access the Octopus server URL (usually http://localhost:8080). Follow the wizard to complete the setup, including database configuration and authentication.
- Install Tentacles (optional): If managing deployments on other machines, install Tentacle agents on those machines following the official site.
Using Docker:
- Choose a Docker container image: Select the appropriate image based on your operating system and desired features from their official site.
- Run the container: Use Docker commands to run the container, specifying necessary configurations like ports and volumes.
- Access the Octopus web portal: Open a web browser and access the exposed port (usually 8080) to configure the server.
- Install Tentacles (optional): Follow official site for deploying Tentacle containers on additional machines.
Octopus Cloud:
- Sign up for Octopus Cloud from their offcial site.
- Choose a plan: Select a suitable plan based on your needs and resource requirements.
- Create an environment: Define your deployment environment and configure desired settings.
- Start your deployment: Follow instructions to deploy your application using Octopus Cloud management tools.
Always keep in mind, providing more specific details about your preferred installation method, operating system, and desired features will allow me to offer more tailored guidance for your successful Octopus Deploy installation.
Basic Tutorials of Octopus Deploy: Getting Started
Octopus Deploy offers various tutorials and resources to get you started, but if you’re looking for a quick step-by-step guide, here’s an example basic workflow to illustrate its functionality:
Scenario: Deploying a simple “Hello World” application to different environments.
Prerequisites:
- Octopus Deploy instance installed and running (on-premises or cloud-based).
- A basic understanding of software development and deployment concepts.
Steps:
1. Create a Project:
- Open the Octopus Deploy web portal and create a new project.
- Give your project a descriptive name (e.g., “HelloWorldApp”).
2. Define Environments:
- Create two environments: “Development” and “Production”.
- Configure each environment with the necessary deployment targets (servers, containers).
- You can use manual configuration or leverage cloud platform integration for target provisioning.
3. Build and Package your Application:
- Build your “Hello World” application following your project’s build process.
- Create a deployment package containing the built artifacts (e.g., compiled code, static files).
- You can use tools like NuGet or custom scripts to create packages.
4. Create a Release:
- In the project, create a new release.
- Select the built package you created earlier.
- Choose the target environment (e.g., Development for initial testing).
5. Define a Lifecycle:
- A lifecycle defines the steps involved in deployment.
- Create a simple lifecycle with one step: “Deploy to Target Server”.
- You can use pre-built steps or custom scripts for deployment tasks.
6. Deploy the Release:
- Review the release details and click “Deploy” to start the deployment process.
- Octopus Deploy will send instructions to the target Tentacle in the chosen environment.
- The Tentacle will download the package, execute the deployment step, and report back the status.
7. Monitor and Verify:
- Track the deployment progress in the web portal.
- Once successful, access your “Hello World” application in the deployed environment and verify it works as expected.
8. Deploy to Production:
- Repeat steps 4-6, selecting the “Production” environment for deployment.
- Consider using additional features like approvals or rollback strategies for production deployments.
9. Explore More:
- Octopus Deploy offers advanced features like variables, templating, blue-green deployments, and integrations with various tools.
Remember: This is a simplified example. Adapt the steps and configurations to your specific application and environment.
Tips:
- Start with a simple deployment to get familiar with the basic workflow.
- Leverage pre-built steps and templates for common tasks.
- Utilize environment variables for configuration management.
- Explore integration with your existing build and testing tools.

Find Trusted Cardiac Hospitals
Compare heart hospitals by city and services — all in one place.
Explore Hospitals