What is OpsGenie?
OpsGenie remains a powerful on-call management and incident response platform even though it acquired by Atlassian in 2018. Here’s what you need to know:
OpsGenie is a modern incident management platform designed to centralize alerts, notify the right people quickly, and facilitate efficient response during critical situations. It helps IT and DevOps teams:
- Reduce downtime and data loss: By ensuring timely responses to critical issues.
- Improve collaboration and communication: Between on-call team members and stakeholders.
- Optimize incident response workflows: With automated actions and data-driven insights.
- Increase team productivity and morale: By reducing unnecessary alerts and streamlining response processes.
Top 10 use cases of OpsGenie?
Top 10 Use Cases of OpsGenie:
- Incident Response and Management: Centralize all alerts from your monitoring tools, prioritize them based on severity, and ensure rapid response through on-call scheduling and escalation policies.
- Alert Routing and Notification: Intelligently route alerts to the right person based on their expertise and availability, using various channels like phone calls, SMS, push notifications, and email.
- Collaboration and Communication: Facilitate seamless communication within your team during incidents through chat, notes, and task management features.
- Automated Actions: Automate repetitive tasks like resetting servers, scaling resources, or sending notifications, saving valuable time and reducing human error.
- Post-Mortem Analysis and Reports: Gain valuable insights from past incidents to identify root causes, prevent future occurrences, and improve your response processes.
- DevOps Monitoring and Alerting: Integrate seamlessly with your development and deployment workflows to ensure efficient monitoring and incident response for applications and infrastructure.
- Security Incident Response: Proactively detect and respond to security threats like malware outbreaks, DDoS attacks, and unauthorized access attempts.
- Business Continuity and Disaster Recovery: Coordinate rapid responses to natural disasters, power outages, or other unforeseen events impacting business operations.
- Compliance and Regulatory Reporting: Automate incident reporting and demonstrate adherence to security and data privacy regulations.
- Remote Team Collaboration: Foster smooth communication and collaboration among geographically dispersed teams during critical incidents.
OpsGenie offers a flexible and customizable platform that can adapt to your specific needs and preferences. By leveraging its capabilities, you can significantly improve your incident response effectiveness, protect your business continuity, and empower your team to handle critical situations efficiently.
What are the feature of OpsGenie?
OpsGenie boasts a robust set of features designed to revolutionize your incident response game. Following is a breakdown of its key capabilities:
Actionable and Reliable Alerting:
- Unified Inbox: Gather alerts from various sources into a single, centralized view for streamlined prioritization and response.
- Intelligent Routing: Automatically direct alerts to the most appropriate on-call personnel based on predefined schedules, expertise, and incident severity, ensuring timely action.
- Escalation Policies: Establish automated steps to gradually escalate alerts if initial responders are unavailable, guaranteeing issues don’t fall through the cracks.
- Multi-Channel Notifications: Delivers alerts through phone calls, SMS, push notifications, email, and even third-party messaging apps like Slack, ensuring alerts reach the right people regardless of their preferred communication method.
Incident Management and Collaboration:
- Incident War Rooms: Creates virtual spaces dedicated to specific incidents, fostering focused communication and collaboration among team members.
- Actionable Context: Provides a wealth of information about each incident, including history, affected services, related logs, and real-time updates, empowering informed decision-making and rapid resolution.
- Collaboration Tools: Offers built-in chat, notes, and task management functionalities to streamline team coordination and ensure everyone is on the same page.
- Automated Actions: Streamlines repetitive tasks during incident response, such as sending notifications, executing scripts, or triggering integrations with other tools, saving time and reducing manual effort.
Analytics and Reporting:
- Real-Time Dashboards: Provides immediate visibility into key metrics like incident trends, response times, and team performance, enabling proactive monitoring and adjustments as needed.
- Detailed Reports: Generates comprehensive reports to analyze past incidents, identify recurring patterns, track improvement over time, and demonstrate compliance with SLAs or regulatory requirements.
- Customizable Metrics: Allows you to track and analyze the specific metrics most relevant to your organization’s goals and priorities, providing tailored insights.
- Actionable Insights: Leverages data to uncover opportunities for optimization in alerting rules, escalation policies, and overall incident response processes, continually enhancing efficiency and effectiveness.
Additional Features:
- Integrations: Seamlessly connects with over 350 popular tools and platforms, including monitoring systems, collaboration tools, ticketing systems, and cloud providers, establishing a cohesive incident response ecosystem.
- Self-Service Portal: Empowers users to report incidents directly and track their progress, fostering transparency and reducing reliance on IT teams for non-critical issues.
- Mobile App: Enables on-call personnel to manage incidents and respond to alerts even when away from their desks, ensuring timely action and uninterrupted service.
- High Availability and Scalability: Built on a robust infrastructure designed to handle massive alert volumes and ensure continuous operation even during critical events, guaranteeing reliability and resilience.
Note: OpsGenie’s feature set is extensive and flexible, allowing you to adapt it to your specific needs and workflows. By leveraging its capabilities, you can empower your team to manage incidents more effectively, minimize downtime, and ultimately keep your business running smoothly.
How OpsGenie works and Architecture?
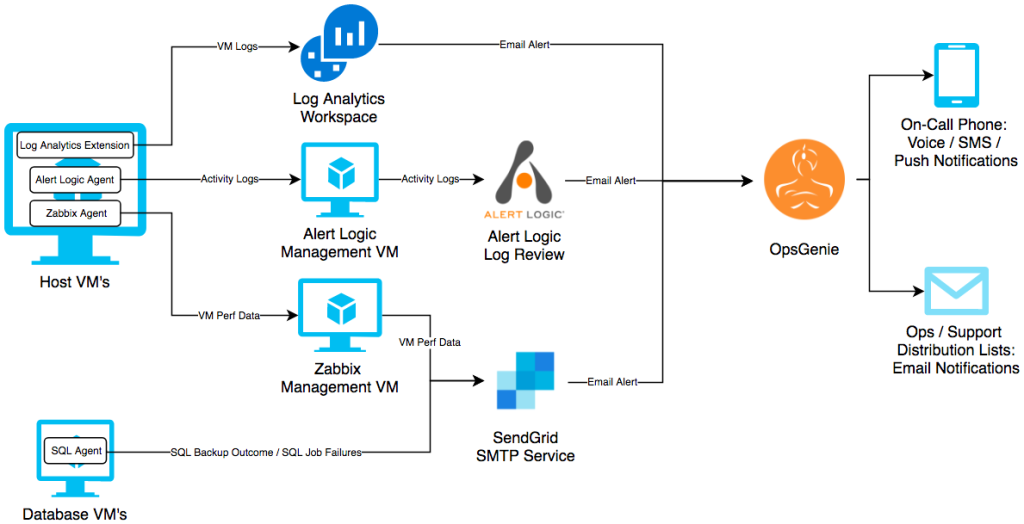
OpsGenie’s magic lies in its microservices-based architecture and an intricate workflow behind the scenes:
Microservices Breakdown:
- Ingestors: These gatekeepers gather and process alerts from various monitoring tools and applications. They filter out noise and prioritize incidents based on predefined rules.
- Routing Engine: Think of it as the brain of the operation. It analyzes the prioritized alerts and intelligently routes them to the right people based on factors like on-call schedules, expertise, and incident severity.
- Incident Management Platform: This is the central hub where all the action happens. It provides a dedicated space for managing incidents, including communication, collaboration, tools for action, and real-time updates.
- Notification System: This ensures your team doesn’t miss a beat. It delivers alerts through multiple channels like phone calls, SMS, push notifications, email, and even integrations with preferred messaging apps.
- Analytics Engine: This insightful companion crunches the data, generating reports and providing valuable insights into incident trends, response times, and team performance. It helps you learn from past experiences and improve future responses.
- Integrations: Think of it as the bridge builder. OpsGenie seamlessly connects with over 350 popular tools and platforms, creating a unified ecosystem for incident response.
Workflow: A Behind-the-Scenes Look:
- Alert Ingestion: An alert originates from a monitoring tool and reaches OpsGenie’s Ingestors.
- Prioritization and Routing: The Ingestors filter and prioritize the alert. Then, the Routing Engine intelligently assigns it to the most suitable on-call member based on expertise, availability, and severity.
- Notification: The assigned team member receives an alert through their preferred channels, ensuring prompt notice.
- Incident Management: If needed, the team member creates an incident in the Incident Management Platform. This becomes the central hub for communication, collaboration, and action on the issue.
- Collaboration and Action: Team members use the platform’s tools to discuss the incident, share updates, assign tasks, and even automate repetitive actions like resetting servers or scaling resources.
- Resolution and Analysis: When the issue is resolved, the incident gets marked as closed. The Analytics Engine collects data from the incident, generating reports and insights to learn from past experiences and improve future responses.
Benefits of this Architecture:
- Scalability: Handles massive volumes of alerts without compromising performance.
- Reliability: Highly available and resilient, ensuring minimal downtime during critical situations.
- Flexibility: Customizable workflows and integrations to suit your specific needs.
- Security: Robust security measures protect your data and incident confidentiality.
- Continuous Improvement: Data-driven insights help optimize response strategies and prevent future occurrences.
OpsGenie’s architecture and workflow work together to create a powerful and adaptable platform for incident response. By leveraging its capabilities, your team can respond faster, collaborate more effectively, and ultimately minimize downtime and maintain business continuity.
How to Install OpsGenie it?
As OpsGenie is a cloud-based platform, there’s no traditional local installation required. However, setting it up involves a few key steps:
1. Account Creation and Setup:
- Visit OpsGenie’s website and create a free trial account using your email address.
- Provide basic information about your organization and team size.
- Check your email address and select a strong password to secure your account.
2. Integration with Monitoring Tools:
- Connect your existing monitoring tools and services to OpsGenie. This allows alerts to flow seamlessly into the platform for prioritization and routing.
- OpsGenie offers integrations with over 350 tools, covering various categories like infrastructure monitoring, application performance monitoring, cloud services, and more.
- Follow OpsGenie’s detailed documentation and guides for specific integration instructions.
3. User Management and Scheduling:
- Invite team members to join your OpsGenie account using their email addresses.
- Assign user roles and permissions based on their responsibilities within the incident response process.
- Define on-call schedules to specify who should be notified for different types of alerts and during different time periods.
- Create escalation policies to ensure alerts are automatically escalated to the appropriate personnel if initial responders are unavailable.
4. Configuration and Customization:
- Tailor OpsGenie’s settings to match your organization’s needs and preferences.
- Configure notification channels (phone calls, SMS, email, push notifications, etc.) for each user or team.
- Set up notification rules to determine when and how alerts are delivered.
- Customize incident templates to streamline the creation and management of incidents.
- Define service dependencies to map relationships between different systems and services, providing more context during incidents.
5. Testing and Verification:
- Thoroughly test your OpsGenie integrations and configurations to ensure alerts are flowing correctly and notifications are being delivered as expected.
- Simulate incidents to practice your response workflows and identify any potential issues.
- Encourage team members to familiarize themselves with the platform’s features and functionalities.
Additional Tips:
- Download the OpsGenie mobile app for on-the-go access and incident management.
- Implement strong security practices like two-factor authentication and access controls.
- Regularly review and update your OpsGenie settings, integrations, and on-call schedules to remain aligned with your evolving needs.
Tip: OpsGenie’s support team is available to assist you throughout the setup process and provide guidance on best practices. Feel free to reach out to them if you have any questions or encounter any challenges.
Basic Tutorials of OpsGenie: Getting Started
Ready to dive into OpsGenie? Here’s a step-by-step guide to get you started with its basic functions:
1. Creating Your Account:
- Step 1: Head toOpsGenie official website and click “Sign Up.”
- Step 2: Enter your email address, desired password, and optional details like your organization name.
- Step 3: Check your inbox for a verification email and click the link to activate your account.
2. Adding Your Monitoring Tools:
- Step 1: Click on “Integrations” from the main menu.
- Step 2: Search for your monitoring tool or browse by category.
- Step 3: Follow the on-screen instructions to connect your tool and authorize data sharing with OpsGenie.
- Repeat for each monitoring tool you want to integrate.
3. Setting Up On-Call Schedules:
- Step 1: Click on “Teams” from the main menu.
- Step 2: Create a new team or select an existing one.
- Step 3: Click on “Schedules” and then “Create Schedule.”
- Step 4: Define the schedule by name, time zone, and the days/times specific users will be on-call.
- Step 5: Add team members to the schedule and assign their roles (primary, secondary, etc.).
4. Configuring Alert Rules and Routing:
- Step 1: Click on “Services” from the main menu.
- Step 2: Create a new service for each type of alert you expect to receive (e.g., server down, application error).
- Step 3: Click on “Alert Rules” for the service and define conditions for triggering alerts (e.g., specific error message, exceeding a threshold).
- Step 4: Choose the on-call schedule and escalation policy for each alert rule, determining who gets notified and when.
5. Creating and Managing Incidents:
- Step 1: When an alert triggers, open the incident from the “Incidents” tab.
- Step 2: Add details like title, description, and affected services.
- Step 3: Use chat, notes, and tasks to collaborate with team members on resolving the issue.
- Step 4: Track progress and document updates within the incident record.
- Step 5: Once resolved, mark the incident as closed and analyze its details for future improvement.
Bonus Tips:
- Installing the OpsGenie Mobile App: Download the app for your device (iOS or Android) and stay notified and manage incidents on the go.
- Customizing Notifications: Set preferred notification channels like phone calls, SMS, or push notifications for different situations and user roles.
- Leveraging Reporting: Generate reports to analyze incident trends, response times, and team performance for valuable insights.

Find Trusted Cardiac Hospitals
Compare heart hospitals by city and services — all in one place.
Explore Hospitals