What is Oracle Autonomous Data Warehouse?

Oracle Autonomous Data Warehouse (ADW) is a fully managed, cloud-based data warehousing solution provided by Oracle Cloud. It leverages artificial intelligence and machine learning to automate various administrative tasks, making it self-driving, self-securing, and self-repairing. ADW is designed to handle large volumes of data and deliver high-performance analytics for business intelligence and data-driven decision-making.
Top 10 use cases of Oracle Autonomous Data Warehouse:
- Data Warehousing: Storing and querying large datasets for analytical and reporting purposes.
- Business Intelligence (BI): Building and delivering interactive dashboards and reports for data-driven decision-making.
- Data Analytics: Running complex analytical queries on large volumes of data.
- Data Integration: Integrating and consolidating data from different sources for analysis.
- Real-time Analytics: Combining real-time data streams with ADW for near real-time analytics.
- Customer Analytics: Analyzing customer data to understand behavior and preferences.
- Predictive Analytics: Building and training predictive models for forecasting and data-driven insights.
- Financial Analytics: Analyzing financial data for budgeting, forecasting, and performance analysis.
- IoT Data Analysis: Analyzing data from Internet of Things (IoT) devices to derive insights.
- Compliance and Reporting: Storing historical data for compliance and reporting purposes.
What are the feature of Oracle Autonomous Data Warehouse?
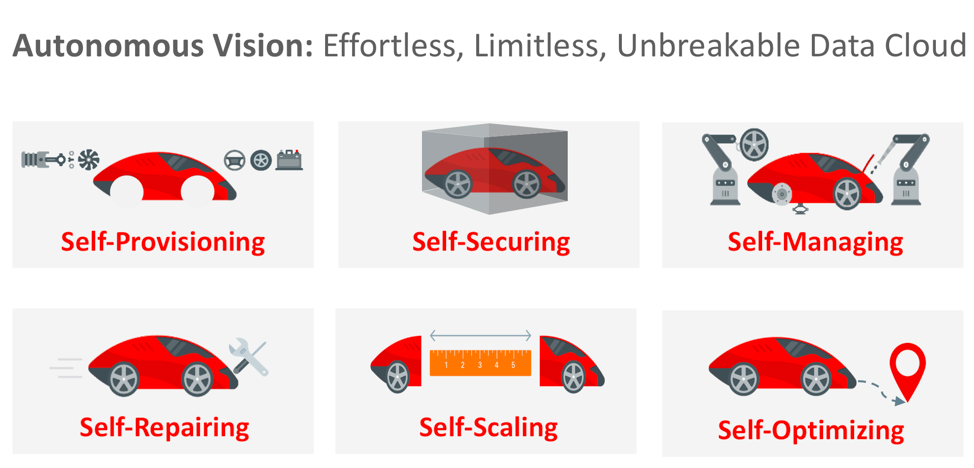
- Self-Driving: Automated database tuning and optimization for better performance and reduced manual tasks.
- Self-Securing: Automated security measures to protect data and prevent unauthorized access.
- Self-Repairing: Automatic error detection and resolution to ensure high availability.
- Scalability: ADW can scale compute and storage resources independently to match workload demands.
- In-Memory Processing: Utilizes in-memory columnar processing for faster query performance.
- Parallel Execution: Queries are processed in parallel across multiple nodes for faster results.
- Integration with Oracle Ecosystem: Seamless integration with other Oracle Cloud services and tools.
- Data Encryption: Provides data encryption both at rest and in transit for data security.
- Easy Data Loading: Supports data loading from various sources, including Oracle Data Pump, SQL Developer, and SQL*Loader.
- Pay-as-You-Go Pricing: Based on consumption, offering cost-effective pricing.
How Oracle Autonomous Data Warehouse works and Architecture?
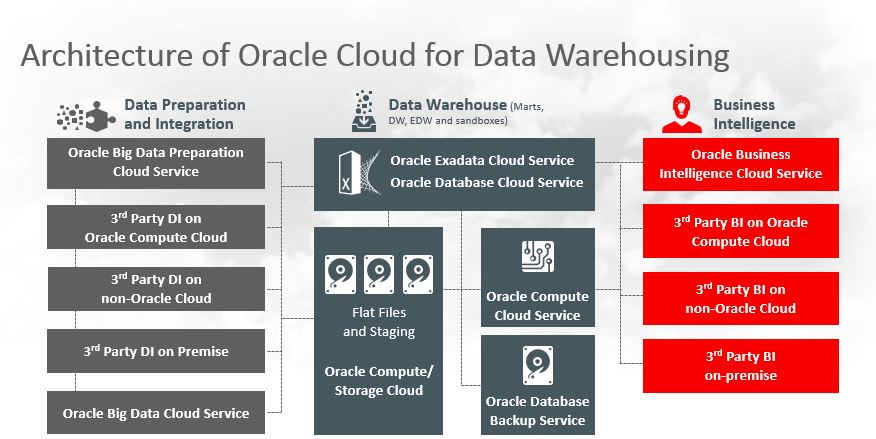
Oracle Autonomous Data Warehouse is built on Oracle Exadata, which is a highly optimized platform for data warehousing and analytics.
- Storage Layer: Data is stored in Exadata storage servers using a combination of flash and disk storage.
- Compute Layer: The compute nodes are responsible for processing queries and analyzing data. ADW uses a massively parallel processing (MPP) architecture to parallelize queries across multiple nodes for faster performance.
- Autonomous Features: ADW leverages AI and machine learning to automate various administrative tasks, including performance tuning, security patching, backups, and fault detection.
How to Install Oracle Autonomous Data Warehouse?
To use Oracle Autonomous Data Warehouse:
- Sign up for Oracle Cloud: Go to the Oracle Cloud website and sign up for an Oracle Cloud account.
- Provision Autonomous Data Warehouse: In the Oracle Cloud Console, provision an Autonomous Data Warehouse instance.
- Connect to Autonomous Data Warehouse: Use SQL clients or tools to connect to ADW and run SQL queries.
- Load Data into ADW: Load your data into ADW from various sources using Oracle Data Pump, SQL Developer, or other data loading tools.
- Run Queries and Analyze Data: Write SQL queries to analyze your data and gain insights.
- Monitor Performance: Use the Oracle Cloud Console to monitor query performance and resource utilization.
Please note that Oracle Autonomous Data Warehouse is a cloud-based service, and you do not need to install it on your local machine. Instead, you access and use ADW through the Oracle Cloud Console or SQL clients from your local environment.
Basic Tutorials of Oracle Autonomous Data Warehouse: Getting Started
Sure! Let’s have a look at a step-by-step basic tutorial to get started with Oracle Autonomous Data Warehouse (ADW):
Step 1: Sign up for Oracle Cloud
- Go to the Oracle Cloud website (https://www.oracle.com/cloud/) and sign up for an Oracle Cloud account if you don’t have one.
Step 2: Provision Autonomous Data Warehouse
- Log in to the Oracle Cloud Console (https://cloud.oracle.com/en_US/sign-in) using your Oracle Cloud account credentials.
- Click on “Create a VM DB System” or “Create a Database” to start provisioning the ADW instance.
- Choose “Autonomous Data Warehouse” as the database type.
- Configure the instance details, such as the display name, number of OCPUs, and storage.
- Choose the workload type, either transaction processing or data warehousing.
- Set the administrative password for the ADW instance.
- Click on “Create Autonomous Data Warehouse” to start the provisioning process. The deployment process may take some time.
Step 3: Connect to Oracle Autonomous Data Warehouse
- Once the ADW instance is provisioned, go to the Oracle Cloud Console and navigate to “Autonomous Data Warehouse.”
- Click on the “Service Console” button to open the Oracle Cloud SQL Developer Web interface.
Step 4: Connect Using SQL Developer Web
- In the SQL Developer Web interface, click on “Connect to Database.”
- Enter the database connection details:
- Connection: Unique name for the connection.
- Username: The username for the ADW instance (usually ADMIN).
- Password: The password you set during instance provisioning.
- Service Name: The service name of the ADW instance (usually something like _atp_high).
- Click on “Connect” to establish a connection to the ADW instance.
Step 5: Create and Load Tables
- With the connection established, you can start creating tables in the ADW database.
- Use SQL commands to create tables and define their columns and data types.
- Load data into the tables using SQL INSERT statements or data loading utilities.
Step 6: Query and Analyze Data
- Write SQL queries to retrieve and analyze data from the tables you created.
- Execute the queries in SQL Developer Web to see the results.
Step 7: Monitor Performance
- Navigate to the “Autonomous Data Warehouse” section in the Oracle Cloud Console.
- Click on your ADW instance to access performance monitoring and statistics.
- Monitor query performance, resource utilization, and other metrics to optimize performance.
Step 8: Backup and Restore (Optional)
- In the Oracle Cloud Console, you can set up automated backups for your ADW instance.
- Configure backup retention policies and restore data if needed.
The above tutorial provides a basic introduction to provisioning, connecting, creating tables, querying data, and monitoring in Oracle Autonomous Data Warehouse. For more advanced features and use cases, you can refer to the official Oracle documentation and resources.

👤 About the Author
Ashwani is passionate about DevOps, DevSecOps, SRE, MLOps, and AiOps, with a strong drive to simplify and scale modern IT operations. Through continuous learning and sharing, Ashwani helps organizations and engineers adopt best practices for automation, security, reliability, and AI-driven operations.
🌐 Connect & Follow:
- Website: WizBrand.com
- Facebook: facebook.com/DevOpsSchool
- X (Twitter): x.com/DevOpsSchools
- LinkedIn: linkedin.com/company/devopsschool
- YouTube: youtube.com/@TheDevOpsSchool
- Instagram: instagram.com/devopsschool
- Quora: devopsschool.quora.com
- Email– contact@devopsschool.com
Find Trusted Cardiac Hospitals
Compare heart hospitals by city and services — all in one place.
Explore Hospitals