What is PyTorch?
PyTorch is an open-source deep learning framework that provides a flexible and dynamic approach to building and training neural networks. Developed by Facebook’s AI Research lab (FAIR), PyTorch is known for its “define-by-run” philosophy, which allows developers to create and modify neural network architectures on the fly. This dynamic nature makes PyTorch particularly well-suited for research and experimentation.
Top 10 use cases of PyTorch:
Here are the top 10 use cases of PyTorch:
- Research and Experimentation: PyTorch’s dynamic computation graph and flexible architecture make it a preferred choice for researchers and academics who need to quickly prototype and experiment with new deep learning models and ideas.
- Natural Language Processing (NLP): PyTorch has been used extensively in NLP tasks like sentiment analysis, machine translation, named entity recognition, and text generation. Its dynamic computation graph is well-suited for sequence-to-sequence models.
- Computer Vision: PyTorch is commonly used for image classification, object detection, image generation, and other computer vision tasks. Its flexible nature allows researchers to design complex architectures like attention mechanisms and GANs.
- Speech Recognition and Synthesis: PyTorch is employed to build models for speech recognition, speech synthesis, and voice assistants, enabling devices to understand and generate human speech.
- Reinforcement Learning: PyTorch is applied in the field of reinforcement learning to train and design agents that learn to interact with environments to maximize rewards. Its dynamic computation graph is advantageous for modeling complex decision-making processes.
- Generative Models: PyTorch is known for its support of generative models such as Variational Autoencoders (VAEs) and Generative Adversarial Networks (GANs), which are used for tasks like image generation, style transfer, and data augmentation.
- Healthcare and Medical Imaging: PyTorch is used in medical research and diagnostics, where deep learning models are applied to analyze medical images, detect diseases, and assist in medical decision-making.
- Autonomous Systems: PyTorch is employed to build models for autonomous vehicles and robotics, enabling machines to perceive and navigate their surroundings based on sensor inputs.
- Time Series Analysis: PyTorch is used for time series forecasting, anomaly detection, and other time-dependent data analysis tasks, leveraging recurrent neural networks (RNNs) and attention mechanisms.
- Transfer Learning: Transfer learning involves using pre-trained models to improve performance on new tasks with limited data. PyTorch’s flexibility makes it suitable for fine-tuning pre-trained models for specific applications.
These are just a few examples of the diverse range of use cases that PyTorch can handle. Its dynamic computation graph and user-friendly nature make it a popular choice for both research and industrial applications in the field of deep learning.
What are the feature of PyTorch?
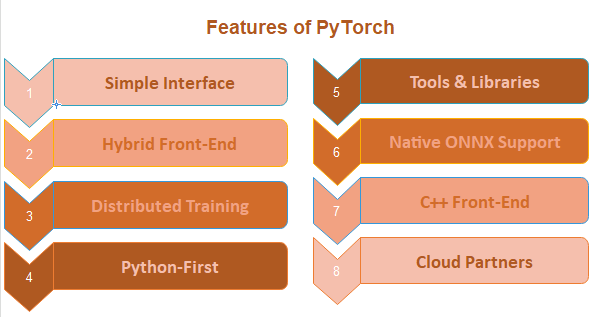
PyTorch offers several features that contribute to its popularity in the deep learning community:
- Dynamic Computation Graph: PyTorch uses a dynamic computation graph, allowing operations to be defined and executed on the fly. This enables more flexible and intuitive model creation and debugging compared to static computation graphs used in some other frameworks.
- Autograd: PyTorch provides automatic differentiation through its
autogradmodule. This feature automatically computes gradients for tensors, making it easy to implement gradient-based optimization algorithms for training neural networks. - Tensors and N-Dimensional Arrays: PyTorch provides a
torch.Tensordata structure that is similar to NumPy arrays but designed for deep learning. Tensors support GPU acceleration for faster computation. - Neural Network Modules: PyTorch offers a wide range of pre-built neural network layers and architectures that can be easily combined to create custom models.
- Easy Debugging: With its dynamic nature, PyTorch allows you to inspect intermediate values and easily debug your code using standard Python debugging tools.
- Pythonic Interface: PyTorch’s API is designed to be intuitive and Pythonic, making it easier for developers to understand and work with.
- GPU Acceleration: PyTorch supports GPU acceleration, allowing you to train and deploy models on GPUs for faster computation.
- Libraries for Computer Vision and NLP: PyTorch includes
torchvisionfor computer vision tasks andtorchtextfor natural language processing, providing pre-processing tools, datasets, and model architectures specific to these domains. - Transfer Learning and Model Zoo: PyTorch offers a range of pre-trained models through its model zoo, making it easy to use and fine-tune well-known architectures for specific tasks.
- Support for Dynamic Inputs: PyTorch models can handle variable-length sequences, making it suitable for tasks involving sequences or text where input lengths vary.
How PyTorch Works and Architecture?
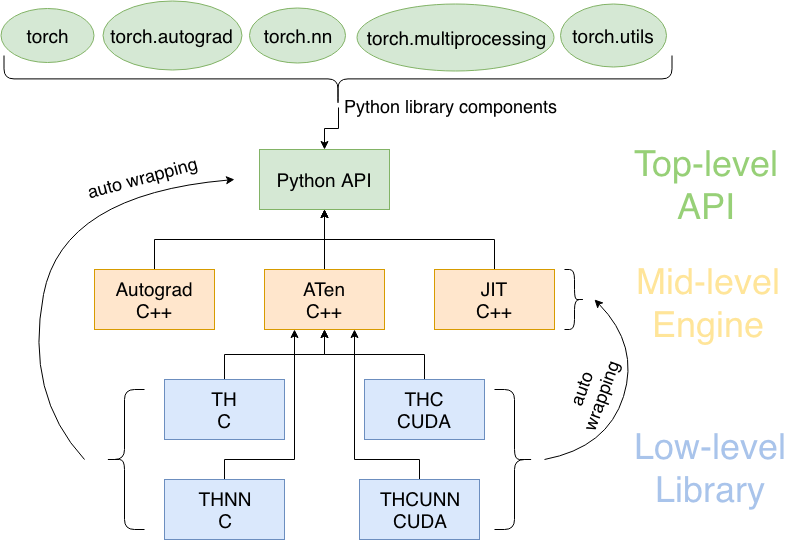
PyTorch is built on the idea of dynamic computation graphs and follows a define-by-run approach. Here’s a simplified overview of how PyTorch works:
- Tensors: Tensors are the basic building blocks of PyTorch. They are multi-dimensional arrays similar to NumPy arrays but with GPU acceleration capabilities.
- Automatic Differentiation: PyTorch’s
autogradmodule automatically tracks operations on tensors and computes gradients with respect to these operations. This is essential for backpropagation and gradient-based optimization. - Define the Model: You define a neural network model using PyTorch’s
nnmodule. This involves creating instances of various layers and specifying their connectivity. - Loss and Optimization: You define a loss function that quantifies the difference between predicted and target values. You choose an optimization algorithm (such as SGD or Adam) and create an optimizer to update the model’s parameters to minimize the loss.
- Training Loop: In a training loop, you forward-propagate inputs through the model to obtain predictions, compute the loss, backpropagate gradients through the network, and update the model’s parameters using the optimizer.
- Evaluation and Prediction: After training, you can evaluate the model’s performance on validation or test data. You can also use the trained model to make predictions on new data.
PyTorch’s architecture revolves around the dynamic computation graph, where operations are executed as they are encountered in the code. This dynamic nature simplifies model creation, debugging, and experimentation, as you can use standard Python constructs and libraries directly. It also makes PyTorch well-suited for tasks that involve varying input lengths or complex control flow.
Under the hood, PyTorch’s dynamic computation graph is built using a combination of Python and C++ libraries. It leverages GPU acceleration for faster computations, which is essential for training deep learning models on large datasets. Overall, PyTorch’s architecture prioritizes flexibility, ease of use, and research-driven experimentation.
How to Install PyTorch?
There are two ways to install PyTorch:
- Using pip
- Open a terminal window.
- Check if pip is installed by running the following command:
pip --versionYou can install it by running the following command, if pip is not installed:
python -m pip install --user pip- You can install PyTorch by running the below command, once pip is installed:
pip install torch- Using Anaconda
- Install Anaconda. Anaconda is a distribution of Python that comes with many pre-installed packages, including PyTorch.
- Once Anaconda is installed, you can open a terminal window and type the following command to install PyTorch:
conda install pytorchWhich method should I use?
The best method to install PyTorch depends on your operating system and your preferences. If you are not sure which method to use, I recommend using pip.
Here are some additional things to keep in mind when installing PyTorch:
- You need to have Python 3 installed.
- You need to have pip installed.
- If you are installing PyTorch from source, you need to have the following dependencies installed:
- GCC or Clang
- CUDA (optional)
- CuDNN (optional)
Basic Tutorials of PyTorch: Getting Started
The following are the steps of basic tutorials of PyTorch:
- Create a tensor.
Python
    import torch

    x = torch.tensor([1, 2, 3])
Code language: JavaScript (javascript)
This creates a tensor with three elements.
- Define a neural network.
Python
    import torch.nn as nn

    class MyNeuralNetwork(nn.Module):
    def __init__(self):
    super().__init__()
    self.linear = nn.Linear(3, 2)

    def forward(self, x):
    return self.linear(x)

    model = MyNeuralNetwork()
This defines a simple neural network with one linear layer.
- Load a dataset.
Python
    import torchvision.datasets as datasets
    import torchvision.transforms as transforms

    mnist_train = datasets.MNIST(root='./data', train=True,      transform=transforms.ToTensor(), download=True)
    mnist_test = datasets.MNIST(root='./data', train=False,      transform=transforms.ToTensor(), download=True)
Code language: PHP (php)
This loads the MNIST dataset, which is a handwritten digits dataset.
- Train the model.
Python
    criterion = nn.CrossEntropyLoss()
    optimizer = torch.optim.SGD(model.parameters(), lr=0.01)

    for epoch in range(10):
    for i, (images, labels) in enumerate(mnist_train):
    outputs = model(images)
    loss = criterion(outputs, labels)
    optimizer.zero_grad()
    loss.backward()
    optimizer.step()
This trains the model on the MNIST dataset for 10 epochs.
- Evaluate the model.
Python
    correct = 0
    total = 0

    for images, labels in mnist_test:
    outputs = model(images)
    _, predicted = torch.max(outputs.data, 1)
    total += labels.size(0)
    correct += (predicted == labels).sum().item()

    accuracy = 100 * correct / total
    print('Accuracy: {}'.format(accuracy))
Code language: PHP (php)
This evaluates the model on the MNIST dataset and prints the accuracy.
These are just the basic steps involved in creating and training a simple neural network using PyTorch. There are many other things you can do with PyTorch, such as using different types of layers, adding regularization, and saving and loading models.

👤 About the Author
Ashwani is passionate about DevOps, DevSecOps, SRE, MLOps, and AiOps, with a strong drive to simplify and scale modern IT operations. Through continuous learning and sharing, Ashwani helps organizations and engineers adopt best practices for automation, security, reliability, and AI-driven operations.
🌐 Connect & Follow:
- Website: WizBrand.com
- Facebook: facebook.com/DevOpsSchool
- X (Twitter): x.com/DevOpsSchools
- LinkedIn: linkedin.com/company/devopsschool
- YouTube: youtube.com/@TheDevOpsSchool
- Instagram: instagram.com/devopsschool
- Quora: devopsschool.quora.com
- Email– contact@devopsschool.com
Find Trusted Cardiac Hospitals
Compare heart hospitals by city and services — all in one place.
Explore Hospitals