What is React Native?

React Native is an open-source framework evolved by Facebook for building cross-platform mobile applications applying JavaScript and React. It allows developers to use React, a popular JavaScript library for building user interfaces, to create native mobile apps for iOS and Android platforms. React Native provides a way to write mobile applications using a single codebase, saving development time and effort.
What is top use cases of React Native?
Top Use Cases of React Native:
- Cross-Platform Mobile Development:
- Description: React Native is primarily used for cross-platform mobile app development, allowing developers to write code once and deploy it on both iOS and Android platforms. This aids in reducing development time and costs.
- Single Codebase for Multiple Platforms:
- Description: Developers can maintain a single codebase for the entire application, which is shared between iOS and Android platforms. This makes it easier to implement updates and new features consistently across platforms.
- Reusable Components:
- Description: React Native promotes the use of reusable components, which can be shared across different parts of the application or even in multiple projects. This modularity refines code maintainability and reusability.
- Hot Reloading:
- Description: React Native supports hot reloading, allowing developers to see the results of the latest code changes instantly without rebuilding the entire application. This feature accelerates the development and debugging process.
- Native-Like Performance:
- Description: React Native bridges the gap between native and web development by allowing developers to write code in JavaScript and still achieve native-like performance. It leverages native components and APIs, resulting in high-performance mobile apps.
- Community and Ecosystem:
- Description: React Native has a large and active community, contributing to its ecosystem with a wide range of libraries, tools, and third-party plugins. This community support makes it easier for developers to find solutions to common issues and access a wealth of resources.
- Code Push Updates:
- Description: React Native supports the ability to push updates to users’ devices without requiring an app store update. This is particularly useful for quickly fixing bugs, improving performance, or adding new features without the need for a lengthy app store approval process.
- Integration with Native Modules:
- Description: React Native allows the integration of native modules written in Swift, Objective-C, Java, or other native languages. This is useful for accessing platform-specific features that may not be available through standard React Native components.
- Cost-Effective Development:
- Description: Developing with React Native can be cost-effective, especially for businesses aiming to create a mobile presence on both iOS and Android platforms. The ability to share a significant portion of the codebase between platforms reduces development costs and time to market.
- Support for Third-Party Plugins:
- Description: React Native has a vibrant ecosystem of third-party plugins and modules, enabling developers to integrate various functionalities into their apps seamlessly. This extensibility allows for rapid development without reinventing the wheel.
- UI/UX-Focused Development:
- Description: React Native’s component-based architecture and declarative syntax make it well-suited for UI/UX-focused development. Designers and developers can collaborate effectively to create visually appealing and responsive user interfaces.
- Rapid Prototyping:
- Description: React Native’s hot reloading and modular structure make it ideal for rapid prototyping. Developers can quickly iterate on features and designs, making it easier to gather feedback and refine the application during the development process.
- Enterprise Mobile Applications:
- Description: React Native is widely adopted for building enterprise mobile applications. It allows companies to leverage their existing web development teams and skills to create efficient and scalable mobile solutions.
- Social Media and Content Apps:
- Description: Many social media and content-based applications use React Native to ensure a consistent user experience across platforms. This includes apps for sharing photos, videos, and other multimedia content.
- E-commerce Applications:
- Description: React Native is popular in the e-commerce sector, where businesses need to provide a seamless and responsive shopping experience on both iOS and Android devices. It allows for the development of feature-rich and visually appealing e-commerce apps.
These use cases highlight the versatility of React Native in addressing various mobile app development needs, making it a preferred choice for developers and businesses looking for cross-platform solutions.
What are feature of React Native?
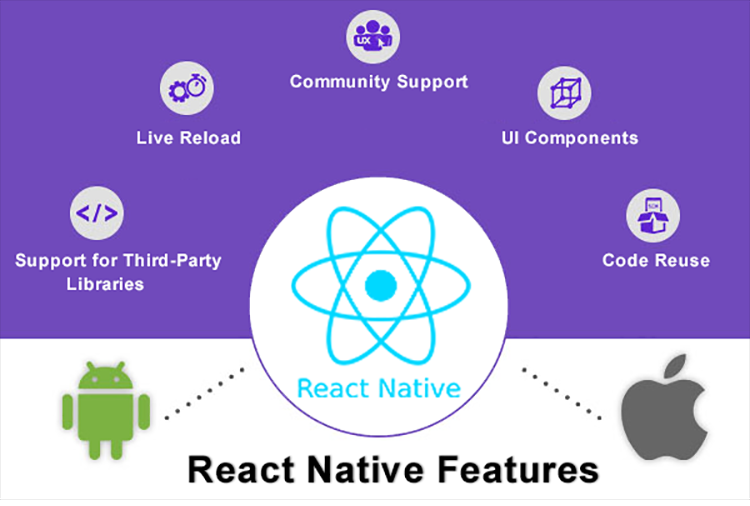
Features of React Native:
- Cross-Platform Development:
- Description: React Native allows developers to build mobile applications that run on both iOS and Android platforms with a single codebase, reducing development time and effort.
- Reusable Components:
- Description: React Native promotes the use of reusable UI components, making it easier to share and maintain code across different parts of an application or between projects.
- Hot Reloading:
- Description: React Native supports hot reloading, enabling developers to see the immediate results of code changes during the development process without the need to rebuild the entire application.
- Native Performance:
- Description: React Native bridges the gap between native and web development, allowing developers to use native components. This results in high performance comparable to fully native apps.
- Declarative Syntax:
- Description: React Native uses a declarative syntax, making it easier for developers to understand and reason about their code. The component-based architecture encourages a modular and structured approach to development.
- Community and Ecosystem:
- Description: React Native has a large and active community that contributes to its ecosystem. This community support results in a wealth of third-party libraries, tools, and resources.
- JavaScript Language:
- Description: React Native uses JavaScript as its programming language, making it accessible to a broad range of developers with web development skills. This lowers the learning curve for those familiar with JavaScript and React.
- Live Updates:
- Description: React Native allows for over-the-air updates, enabling developers to push updates to users’ devices without requiring them to download a new version from an app store.
- Strong Developer Tools:
- Description: React Native comes with a set of powerful developer tools, including React DevTools and React Native Debugger, which aid in debugging, profiling, and inspecting the application’s components.
- Integration with Native Modules:
- Description: React Native allows the integration of native modules written in Swift, Objective-C, Java, or other native languages. This facilitates the use of platform-specific features.
- Rich Ecosystem of Libraries:
- Description: React Native has a vast ecosystem of third-party libraries and modules that can be easily integrated into applications. This accelerates development by leveraging existing solutions.
- Strong Community Support:
- Description: The React Native community is active and provides support through forums, documentation, and open-source contributions. This support is valuable for troubleshooting issues and staying updated on best practices.
- Easy Learning Curve for React Developers:
- Description: Developers familiar with React for web development can quickly transition to React Native, as the core concepts and syntax are similar. This allows for a seamless transfer of skills.
What is the workflow of React Native?
Workflow of React Native:
- Project Initialization:
- Action: Set up a new React Native project.
- Activity: Use the React Native CLI or an integrated development environment (IDE) to create a new project. This involves installing dependencies, configuring project settings, and initializing the project structure.
- Component Development:
- Action: Build UI components.
- Activity: Develop reusable UI components using React Native’s component-based architecture. Components can include views, buttons, input fields, and other elements.
- State Management:
- Action: Manage application state.
- Activity: Use React’s state management to handle dynamic data and user interactions. Consider using state management libraries like Redux for more complex state requirements.
- Navigation Setup:
- Action: Implement navigation between screens.
- Activity: Set up navigation to enable users to move between different screens within the application. React Navigation is a famous library for managing navigation in React Native apps.
- API Integration:
- Action: Connect to backend APIs.
- Activity: Use tools like Axios or the Fetch API to make HTTP requests and integrate with backend services. Handle data retrieval and update UI components based on API responses.
- Styling:
- Action: Style UI components.
- Activity: Apply styles using the StyleSheet API to ensure a consistent and visually appealing user interface. React Native uses a subset of CSS for styling.
- Testing:
- Action: Test components and features.
- Activity: Implement unit tests and integration tests to ensure the functionality of individual components and features. Use testing frameworks like Jest.
- Debugging:
- Action: Debug and troubleshoot issues.
- Activity: Utilize React Native Debugger or built-in debugging tools to identify and resolve issues in the code. Set breakpoints, inspect variables, and view component hierarchies.
- Optimization:
- Action: Optimize performance.
- Activity: Analyze and optimize the performance of the application. Consider code splitting, lazy loading, and other techniques to enhance the app’s speed and responsiveness.
- Deployment:
- Action: Build and deploy the application.
- Activity: Use the React Native CLI or build services to create platform-specific bundles. Deploy the app to app stores for distribution to users.
- Continuous Integration/Continuous Deployment (CI/CD):
- Action: Implement CI/CD pipelines.
- Activity: Set up CI/CD workflows to automate the testing, building, and deployment processes. This ensures a streamlined and efficient development lifecycle.
- Monitoring and Analytics:
- Action: Implement monitoring tools.
- Activity: Integrate analytics tools and monitoring solutions to track user behavior, identify issues, and gather insights into application performance.
- Over-the-Air Updates:
- Action: Implement over-the-air update capabilities.
- Activity: Use services like CodePush to enable the delivery of updates to users’ devices without requiring them to download a new version from an app store.
- Maintenance and Updates:
- Action: Maintain and update the application.
- Activity: Regularly update dependencies, apply security patches, and release new features or improvements. Monitor user feedback and address issues promptly.
This workflow provides a step-by-step guide for developing and maintaining React Native applications, covering key aspects from project initialization to ongoing updates and maintenance.
How React Native Works & Architecture?
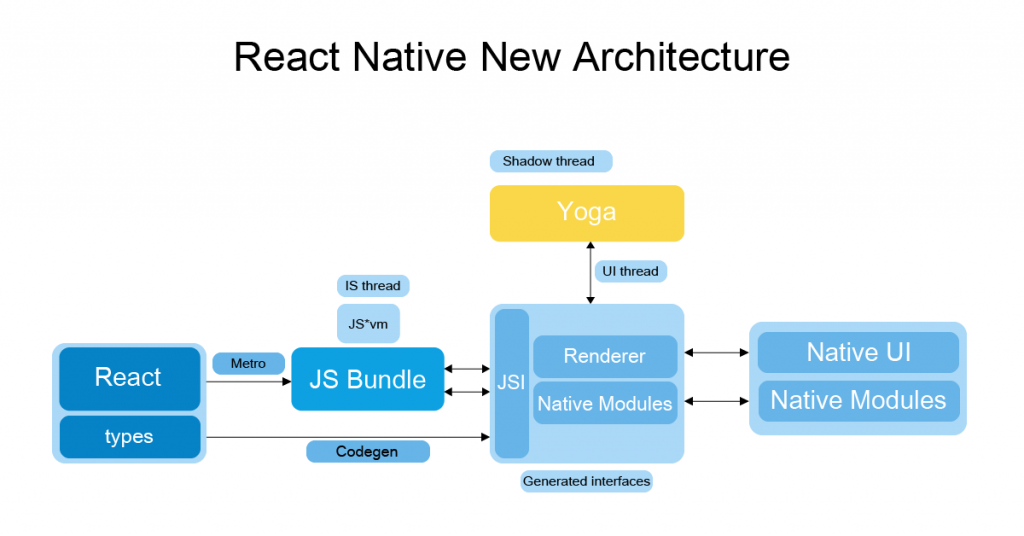
React Native is a popular JavaScript framework for building native mobile apps for iOS and Android. Here’s how it works and its architecture:
1. JavaScript Development:
- Developers write code using JavaScript and React syntax.
- The code defines the UI components and their behavior.
- React Native uses its own virtual DOM (Document Object Model) to efficiently represent the UI.
2. Conversion to Native Code:
- The React Native bridge takes the JavaScript code and converts it to native code (Objective-C/Swift for iOS, Java for Android).
- This allows the app to run seamlessly on the target platform.
- The bridge acts as a communication layer between the JavaScript and native environments.
3. Rendering Native Views:
- The converted native code interacts with the platform’s native UI components.
- Native views like buttons, text fields, and images are rendered on the device screen.
- This ensures that the app looks and feels like a native app.
4. Threading Model:
- React Native uses a multi-threaded architecture.
- The JavaScript code runs on the main thread, while UI updates happen on a separate UI thread.
- This ensures responsiveness and smooth animations.
5. Architecture Overview:
- React Components: Represent UI elements and handle user interaction.
- JavaScript Code: Defines the app’s logic and interacts with native modules.
- Native Modules: Provide access to platform-specific features like camera, GPS, etc.
- React Native Bridge: Facilitates communication between JavaScript and native code.
- JavaScript Virtual DOM: In-memory representation of the UI, used for efficient updates.
- Native UI Components: Rendered on the device screen using the platform’s native APIs.
Benefits of React Native Architecture:
- Cross-platform development: Build apps for iOS and Android with a single codebase.
- Faster development: React’s declarative UI and hot reloading improve development speed.
- Native performance: Apps look and feel like native apps, with smooth performance.
- Large community and ecosystem: Abundant resources and libraries available.
Challenges of React Native Architecture:
- Bridge overhead: Communication between JavaScript and native code can introduce performance overhead.
- Limited native features: Not all native features are readily available through React Native modules.
- Platform-specific quirks: Developers may need to handle platform-specific differences.
Overall, React Native’s architecture offers a powerful and efficient way to build cross-platform mobile apps with a single codebase. Developers can leverage the familiarity of JavaScript and React while still achieving native performance and look-and-feel.
How to Install and Configure React Native?
Installing and Configuring React Native:
Following is a step-by-step guide on how to install and configure React Native:
1. Install Node.js:
- Download and install Node.js from the official website
- Verify the installation by running
node -vin your terminal.
2. Install Yarn (optional):
- Yarn is a package manager often used with React Native.
- Download and install Yarn from the official website
- Verify the installation by running
yarn -vin your terminal.
3. Install React Native CLI:
- Run the following command to install the React Native CLI globally:
npm install -g react-native-cli
- Verify the installation by running
react-native -vin your terminal.
4. Create a New Project:
- Run the following command to create a new React Native project:
react-native init my-project
- Replace
my-projectwith your desired project name.
5. Start the Project:
- Navigate to your project directory:
cd my-project
- Install the project dependencies:
npm install
- Start the Metro bundler:
npm start
- Run the following command on iOS:
react-native run-ios
- Run the following command on Android:
react-native run-android
Important Tips:
- Follow the official React Native documentation for detailed installation and configuration instructions.
- Use a text editor with React Native syntax highlighting for better development experience.
- Begin with simple projects and gradually improves to more complex ones as you gain confidence.
- Utilize online resources and tutorials for troubleshooting and additional learning.
- Join the React Native community for support and knowledge sharing.
By following these steps and utilizing the available resources, you can successfully install and configure React Native and start building your own mobile apps.
Fundamental Tutorials of React Native: Getting started Step by Step
Following is a breakdown of step-by-step basic tutorials to get you started with React Native:
1. Setup Development Environment:
- Install Node.js: Follow the official guide to install Node.js on your system
- Install React Native CLI: Run
npm install -g react-native-cliin your terminal to install the React Native command-line interface. - (Optional) Install Yarn: Yarn is a popular package manager for React Native. Install it with
npm install -g yarn.
2. Create a New Project:
- Run
react-native init my-projectto create a new React Native project named “my-project”. - Navigate to the project directory:
cd my-project. - Install dependencies:
npm installoryarn.
3. Start the Development Server:
- Run
react-native startto start the Metro bundler, which compiles your JavaScript code and serves it to the running application.
4. Run the App on a Simulator or Device:
- iOS:
- Connect your iPhone or iPad to your computer.
- Run
react-native run-iosto launch the app on your device or simulator.
- Android:
- Combine your Android device to your computer and enable USB debugging.
- Run
react-native run-androidto start the app on your device.
5. Basic Building Blocks:
- Components: Learn how to create and use React components to build your UI. Start with simple components like
Text,View, andImage. - Props: Understand how to pass data between components using props.
- State: Learn about state management in React Native and how to update the UI based on state changes.
6. User Interaction:
- Touch Events: Implement touch events like
onPressandonLongPressto handle user interactions with your UI elements. - TextInput: Learn how to create input fields to allow users to enter text.
- ScrollView: Implement scroll views to display content that exceeds the screen size.
7. Networking and APIs:
- Fetch API: Use the Fetch API to fetch data from external APIs.
- AsyncStorage: Learn how to persist data locally on the device using AsyncStorage.
8. Styling:
- Inline Styles: Apply styles directly to components using inline styles.
- StyleSheet: Learn how to create reusable styles with StyleSheet.
- Flexbox: Understand the basics of Flexbox for layout management.
9. Navigation:
- React Navigation: Use a library like React Navigation to navigate between different screens in your app.
- Stack Navigator: Learn how to create a stack of screens where users can navigate forward and backward.
- Tab Navigator: Implement a tab bar to switch between different sections of your app.
Remember: Start with simple projects and gradually build your knowledge and skills over time. Practice regularly, experiment with different features, and utilize the available resources to solidify your understanding of React Native.
Important Tips:
- Utilize hot reloading to see changes in your code reflected instantly on the running app.
- Use the React Developer Tools browser extension for debugging and inspecting the UI components.
- Keep your dependencies updated for bug fixes and security improvements.
- Don’t be afraid to ask for help in the community if you encounter any challenges.
By following these steps and exploring the resources provided, you can effectively learn the basics of React Native and start building your own mobile applications.

Find Trusted Cardiac Hospitals
Compare heart hospitals by city and services — all in one place.
Explore Hospitals