What is Talend?
Talend is an open-source data integration platform that allows organizations to easily move, process, and analyze large amounts of data. It offers a wide range of features and capabilities, making it a popular choice for businesses of all sizes.
Top 10 use cases of Talend:
- Data Warehousing
- Business Intelligence
- Data Migration
- Cloud Integration
- Master Data Management
- Data Quality
- ETL (Extract, Transform, Load)
- Big Data Integration
- Real-time Data Integration
- IoT (Internet of Things) Integration
What are the feature of Talend?
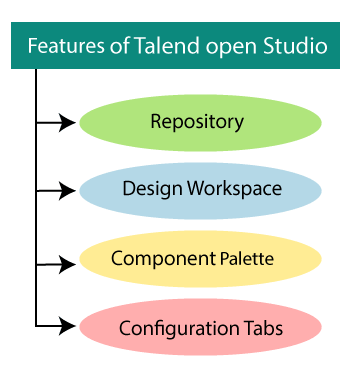
- Open-source
- Easy-to-use graphical interface
- Large number of connectors and components
- Real-time monitoring and logging
- Support for big data technologies such as Hadoop, Spark, and NoSQL databases
- Automated testing and debugging
- Cloud integration capabilities
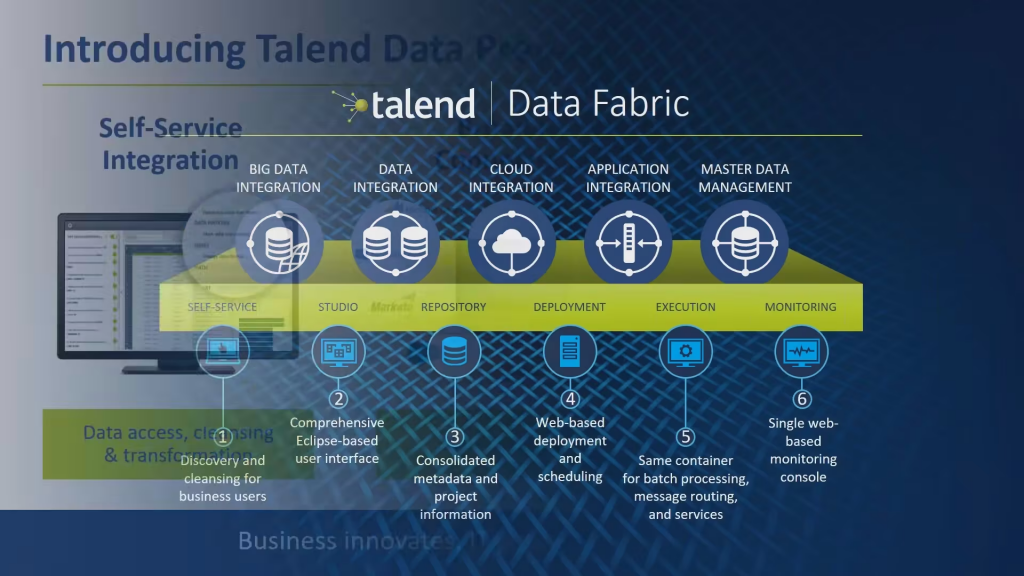
How Talend works and Architecture?
Talend follows a flexible and scalable architecture, enabling users to build complex data integration workflows to meet their specific business needs. Below is an overview of how Talend works and its architecture:
- Talend Components:
Talend provides a wide range of pre-built components that serve various functions, such as data connectors, data transformation, data quality, and job control. These components are available in the Talend Studio Palette and can be dragged and dropped onto the workspace to create data integration jobs. Some common components include:
- tFileInputDelimited: Reads data from delimited files (e.g., CSV).
- tInputExcel: Reads data from Excel files.
- tMap: Performs data transformations and mappings.
- tFilterRow: Filters data based on certain conditions.
- tMySQLOutput: Writes data to a MySQL database.
- tSalesforceInput: Reads data from Salesforce.
- Talend Job Design:
Data integration workflows in Talend are created using Talend Jobs. Jobs are visual representations of data integration tasks, composed of interconnected components in the workspace. Talend Studio provides a graphical drag-and-drop interface to design and configure these jobs. The flow of data through the components is defined by connecting the output of one component to the input of another. - Metadata Management:
Talend has a powerful metadata management feature that allows users to define reusable metadata for connections, schemas, and other settings. This means that users can create metadata once and use it across multiple jobs. Any changes made to the metadata propagate to all jobs using that metadata, making it easier to maintain and update data integration workflows. - Code Generation:
Once the job design is complete, Talend Studio generates Java code behind the scenes for the job. This code represents the data integration logic defined by the components in the job. The generated code is optimized for performance and efficiency. - Job Execution:
Talend supports the execution of jobs in various ways:
- Local execution: Jobs can be run directly from Talend Studio on the local machine for development and testing purposes.
- Remote execution: Jobs can be deployed to a Talend Job Server, allowing remote execution in a scalable and distributed environment.
- Scheduling: Talend Jobs can be scheduled to run at specific times using built-in scheduling features or by integrating with third-party scheduling tools.
- Talend Runtime:
Talend Runtime is the engine responsible for executing Talend Jobs. It can be deployed as standalone or embedded within other applications. Talend Runtime provides features like load balancing, clustering, and parallel execution to optimize job performance. - Talend Job Server:
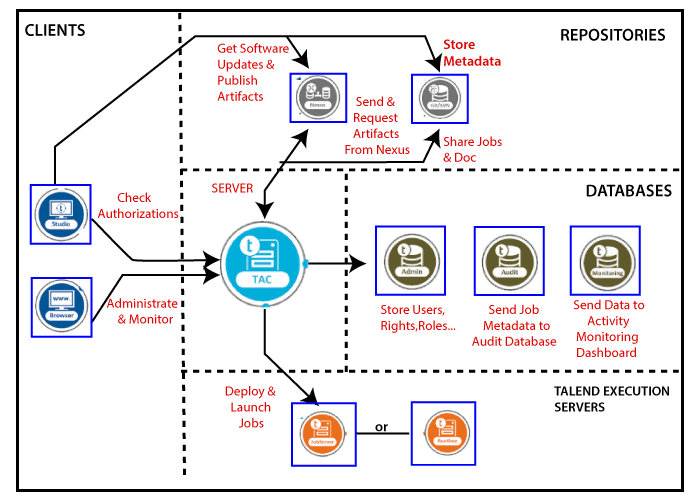
The Talend Job Server is used to manage job execution on remote servers. It allows centralized monitoring, scheduling, and distribution of jobs across different environments. - Talend Administration Center:
The Talend Administration Center provides a web-based interface for managing, monitoring, and scheduling jobs. It allows collaboration among developers, administrators, and users, providing centralized control over Talend artifacts.
Overall, Talend’s architecture is designed to provide a robust, scalable, and flexible platform for data integration and management. Its visual development approach, rich set of components, and metadata management capabilities make it a popular choice for organizations of various sizes to handle their data integration needs.
How to Install Talend?
Installing Talend is a straightforward process that involves downloading the Talend Studio installer and running it on your computer. Talend offers both open-source and commercial versions of its data integration software. Here are the general steps to install Talend Studio (the open-source version):
Step 1: Download the Talend Studio Installer:
Go to the Talend website (https://www.talend.com/download/) and download the Talend Studio installer for your operating system. Make sure to choose the appropriate version based on your system architecture (32-bit or 64-bit) and the Talend product you want to install (e.g., Talend Open Studio for Data Integration).
Step 2: Launch the Installer:
To start the installation process, locate the downloaded installer file and run it.
Step 3: Choose Installation Type:
You will be prompted to select the installation type during the installation. For the Talend Studio open-source version, you typically have options like “Typical” or “Custom” installation.
- The “Typical” installation includes the essential components needed for data integration.
- The “Custom” installation allows you to choose specific features and components to install.
Step 4: Agree to License Agreement:
Read and accept the Talend license agreement to proceed with the installation.
Step 5: Choose Installation Directory:
Select the directory where you want to install Talend Studio. The installer will use this location to place all the necessary files.
Step 6: Configure Java Runtime Environment (JRE):
If you don’t have Java installed on your system, the installer may prompt you to choose the Java Runtime Environment (JRE) to use with Talend Studio. You can select an existing JRE installed on your system or let the installer download and install one for you.
Step 7: Complete the Installation:
The installer will now copy the required files and components to the installation directory. You will get a confirmation message, after the completion of the installation.
Step 8: Launch Talend Studio:
After the installation, you can launch Talend Studio by clicking on its icon or running the executable file from the installation directory.
Step 9: Configure Workspace (Optional):
On the first launch, you may be asked to configure the workspace location for your Talend projects. You can either use the default workspace or choose a custom location.
Step 10: Start Using Talend Studio:
Once Talend Studio is launched, you can start building data integration jobs and workflows using the intuitive drag-and-drop interface and a wide range of pre-built components.
That’s it! You have now installed Talend Studio on your computer and can start using it for data integration, ETL (Extract, Transform, Load), data profiling, and other data-related tasks. Note that these steps are general guidelines for the installation process, and the exact steps may vary slightly depending on the version and release of Talend Studio you are installing. Always refer to the official Talend documentation or any specific instructions provided with the installer for the most accurate and up-to-date installation instructions.
Basic Tutorials of Talend: Getting Started
To get started with Talend, it is recommended to begin with the following tutorials:
Here, Let’s come to the step-by-step tutorial to get started with Talend. In this tutorial, I’ll guide you through the process of installing Talend Open Studio and creating a simple data integration job.
Step 1: Download and Install Talend Open Studio
- Visit the Talend website (www.talend.com) and navigate to the “Products” section.
- Look for “Talend Open Studio” and click on “Download Now” or a similar link.
- Choose the appropriate version for your operating system (Windows, macOS, or Linux) and download the installer.
- Once the download is complete, run the installer and follow the on-screen instructions to install Talend Open Studio on your computer.
Step 2: Launch Talend Open Studio
- After installation, launch Talend Open Studio by finding the appropriate shortcut/icon on your computer.
- Talend Open Studio may take a few seconds to start up, depending on your computer’s performance.
Step 3: Create a New Talend Project
- When Talend Open Studio is running, click on “Create New Project” from the Welcome screen or navigate to “File” > “New” > “Project” from the top menu.
- Give your project a name and specify the directory where you want to save it.
- Click “Finish” to create the new project.
Step 4: Create a New Job
- With the project created, you will be presented with the Talend Studio interface.
- To create a new job, right-click on the project name in the “Repository” panel on the left and select “Create Job” from the context menu.
- Provide a name for your job and click “Finish.”
Step 5: Design the Data Integration Job
- With the new job open in the workspace, you’ll see two main sections: the “Palette” on the right and the “Designer” in the middle.
- The Palette contains a wide range of components to perform various tasks like reading data, transforming data, and writing data. Drag and drop the required components onto the Designer area to create your data integration flow.
- Connect the components by dragging a line from the output of one component to the input of another. This defines the flow of data from source to destination.
- Configure each component by double-clicking on it, and fill in the necessary details, such as file paths, database connection information, or transformations.
Step 6: Save and Execute the Job
- Save your job by clicking on the save icon in the toolbar or navigating to “File” > “Save” from the top menu.
- To execute the job, click on the “Run” tab at the bottom of the screen, and then click on the “Run” button (green arrow).
- You can monitor the job’s execution progress and view any potential errors in the “Run” tab.
Congratulations! You’ve created and executed your first Talend data integration job. This tutorial covered the basic steps to get started, but there’s much more to explore in Talend, including advanced transformations, error handling, scheduling jobs, and more. Talend also offers a wide range of connectors to various data sources and platforms, making it a powerful tool for data integration tasks.

👤 About the Author
Ashwani is passionate about DevOps, DevSecOps, SRE, MLOps, and AiOps, with a strong drive to simplify and scale modern IT operations. Through continuous learning and sharing, Ashwani helps organizations and engineers adopt best practices for automation, security, reliability, and AI-driven operations.
🌐 Connect & Follow:
- Website: WizBrand.com
- Facebook: facebook.com/DevOpsSchool
- X (Twitter): x.com/DevOpsSchools
- LinkedIn: linkedin.com/company/devopsschool
- YouTube: youtube.com/@TheDevOpsSchool
- Instagram: instagram.com/devopsschool
- Quora: devopsschool.quora.com
- Email– contact@devopsschool.com
Find Trusted Cardiac Hospitals
Compare heart hospitals by city and services — all in one place.
Explore Hospitals