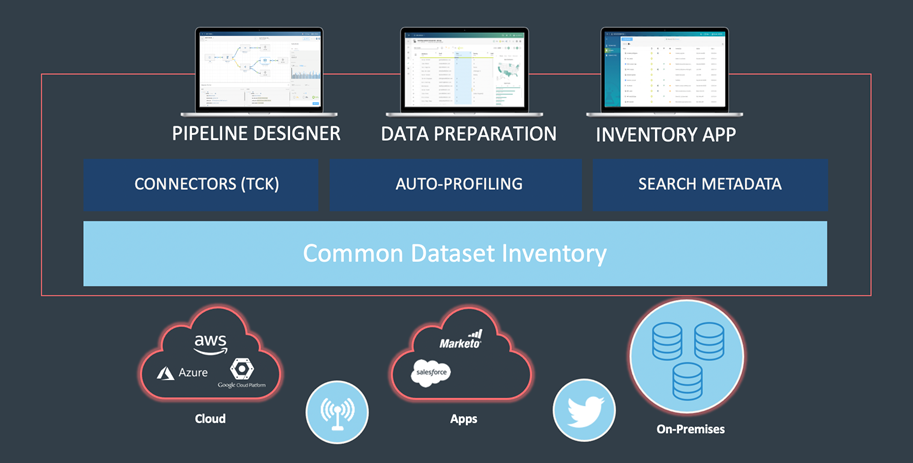
What is Talend Pipeline Designer?

Talend Pipeline Designer is a cloud-based data integration tool provided by Talend, a leading data integration and data management software company. It allows users to design and execute data pipelines in a visual and intuitive manner, making it easier to extract, transform, and load (ETL) data from various sources into target systems. Talend Pipeline Designer is part of the broader Talend Data Fabric suite, which offers a comprehensive set of data integration, data quality, and data governance capabilities.
Top 10 use cases of Talend Pipeline Designer:
- Data Ingestion: Extract data from various sources, such as databases, files, APIs, and cloud services, and ingest it into target data stores.
- Data Transformation: Perform data transformations, cleansing, and enrichment to ensure data quality and consistency.
- Data Loading: Load data into data warehouses, data lakes, or cloud storage for analysis and reporting.
- Real-time Data Integration: Integrate and process streaming data from IoT devices, sensors, and other real-time sources.
- Cloud Data Integration: Migrate data from on-premises systems to cloud platforms or synchronize data between cloud services.
- Data Synchronization: Keep data consistent across different systems by synchronizing data between them.
- Data Replication: Replicate data from one database to another for redundancy or backup purposes.
- Data Archiving: Archive historical data to long-term storage solutions.
- Data Governance: Enforce data quality rules and governance policies during data integration processes.
- Data Orchestration: Orchestrate complex data workflows involving multiple data sources and destinations.
What are the feature of Talend Pipeline Designer?
- Drag-and-Drop Interface: Design data pipelines using an intuitive visual interface with drag-and-drop components.
- Pre-built Components: Access a library of pre-built connectors and transformations to simplify data integration.
- Data Profiling: Profile data to assess its quality, structure, and potential issues.
- Data Mapping: Map data fields between source and target systems with built-in data mapping capabilities.
- Data Validation: Validate data against defined rules to ensure data quality and integrity.
- Data Governance: Enforce data governance policies and standards during data integration processes.
- Real-time Monitoring: Monitor data pipeline execution in real-time to detect and resolve issues promptly.
- Error Handling: Handle errors and exceptions during data integration processes.
- Metadata Management: Manage metadata to keep track of data lineage and transformation processes.
- Cloud-Based: Talend Pipeline Designer is a cloud-based tool accessible via web browsers, eliminating the need for on-premises installations.
How Talend Pipeline Designer works and Architecture?
Talend Pipeline Designer works by allowing users to visually design data pipelines using a cloud-based interface. Users drag and drop components onto the canvas, connect them to define data flow, and configure the components’ settings to perform data transformations, extractions, and loading operations.
The key components of Talend Pipeline Designer are:
- Connectors: These components facilitate data extraction from various sources (e.g., databases, files, APIs).
- Transformations: These components perform data transformations, enrichment, and cleansing.
- Loaders: These components facilitate data loading into target data stores (e.g., databases, cloud storage).
- Monitoring: Talend Pipeline Designer provides real-time monitoring of pipeline execution and status.
How to Install Talend Pipeline Designer?
Talend Pipeline Designer is a cloud-based tool, so there is no need for traditional installation. To use Talend Pipeline Designer, follow these steps:
- Sign up: Visit the Talend website (https://www.talend.com/) and sign up for an account.
- Log in: After signing up, log in to the Talend Pipeline Designer using your account credentials.
- Access the Designer: Once logged in, you can access the Talend Pipeline Designer from your web browser.
- Start Designing Pipelines: Use the drag-and-drop interface to design, configure, and execute your data pipelines.
Talend Pipeline Designer operates in the cloud, so there is no need to install any software on your local machine. Simply access the tool through your web browser, and you can start designing and executing data pipelines immediately.
Basic Tutorials of Talend Pipeline Designer: Getting Started
Are you ready to dive into the wonderful world of Talend Pipeline Designer? In this tutorial, we’ll take you through the basics of using this powerful tool to create data pipelines. So don’t fear, relax, and let’s get started!

Chapter 1: Getting Started
1.1 Installation
First things first, let’s get Talend Pipeline Designer up and running on your machine. Here’s a step-by-step procedure that will help you through the installation process:
- Go to the Talend website and download the latest version of Talend Pipeline Designer.
- Start the installer and apply the given screen instructions.
- Once the installation is complete, launch Talend Pipeline Designer.
1.2 Creating a New Project
Now that you have Talend Pipeline Designer installed, it’s time to create your first project. Here’s how you can do it:
- Open Talend Pipeline Designer.
- Click on “File” in the top menu and select “New Project”.
- Give your project a name and choose a directory to save it in.
- Click “Finish” to create the project.
Chapter 2: Building Your First Pipeline
2.1 Adding a Data Source
Let’s start by adding a data source to our pipeline. Follow these steps:
- Right-click on your project and choose “New” > “Data Source” in the project explorer.
- Choose the type of data source you want to add (e.g., CSV, Excel, Database).
- Configure the settings for your data source (e.g., file path, database connection details).
- Click “Finish” to add the data source to your pipeline.
2.2 Transforming Data
Now that we have a data source, let’s transform the data using Talend Pipeline Designer’s powerful transformation capabilities. Here’s how:
- Drag and drop the data source onto the canvas.
- Add a transformation component (e.g., Filter, Sort, Join) to the canvas.
- Connect the data source to the transformation component.
- Configure the settings for the transformation component.
- Repeat steps 2-4 to add more transformation components if needed.
2.3 Outputting the Data
Finally, let’s output the transformed data to a destination. Follow these steps:
- Drag and drop the transformation component onto the canvas.
- Add an output component (e.g., CSV Output, Database Output) to the canvas.
- Connect the transformation component to the output component.
- Configure the settings for the output component (e.g., file path, database connection details).
- Click “Run” to execute the pipeline and see the output.
Conclusion
Congratulations! You’ve completed the basic tutorials of Talend Pipeline Designer. Now you’re ready to explore more advanced features and create even more complex data pipelines. Happy data integration!

👤 About the Author
Ashwani is passionate about DevOps, DevSecOps, SRE, MLOps, and AiOps, with a strong drive to simplify and scale modern IT operations. Through continuous learning and sharing, Ashwani helps organizations and engineers adopt best practices for automation, security, reliability, and AI-driven operations.
🌐 Connect & Follow:
- Website: WizBrand.com
- Facebook: facebook.com/DevOpsSchool
- X (Twitter): x.com/DevOpsSchools
- LinkedIn: linkedin.com/company/devopsschool
- YouTube: youtube.com/@TheDevOpsSchool
- Instagram: instagram.com/devopsschool
- Quora: devopsschool.quora.com
- Email– contact@devopsschool.com
Find Trusted Cardiac Hospitals
Compare heart hospitals by city and services — all in one place.
Explore Hospitals