What is Tkinter?

Tkinter is a standard Graphical User Interface (GUI ) toolkit that comes with Python. It provides a set of tools and libraries for building desktop applications with graphical interfaces. Tkinter is based on the Tk GUI toolkit and is commonly used for creating simple to moderately complex desktop applications with graphical user interfaces.
What is top use cases of Tkinter?
Top Use Cases of Tkinter:
- Desktop Applications:
- Tkinter is widely used for building desktop applications with graphical interfaces. It allows developers to create windows, buttons, menus, and other GUI components to build interactive and user-friendly applications.
- Data Visualization Tools:
- Tkinter can be used to create data visualization tools by integrating with libraries like Matplotlib. Developers can build applications that display charts, graphs, and other visual representations of data.
- Educational Software:
- Tkinter is often used for developing educational software, especially in introductory programming courses. It provides a straightforward way for students to create GUI applications as part of their learning experience.
- Utility Tools:
- Developers use Tkinter to build utility tools and applications that perform specific tasks. These can include file converters, image editors, calculators, and other small utility applications.
- Configuration Tools:
- Tkinter is suitable for building configuration tools where users can interactively set preferences or configure settings for applications. It provides a familiar interface for users to navigate and modify options.
- Database Applications:
- Tkinter is used to create front-end interfaces for database applications. Developers can build forms and screens for data entry, retrieval, and manipulation, interacting with databases through Python database connectors.
- Automation Scripts with GUIs:
- Tkinter can be used to add graphical interfaces to automation scripts. Instead of running scripts solely from the command line, developers can create GUIs for users to interact with and configure scripts.
- Text Editors and IDEs:
- While Tkinter alone might not be suitable for building fully-featured text editors or IDEs, it can be used to create simple text editors or scripting environments where users can input and edit code.
- Game Development Tools:
- Tkinter can be employed to create simple game development tools or level editors. While not suitable for complex game development, Tkinter can provide basic interfaces for certain game-related tasks.
- Monitoring and Control Systems:
- Tkinter is used in applications that involve monitoring and controlling systems. This includes interfaces for monitoring sensor data, controlling devices, and interacting with hardware.
- Customized GUIs for Scripts:
- Developers often use Tkinter to create customized graphical interfaces for scripts. This allows users to interact with scripts using a more intuitive GUI rather than the command line.
- Network Configuration Tools:
- Tkinter can be used to build tools for configuring network settings. This includes applications for setting up connections, managing network devices, and configuring network parameters.
- Simulation and Modeling Tools:
- Tkinter can be used to build simulation and modeling tools where users can interact with and visualize simulated scenarios. This is common in engineering and scientific applications.
- Prototyping:
- Tkinter is suitable for quickly prototyping GUI applications. Developers can create prototype interfaces to demonstrate concepts, gather feedback, and refine the design before building more polished applications.
- Interactive Tutorials:
- Tkinter is often used in interactive tutorials and educational materials for teaching GUI programming in Python. Its simplicity makes it accessible for learners.
Tkinter is a versatile and accessible tool for building graphical user interfaces in Python. While it may not be the best choice for highly complex applications, it excels in scenarios where a lightweight and straightforward GUI toolkit is needed, especially for smaller-scale projects and educational purposes.
What are feature of Tkinter?
Features of Tkinter:
- Simple and Easy to Learn:
- Tkinter is designed to be simple and easy to learn, making it accessible for beginners in GUI programming with Python.
- Platform Independence:
- Tkinter is platform-independent, meaning that applications developed using Tkinter can run on different operating systems without modification.
- Standard Library Inclusion:
- Tkinter is included in the Python standard library, eliminating the need for additional installations or dependencies. It comes bundled with Python, making it readily available.
- Cross-Platform Look and Feel:
- Tkinter applications maintain a consistent look and feel across different operating systems, providing a native appearance on each platform.
- Extensible:
- Tkinter is extensible, allowing developers to create custom widgets and extend its functionality using the Tkinter module or other third-party extensions.
- Event-Driven Programming:
- Tkinter follows an event-driven programming paradigm. Actions, such as button clicks or keypresses, trigger events, and developers can define functions (event handlers) to respond to these events.
- Widgets:
- Tkinter provides a variety of built-in widgets, including buttons, labels, entry fields, text boxes, checkboxes, radio buttons, and more. These widgets form the building blocks of a GUI.
- Geometry Managers:
- Tkinter includes geometry managers (e.g.,
pack,grid,place) that help in arranging widgets within a window. These managers simplify the process of organizing the layout of the GUI.
- Tkinter includes geometry managers (e.g.,
- Canvas Widget:
- Tkinter includes a powerful
Canvaswidget that allows developers to draw shapes, lines, text, and images. It is useful for creating custom graphical elements.
- Tkinter includes a powerful
- Menus and Menu Bars:
- Tkinter supports the creation of menus and menu bars, allowing developers to add dropdown menus to their applications with various options and commands.
- Dialog Boxes:
- Tkinter provides dialog boxes for common interactions, such as file selection (
tkinter.filedialog), color selection (tkinter.colorchooser), and message boxes (tkinter.messagebox).
- Tkinter provides dialog boxes for common interactions, such as file selection (
- Theming:
- Tkinter supports theming, allowing developers to customize the appearance of their applications by selecting different themes.
- Clipboard Interaction:
- Tkinter allows interaction with the system clipboard, enabling copy and paste functionality within the application.
- Text and Text Editing:
- Tkinter includes a
Textwidget that supports multiline text editing. It allows developers to create text editors or input areas for larger amounts of text.
- Tkinter includes a
- Binding and Events:
- Tkinter provides a mechanism for binding functions to events. Developers can specify which functions should be executed when specific events occur, such as button clicks or keypresses.
- Integration with Other GUI Toolkits:
- Tkinter can be integrated with other GUI toolkits, allowing developers to combine Tkinter with additional features or widgets from other libraries.
What is the workflow of Tkinter?
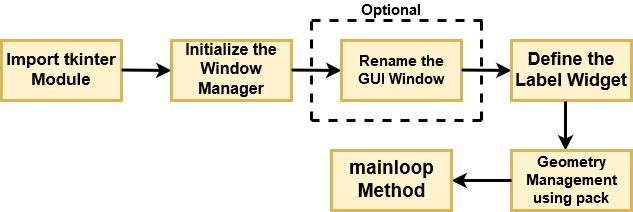
Workflow of Tkinter:
- Import Tkinter:
- Import the
tkintermodule in Python to access the Tkinter toolkit.
import tkinter as tkCode language: JavaScript (javascript)- Create the Main Window:
- Create the main window for the application using the
Tkclass.
root = tk.Tk()- Add Widgets:
- Add widgets to the window, such as buttons, labels, entry fields, etc.
   label = tk.Label(root, text="Hello, Tkinter!")
button = tk.Button(root, text="Click Me")Code language: JavaScript (javascript)- Organize Layout:
- Use geometry managers (
pack,grid,place) to organize the layout of widgets within the window.
   label.pack()
button.pack()Code language: CSS (css)- Define Functions:
- Define functions that will be executed in response to events, such as button clicks.
   def on_button_click():
       label.config(text="Button Clicked!")

button.config(command=on_button_click)Code language: JavaScript (javascript)- Run the Main Loop:
- Start the main event loop using the
mainloopmethod. This loop continuously waits for user interactions and events.
root.mainloop()Code language: CSS (css)- Respond to Events:
- Define event handler functions to respond to user actions or other events.
   def on_button_click():
       label.config(text="Button Clicked!")

button.config(command=on_button_click)Code language: JavaScript (javascript)- Dialog Boxes and Menus:
- Use dialog boxes (
filedialog,colorchooser,messagebox) and menus to enhance the functionality of the application.
   from tkinter import filedialog

   def open_file_dialog():
       file_path = filedialog.askopenfilename()
print("Selected File:", file_path)Code language: JavaScript (javascript)- Canvas Widget:
- Utilize the
Canvaswidget for drawing shapes, lines, and other graphical elements.
   canvas = tk.Canvas(root, width=200, height=100)
   canvas.create_rectangle(50, 25, 150, 75, fill="blue")
canvas.pack()Code language: JavaScript (javascript)- Clipboard Interaction:
- Implement clipboard interaction for copy and paste functionality.
root.clipboard_clear() root.clipboard_append("Hello, Clipboard!") root.update() # Required to update the clipboard - Theming:
- Apply themes to customize the appearance of the application.
from tkinter import ttk style = ttk.Style() style.theme_use("clam") - Integration with Other Libraries:
- Integrate Tkinter with other GUI libraries or toolkits to combine features and extend functionality.
    import tkinter as tk
    from tkinter import ttk

    # Create a themed button
    themed_button = ttk.Button(root, text="Themed Button")          Code language: PHP (php)
13. Testing and Debugging:
- Test the application by interacting with the GUI components. Apply debugging tools and techniques to identify and fix issues.
14. Deployment:
- Deploy the application by packaging it using tools like PyInstaller or cx_Freeze. Distribute the application to end-users.
15. Ongoing Maintenance:
- Regularly update the application based on user feedback, address bugs, and consider adding new features. Ensure compatibility with the latest versions of Python and Tkinter.
The workflow of Tkinter involves creating a main window, adding widgets, defining event handlers, and running the main event loop. The simplicity of Tkinter makes it suitable for developing basic to moderately complex GUI applications in Python.
How Tkinter Works & Architecture?
Tkinter is a powerful Python library for building graphical user interfaces (GUIs). It uses the Tk widget toolkit developed by the Tcl scripting language to create widgets like buttons, labels, and canvases. Understanding how Tkinter works and its architecture can help you build efficient and robust GUIs in Python.
Core Principles:
- Object-oriented: Tkinter elements are represented as Python objects with attributes and methods.
- Event-driven: User interactions and other events trigger callbacks for handling specific actions.
- Widget-based: GUIs are built by composing and configuring different types of widgets.
- Extensible: Additional functionality can be added through external libraries and packages.
Workflow:
- Import Tkinter:
import tkinter as tk - Create a main window:
root = tk.Tk() - Create and configure widgets:
label = tk.Label(root, text="Hello, World!") - Pack or grid widgets:
label.pack()orlabel.grid(row=0, column=1) - Start the main loop:
root.mainloop()
Architecture:
- Main window: The root window represents the top-level container for all other widgets.
- Widgets: Basic building blocks of GUIs, each with specific functionality (e.g., buttons, labels, entry fields).
- Geometry managers: Arrange and resize widgets within the window (e.g., pack, grid).
- Events: User interactions and system events trigger callbacks for specific actions (e.g., button click, window resize).
- Event loop: Continuously listens for events and updates the GUI when necessary.
Key Benefits:
- Simple and easy to learn: Compared to other GUI libraries, Tkinter has a gentle learning curve.
- Cross-platform: Runs on all major operating systems with consistent functionalities.
- Lightweight and efficient: Requires minimal resources and runs smoothly on most machines.
- Extensible: Can be enhanced with additional libraries and packages for advanced features.
Use Cases:
- Small desktop applications: Simple tools, calculators, data viewers.
- Educational tools: Interactive programs for learning concepts or testing knowledge.
- Prototyping and testing: Quickly build and test the look and feel of an application.
- Scripting tools: Automate GUI tasks and interactions with other applications.
Important Tips:
- Explore different widget types and layouts to create visually appealing and user-friendly GUIs.
- Utilize event handling effectively to respond to user interactions and system events.
With dedication and practice, you can master Tkinter and build fantastic GUIs for your Python projects!
How to Install and Configure Tkinter?
Here’s how to install and configure Tkinter:
In most cases, Tkinter is already installed! It comes bundled with Python 3 by default, so you might not need to install it separately.
To check if Tkinter is installed:
- Open a Python interpreter: Bash
python - Import Tkinter: Python
import tkinter as tk - If no errors occur, Tkinter is installed and ready to use!
If you encounter an error:
For Windows:
- Check for Tcl/Tk: If you installed Python from python.org, Tcl/Tk is likely already included.
- Install manually: If not, download the appropriate Tcl/Tk installer from ActiveTcl from their official website and follow the instructions.
For macOS:
- Install ActiveTcl: Download and install ActiveTcl from their official website.
For Linux:
- Use your package manager: Bash
# Ubuntu/Debian sudo apt-get install python3-tk # Fedora/CentOS sudo yum install tkinter
Once Tkinter is installed:
Import and use it in your Python code:
Python
import tkinter as tk

# Create a main window
root = tk.Tk()

# Create and configure widgets (labels, buttons, etc.)
label = tk.Label(root, text="Hello, World!")
label.pack()

# Start the main loop
root.mainloop()
Code language: PHP (php)
Additional Notes:
- Tkinter version: Check your Tkinter version using
tk.TkVersion. - External tools: Consider IDLE or Thonny IDEs, which have Tkinter built-in.
- Troubleshooting: Consult online resources or forums for specific issues.
Fundamental Tutorials of Tkinter: Getting started Step by Step

I’m excited to guide you through some stepwise fundamental Tkinter tutorials! Since you’re open to options, let’s start with a classic beginner project: the Interactive Button Clicker! This will introduce you to key concepts like creating widgets, handling events, and updating the GUI dynamically.
Here’s the step-by-step breakdown:
1. Import Tkinter and Generate the Main Window:
Python
import tkinter as tk

# Create the main window
root = tk.Tk()
root.title("Click Counter")  # Set the window title
Code language: PHP (php)
2. Create the Click Counter Label:
Python
click_count = 0  # Initialize counter variable

# Create and configure the label
label = tk.Label(root, text=f"Clicks: {click_count}")

# Place the label at a specific location (row 0, column 0)
label.grid(row=0, column=0)
Code language: PHP (php)
3. Create the Click Button:
Python
# Define function to update the counter and label text
def click_button_handler():
    global click_count  # Reference global variable
    click_count += 1
    label.config(text=f"Clicks: {click_count}")  # Update label text

# Create and configure the button
button = tk.Button(root, text="Click Me!", command=click_button_handler)

# Place the button below the label (row 1, column 0)
button.grid(row=1, column=0)
Code language: PHP (php)
4. Start the Main Loop:
Python
root.mainloop()  # Keep the window open and listen for events
Code language: PHP (php)
Explanation:
- We import Tkinter and create the main window with a title.
- We define a variable
click_countto store the number of clicks. - We create a label widget and configure its text to display the initial click count. We use string formatting to dynamically include the variable value.
- We place the label on the window using the
gridgeometry manager. - We create a button widget with the text “Click Me!” and connect it to the
click_button_handlerfunction using thecommandattribute. - The
click_button_handlerfunction increments theclick_countvariable and updates the label text with the new count usingconfig. - Finally, we start the main loop to keep the window open and respond to user clicks on the button.
This is just a fundamental example, and you can extend it further. Here are some ideas:
- Add another button to reset the counter.
- Display the click history in a listbox.
- Change the label color based on the click count.
Remember, experimentation is key to learning Tkinter! Feel free to modify the code, explore different widgets and layouts, and build your own interactive applications.
Happy coding!

Find Trusted Cardiac Hospitals
Compare heart hospitals by city and services — all in one place.
Explore Hospitals