What is Travis CI?
Travis CI is a widely used continuous integration (CI) platform that helps developers automate the building, testing, and deployment of software projects. It simplifies the development process by automatically running tests and catching bugs early, leading to more reliable and robust software.
Top 10 use cases of Travis CI?
Top 10 Use Cases of Travis CI:
- Faster Development Cycles: Automates repetitive tasks like building and testing, allowing developers to focus on writing code.
- Improved Software Quality: Catches bugs early and often through automated testing, leading to fewer bug fixes in production.
- Faster Feedback: Provides immediate feedback on code changes through automated testing, speeding up development cycles.
- Reduced Risks: Minimizes risks of regressions and human errors through automated testing and validation.
- Better Collaboration: Provides visibility into the development process for all team members, improving communication and teamwork.
- Scalability and Efficiency: Adapts to projects of all sizes and complexities, scaling effortlessly to handle increasing codebases.
- Integration with Various Tools: Connects seamlessly with popular development tools and services, streamlining your workflow.
- Support for Different Environments: Run builds and tests on different environments like development, staging, and production.
- Enhanced Security: Utilize features like secrets management and vulnerability scanning to improve security posture.
- Cost Optimization: Free for open-source projects and offers flexible pricing plans for commercial projects.
Overall, Travis CI helps developers build, test, and deploy software faster, more reliably, and with greater ease. It’s a valuable tool for teams of all sizes looking to improve their software development process.
What are the feature of Travis CI?
Travis CI boasts a plethora of features designed to streamline your CI workflow and optimize software development. Here’s a peek into its functionality powerhouse:
1. Automated Build and Testing:
- Trigger Builds: Automatically launch builds upon code pushes, ensuring immediate feedback and updates.
- Parallel Testing: Run tests concurrently for faster build times and efficient resource utilization.
- Caching: Reduce unnecessary rebuilds by caching tested dependencies and build artifacts.
- Support for Diverse Languages and Frameworks: Seamless integration with various languages like Python, Ruby, Java, JavaScript, and popular frameworks like Django, Rails, Spring Boot, and React.
2. Continuous Integration and Delivery (CI/CD):
- Environments and Stages: Define build stages (e.g., build, test, deploy) and configure separate environments for development, staging, and production.
- Deployment Integration: Utilize built-in integrations with deployment platforms like Heroku, AWS, and Google Cloud Platform for automated deployments.
- Rollbacks and Recovery: Implement rollback mechanisms to easily revert to previous versions in case of issues.
3. Scalability and Flexibility:
- Flexible Configuration: Adapt Travis CI to your project needs with custom scripts, plugins, and environment variables.
- Parallel Builds: Run multiple builds concurrently for large projects or complex testing scenarios.
- Multiple Execution Platforms: Execute builds on Linux, macOS, and Windows platforms for optimal compatibility.
4. Collaboration and Visibility:
- Notifications: Stay informed about build progress and results through email, Slack, or other notification channels.
- Detailed Reporting: Generate comprehensive reports and visualize build history with dashboards and charts.
- Team Management: Assign roles and permissions within your Travis CI organization for efficient collaboration and control.
5. Security and Reliability:
- Secrets Management: Securely store sensitive data like passwords and API keys, preventing accidental exposure.
- Vulnerability Scanning: Integrate vulnerability scanners to identify and address security issues in your codebase.
- Audit Logs: Track build execution history and monitor activities for improved security and accountability.
- High Availability: Built on a robust infrastructure for reliable and consistent performance.
6. Open Source Integration:
- Free Plans: Open-source projects can leverage Travis CI’s functionality for free, making it accessible to all developers.
- Extensive Integrations: Connect with countless tools and services you already use in your development workflow.
- Active Community: Benefit from a vibrant community of developers and contribute to the platform’s open-source codebase.
Remember, these are just a glimpse of the numerous features offered by Travis CI. As you explore the platform further, you’ll discover even more functionalities to enhance your software development experience.
How Travis CI works and Architecture?
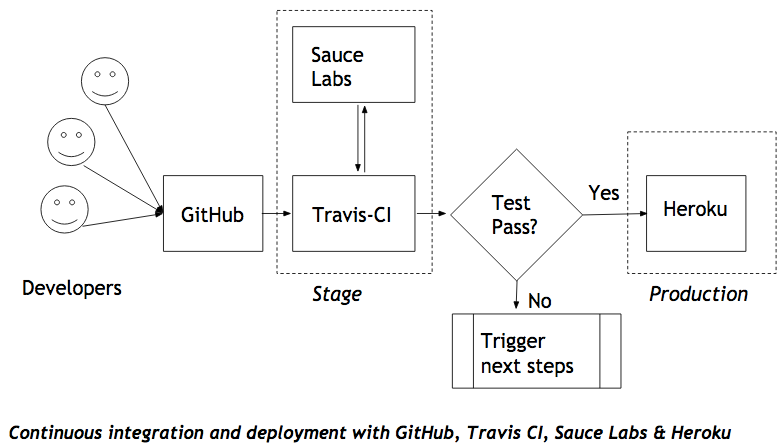
Travis CI works like a well-oiled machine, automating your CI tasks by orchestrating builds, tests, and deployments behind the scenes. Here’s a breakdown of its architecture and workflow:
Components:
- Travis CI Server: Manages user accounts, projects, and build triggers, running in a highly available, distributed cloud environment.
- Travis CI Workers: Dedicated virtual machines or containers responsible for executing individual build jobs.
- API: Allows programmatic interaction with Travis CI for integration with your existing tools and infrastructure.
- Build Configuration File (.travis.yml): Defines your entire CI/CD pipeline, specifying stages, jobs, commands, and environments.
- Testing Frameworks: Integrate any testing framework to validate your code at each stage and identify potential issues early.
- Caching: Store build artifacts and dependencies to avoid unnecessary rebuilds and optimize performance.
Workflow:
- Trigger: Code push, API call, or schedule triggers your build execution.
- Stage Execution: Builds execute one stage at a time, with jobs within each stage running sequentially or concurrently.
- Job Execution: Travis CI assigns a worker to your job, creates a container for the environment specified in your
.travis.yml, and executes the commands you’ve defined. - Testing and Validation: Your chosen testing framework runs automatically, validating your code and reporting any errors.
- Deployment (Optional): Upon successful completion, your pipeline can automatically deploy your code to any chosen environment.
- Notifications and Reporting: Stay informed about your build progress and results through email, Slack, or detailed reports.
Scalability and Flexibility:
- Multiple Worker Pool: Travis CI utilizes a large pool of workers to handle multiple builds concurrently, scaling seamlessly with your project needs.
- Open Source Integrations: Connect with countless tools and services you already use in your development workflow.
- Custom Configurability: Extend Travis CI’s functionality with custom scripts, plugins, and environment variables.
Security and Reliability:
- Secrets Management: Securely store sensitive data like passwords and API keys, preventing accidental exposure.
- Vulnerability Scanning: Integrate vulnerability scanners to identify and address security issues in your codebase.
- Audit Logs: Track build execution history and monitor activities for improved security and accountability.
- High Availability: Built on a robust infrastructure for reliable and consistent performance.
Remember, Travis CI’s architecture and workflow offer a powerful and flexible solution for automating your CI processes.
How to Install Travis CI it?
Installing Travis CI doesn’t require any direct software installation on your end as it’s a cloud-based platform. However, you do need to configure your project to use it for CI/CD. Here’s a step-by-step guide:
1. Create a Travis CI Account:
- Head to the Travis CI official website and sign up for a free or paid account.
- Choose the plan that best suits your project size and needs.
2. Connect Your Git Repository:
- Click “Add a repository” and choose the Git provider you use (e.g., GitHub, Bitbucket).
- Authorize Travis CI to access your repository.
3. Configure Your Build:
- Generate a file named
.travis.ymlin your project root directory. - This file defines your CI/CD pipeline, specifying stages, jobs, commands, and environments.
- You can find examples and tutorials for various languages and frameworks on the Travis CI documentation.
4. Push Your Code Changes:
- Once you’ve configured your
.travis.ymlfile, push your code changes to your Git repository. - This will trigger Travis CI to automatically build and test your code.
Tip: The specific configuration steps might vary depending on your chosen plan, language, and framework.
Basic Tutorials of Travis CI: Getting Started
Ready to embrace the wonders of continuous integration with Travis CI? Buckle up, fellow programmer, for a thrilling tutorial through its basic functionalities!
Before We Begin:
- GitHub Account: You’ll need an active GitHub account to connect with Travis CI.
- Public Repository: Choose a public repository on GitHub where you’ll test your builds.
Let’s Jump In!:
1. Sign Up and Connect:
- Head to Travis CI official website and sign up with your GitHub account.
- Click “Authorize Travis CI” to grant access to your repositories.
- In your Travis CI dashboard, select “Activate” on the desired repository.
2. Configure Your .travis.yml File:
This file tells Travis CI what to do during a build. Here’s a basic example:
YAML
language: python
script:
  - pip install pytest
  - pytest tests.py
Code language: CSS (css)- It specifies the language (Python in this case).
- Defines commands to run during the build (install pytest and run tests).
3. Commit and Push:
Commit your .travis.yml file and push it to your repository.
4. Witness the Build Magic:
Travis CI will automatically detect the push and start a build. You can see its progress and logs in real-time on your Travis CI dashboard.
5. Celebrate Success (or Analyze Failures):
If your tests pass, congrats! You’ve just run your first successful build with Travis CI. If they fail, don’t despair! Analyze the logs for clues and adjust your build accordingly.
Beyond the Basics:
This is just the tip of the iceberg! Travis CI offers a plethora of features, including:
- Stages: Divide your build into multiple stages like testing and deployment.
- Dependencies: Specify dependencies like databases or external services.
- Notifications: Get notified of build results via email or other channels.
- Environment Variables: Define variables to customize your build.
Note:
- Safety First: Ensure your
.travis.ymlfile doesn’t expose sensitive information like credentials. - Ethical Builds: Use Travis CI responsibly for your own projects and respect others’ code.
- Community is Key: Utilize the Travis CI community forum and resources for help and learning.
Let’s embark on this exciting journey together, building a smoother and more efficient development experience with Travis CI!

Find Trusted Cardiac Hospitals
Compare heart hospitals by city and services — all in one place.
Explore Hospitals