What is Xcode?
Xcode is an integrated development environment (IDE) created by Apple for macOS. It provides a comprehensive set of tools and resources for developers to create software for macOS, iOS, iPadOS, watchOS, and tvOS. Xcode supports multiple programming languages, including Swift, Objective-C, and C++, and it includes features for coding, debugging, testing, and deploying applications for Apple devices.
What is top use cases of Xcode?
Top Use Cases of Xcode:
- iOS App Development:
- Xcode is primarily used for developing applications for iOS devices such as iPhones and iPads. It supports the Swift programming language, which is designed by Apple for iOS app development, as well as Objective-C.
- macOS App Development:
- Developers use Xcode to create applications for macOS, including desktop applications and utilities. Xcode provides tools for designing the user interface, coding functionality, and debugging macOS apps.
- iPadOS App Development:
- Xcode is employed for building applications specifically designed for iPad devices. iPadOS apps can take advantage of the larger screen and unique capabilities of iPads.
- watchOS App Development:
- Xcode supports the development of apps for Apple Watch using the watchOS platform. Developers can create apps that run on the Apple Watch and leverage its features, including health tracking and notifications.
- tvOS App Development:
- For Apple TV, developers use Xcode to create apps for tvOS. This includes applications for media streaming, gaming, and other types of content consumption on the Apple TV platform.
- Cross-Platform Development:
- Xcode supports cross-platform development, allowing developers to create applications that run on multiple Apple platforms, such as iOS, macOS, watchOS, and tvOS, from a single codebase.
- Game Development:
- Xcode provides tools for game development using frameworks like SpriteKit and SceneKit. Developers can create 2D and 3D games for iOS, macOS, watchOS, and tvOS.
- Augmented Reality (AR) Development:
- With the introduction of ARKit, Xcode supports the development of augmented reality applications for iOS devices. Developers can create immersive AR experiences using features like motion tracking and environmental understanding.
- App Prototyping and Design:
- Xcode includes Interface Builder, a visual design tool, which allows developers and designers to create and prototype user interfaces for their applications. This visual approach helps in the early stages of app design.
- Swift Package Manager:
- Xcode integrates with the Swift Package Manager, a tool for managing the distribution of Swift code. Developers can use the package manager to add dependencies and manage the project’s external libraries.
- Continuous Integration and Testing:
- Xcode includes features for continuous integration and testing, allowing developers to automate the build and testing processes. This is crucial for maintaining code quality and detecting issues early in the development cycle.
- Core Data and Database Integration:
- Xcode supports Core Data, Apple’s framework for managing the model layer of an application. Developers can integrate databases and use Core Data to handle data persistence in their applications.
- Performance Analysis and Profiling:
- Xcode includes tools for performance analysis and profiling, helping developers identify and address performance bottlenecks in their applications.
- App Distribution and Deployment:
- Xcode provides tools for deploying applications to the App Store and other distribution channels. Developers can create distributable packages for testing, beta releases, and final deployment.
- Open Source Development:
- Xcode supports open source development projects and includes tools for version control integration, code collaboration, and working with repositories hosted on platforms like GitHub.
Xcode is an essential tool for Apple developers, enabling them to build a wide range of applications for Apple’s ecosystem. Its versatility and integration with Apple’s platforms make it a comprehensive development environment for creating software that runs on iPhones, iPads, Macs, Apple Watches, and Apple TVs.
What are feature of Xcode?
Features of Xcode:
- Interface Builder:
- Description: Interface Builder allows developers to visually design user interfaces for their apps using drag-and-drop elements.
- Code Editor:
- Description: Xcode includes a powerful code editor with syntax highlighting, code completion, and integrated documentation.
- Swift Playgrounds:
- Description: Swift Playgrounds provide an interactive environment for experimenting with Swift code and testing ideas.
- Simulator:
- Description: Xcode includes simulators for testing apps on various Apple devices without the need for physical hardware.
- Performance Analysis:
- Description: Xcode provides tools for analyzing and optimizing the performance of apps, including CPU and memory usage.
- Storyboard and SwiftUI:
- Description: Xcode supports storyboards for designing app flows visually and SwiftUI for declarative UI development.
- Source Control Integration:
- Description: Xcode integrates with version control systems like Git for source code management.
- Automated Testing:
- Description: XCTest framework enables developers to write and run automated tests for their code.
- Debugging Tools:
- Description: Xcode offers robust debugging tools, including breakpoints and a visual debugger.
- App Distribution:
- Description: Xcode facilitates the distribution of apps to the App Store or other deployment channels.
- Asset Management:
- Description: Asset catalogs help manage and organize app resources such as images and icons.
- Documentation and Help:
- Description: Xcode provides extensive documentation and contextual help for Swift, Objective-C, and Apple frameworks.
- Localization and Internationalization:
- Description: Xcode supports localization and internationalization for adapting apps to different languages.
- Instruments:
- Description: Instruments is a performance and analysis tool for detailed app behavior insights.
- Swift Package Manager:
- Description: Xcode integrates with the Swift Package Manager for managing external dependencies.
- Continuous Integration and Continuous Delivery (CI/CD):
- Description: Xcode Server and Xcode Cloud support CI/CD for automating build and test processes.
What is the workflow of Xcode?
Workflow of Xcode:
- Create a New Project:
- Start by creating a new project in Xcode. Choose a template based on the type of app you want to build (e.g., iOS app, macOS app).
- Design the User Interface:
- Use Interface Builder or SwiftUI to design the user interface of your app visually. Arrange elements, set properties, and create app flows.
- Write Code:
- Use the integrated code editor to write the application code. Xcode supports Swift, Objective-C, and other languages.
- Test in Simulator:
- Test your app in the Xcode Simulator to see how it behaves on different Apple devices. Debug and refine the code as needed.
- Automated Testing:
- Write automated tests using the XCTest framework to ensure the reliability and correctness of your code.
- Performance Analysis:
- Use Instruments to analyze the performance of your app. Identify and address any performance bottlenecks.
- Version Control:
- Integrate your project with version control (e.g., Git) to manage source code changes and collaborate with a team.
- Asset Management:
- Organize and manage app resources (images, icons, etc.) using asset catalogs.
- Localization:
- Localize your app for different languages and regions using Xcode’s localization tools.
- Documentation and Help:
- Access documentation and contextual help within Xcode to understand APIs and frameworks.
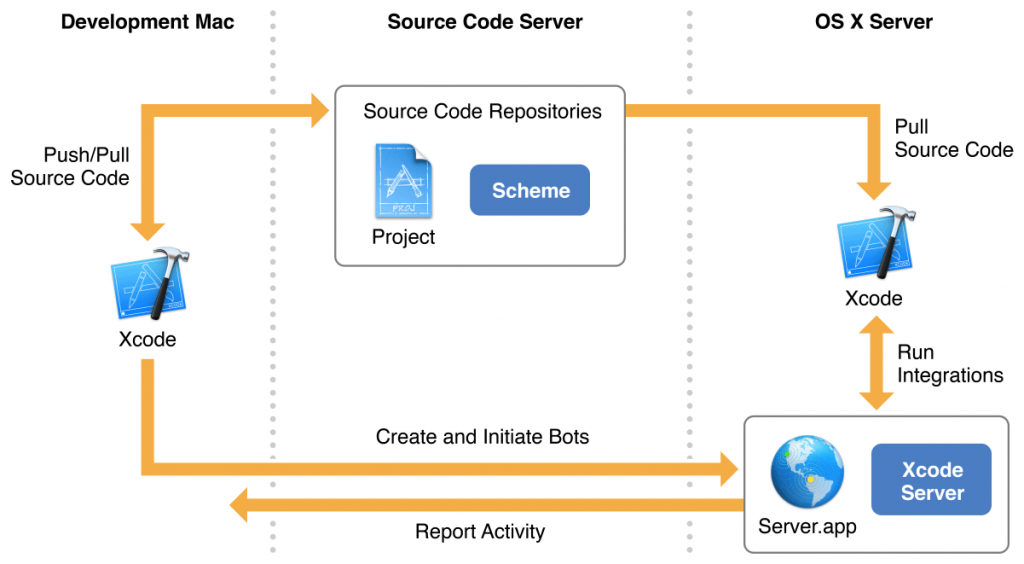
- Continuous Integration:
- Set up continuous integration using Xcode Server or Xcode Cloud to automate the build and test processes.
- App Distribution:
- Prepare your app for distribution. Configure provisioning profiles and certificates for deployment to the App Store or other channels.
- Swift Package Manager:
- Manage external dependencies using the Swift Package Manager if your project includes third-party libraries.
- Refinement and Iteration:
- Iterate on your code, UI, and features based on testing, feedback, and performance analysis.
- Final Testing:
- Perform final testing on physical devices to ensure your app works seamlessly in real-world conditions.
- App Submission:
- Submit your app to the App Store or distribute it through other channels. Follow the submission guidelines and requirements.
- Post-Release Maintenance:
- Monitor user feedback, address bug reports, and release updates as needed. Use Xcode to make modifications and improvements.
The workflow in Xcode is iterative and involves designing, coding, testing, and refining your app until it meets your requirements and is ready for distribution. The integrated tools and features in Xcode support each phase of the development process.
How Xcode Works & Architecture?
Xcode is a powerful integrated development environment (IDE) developed by Apple for building applications for macOS, iOS, iPadOS, watchOS, tvOS, and Safari extensions. Here’s a breakdown of its workings and architecture:
1. Architecture:
- Modular design: Xcode is built upon a modular architecture with separate components for each functionality, like editing, debugging, and building.
- Plug-in system: Developers can extend Xcode’s functionalities by creating and installing plug-ins.
- Command-line interface (CLI): Xcode provides a powerful CLI for building and managing projects.
- Sandboxed environment: Xcode runs in a sandboxed environment for security and stability.
2. Key Components:
- Interface Builder: For designing and building user interfaces using a drag-and-drop interface.
- Source Editor: For writing and editing code in various programming languages, including Swift and Objective-C.
- Debugger: For debugging and analyzing your application’s behavior.
- Simulator: For running and testing your application on a simulated device environment.
- Build System: For compiling and packaging your application for deployment.
- Version Control: Integrates with version control systems like Git for managing code changes.
3. Workflow:
- Create a project: Choose the desired platform and template for your application.
- Design the UI: Use Interface Builder to design and build the UI layout.
- Write code: Write code in the source editor to implement the application’s logic.
- Debug and test: Use the debugger and simulator to test and fix errors in your code.
- Build and deploy: Use the build system to build your application and deploy it to the App Store or other platforms.
4. Benefits of Xcode Architecture:
- Modularity: Allows for easy expansion and customization.
- Plug-in system: Enables developers to add new features and functionalities.
- CLI: Provides powerful automation capabilities.
- Sandboxed environment: Improves security and stability.
By understanding the workings and architecture of Xcode, you can gain a better appreciation for its capabilities and use it more effectively for developing applications across Apple platforms.
How to Install and Configure Xcode?
Installing and Configuring Xcode
Let’s have a look at how to install and configure Xcode:
1. System Requirements:
- Mac computer with Apple Silicon or Intel processor.
- macOS Monterey 12.0 or later.
- At least 12GB of RAM (16GB recommended).
- At least 20GB of free disk space.
2. Download and Install Xcode:
- Open the Mac App Store.
- Search for “Xcode”.
- Click on “Get” or “Install”.
- Authenticate with your Apple ID if prompted.
- Xcode will download and install automatically.
3. Launch Xcode:
- Open Spotlight Search by pressing Command + Space.
- Type “Xcode” and press Enter.
- Xcode will launch and prompt you to accept the license agreement.
4. Configure Xcode:
- Choose your preferred theme (Light, Dark, or Automatic).
- Select your preferred code editor settings (font, font size, line spacing).
- Explore the different Xcode features and tools.
- Download and install any desired plugins.
5. Create a Project:
- Choose File > New > Project.
- Choose the desired platform (iOS, iPadOS, macOS, watchOS, tvOS) and template.
- Enter a project name and location.
- Click “Next”.
- Follow the prompts to customize your project settings.
- Click “Create”.
6. Start Coding:
- Start writing code in the source editor.
- Apply Interface Builder to plan your user interface.
- Run your application in the simulator to test it.
- Debug your code using the debugger.
7. Additional Tips:
- Review the official Apple documentation for detailed instructions and configurations.
- Utilize online resources and tutorials for learning and troubleshooting.
- Join the Xcode community forums for support and discussions.
By following these steps and utilizing the available resources, you can successfully install, configure, and start building applications with Xcode. Remember, practice and exploration are key to mastering this powerful development environment.
Fundamental Tutorials of Xcode: Getting started Step by Step
Following is a step-by-step fundamental tutorials to get you started with Xcode:
1. Setting Up Your Environment:
- Install Xcode: Download and install Xcode from the Mac App Store.
- Update Xcode: Ensure you have the latest version of Xcode installed for optimal functionality.
- Learn the Interface: Familiarize yourself with the different menus, buttons, and panels in Xcode.
- Explore the Playground: Xcode includes a built-in playground for experimenting with Swift code and learning basic concepts.
2. Creating Your First Project:
- Choose a Template: Select a project template based on the desired platform and application type (e.g., iOS app, macOS app, watchOS app).
- Configure Project Settings: Set the project name, location, and other relevant configurations.
- Explore the Project Structure: Understand the different files and folders within your project, including the main.storyboard and AppDelegate.swift files.
3. Building a Basic User Interface:
- Use Interface Builder: Use the drag-and-drop interface to create your application’s user interface elements (e.g., buttons, labels, text fields).
- Connect UI Elements to Code: Learn how to connect your UI elements to code using outlets and actions, allowing user interaction to trigger specific actions.
- Customize the UI: Change the appearance of your UI elements using properties like fonts, colors, and layouts.
4. Introduction to Swift Code:
- Learn Basic Syntax: Understand the fundamental concepts of Swift programming, including variables, constants, operators, and control flow statements.
- Write Simple Functions: Create functions to perform specific tasks and organize your code.
- Work with Data: Learn how to store and manipulate data in your application using arrays, dictionaries, and other data structures.
5. Adding Functionality:
- Implement User Interactions: Respond to user actions like button clicks and text input using event handlers.
- Work with Networking: Learn how to connect to external APIs and retrieve data from the internet.
- Use Persistence: Persist data to storage so it can be retrieved later, even after the application is closed.
6. Deploying Your Application:
- Build and Run: Build your application and run it in the simulator to test its functionality.
- Configure for Deployment: Sign your application and prepare it for distribution on the App Store or other platforms.
- Share Your Application: Share your application with others and get feedback on your work.
Important Tips:
- Start with small, manageable projects.
- Practice regularly to improve your coding skills.
- Utilize online resources and tutorials for learning and troubleshooting.
- Engage with the Xcode community forums for support and discussions.
Remember, learning Xcode takes time and effort. Be patient, persistent, and keep practicing to become a proficient developer. These resources will provide a solid foundation for your journey in mobile app development with Xcode.

Find Trusted Cardiac Hospitals
Compare heart hospitals by city and services — all in one place.
Explore Hospitals