What is RKE2?
RKE stands for Rancher Kubernetes Engine. RKE2 also known as the (RKE Government) is a combination of RKE1 and K3s. It inherits usability, ease-of-operations, and deployment model from K3s and close alignment with upstream Kubernetes from RKE1. Normally, RKE2 doesn’t rely on docker, it launches the control plane components as static pods that are managed by the kubelet.
The diagram below will help you understand the RKE2 cluster topology.
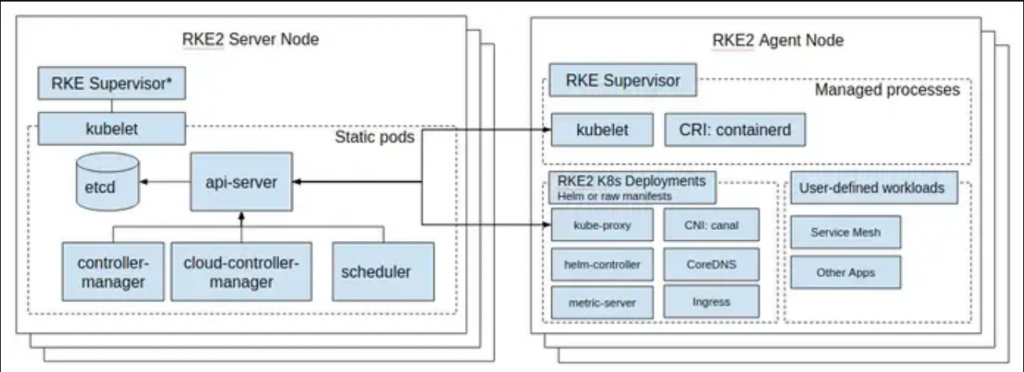
RKE2 ships a number of open-source components that include:
- K3s
- Helm Controller
- K8s
- API Server
- Controller Manager
- Kubelet
- SchedulerSet up Linux Nodes
- Proxy
- etcd
- containerd/cri
- runc
- Helm
- Metrics Server
- NGINX Ingress Controller
- CoreDNS
- CNI: Canal (Calico & Flannel), Cilium or Calico
System Requirements
Use a system that meets the below requirements:
- RAM: 4GB Minimum (we recommend at least 8GB)
- CPU: 2 Minimum (we recommend at least 4CPU)
- 3 Rocky Linux 8 Nodes
- Zero or more agent nodes that are designated to run your apps and services
- A load balancer to direct front-end traffic to the three nodes.
- A DNS record to map a URL to the load balancer
Step 1 – Set up Rocky Linux 8 Nodes
For this guide, we will use 3 Rocky Linux nodes, a load balancer, and RKE2 agents(1 or more).
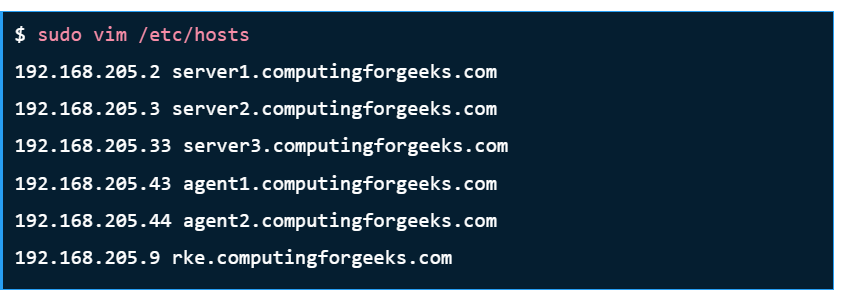
| TASK | HOSTNAME | IP ADDRESS |
| Server Node 1 | server1.computingforgeeks.com | 192.168.205.2 |
| Server Node 2 | server2.computingforgeeks.com | 192.168.205.3 |
| Server Node 3 | server3.computingforgeeks.com | 192.168.205.33 |
| Load Balancer | rke.computingforgeeks.com | 192.168.205.9 |
| Agent Node1 | agent1.computingforgeeks.com | 192.168.205.43 |
| Agent Node2 | agent2.computingforgeeks.com | 192.168.205.44 |
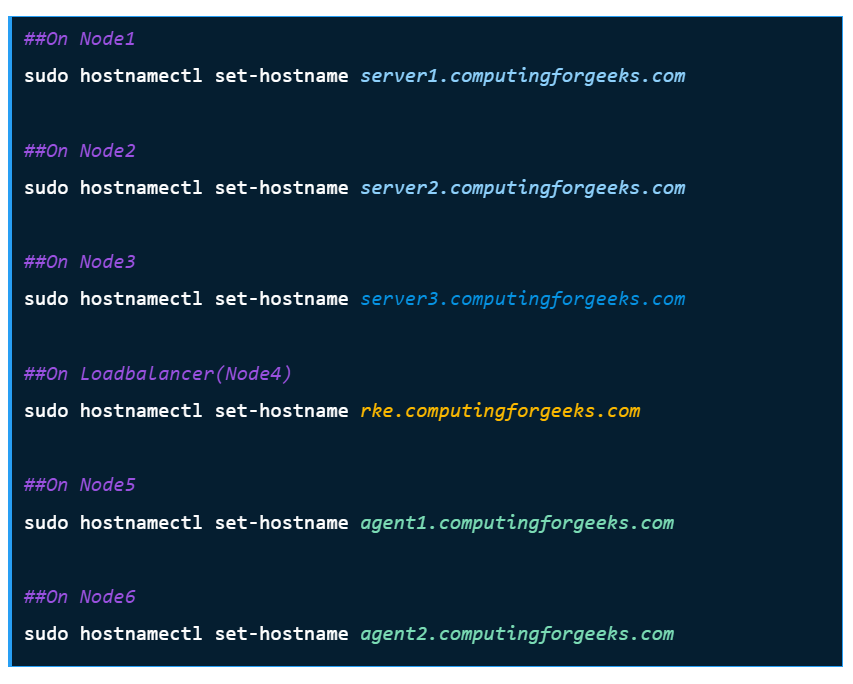
Set the hostnames as shown:
Step 2 – Configure the Fixed Registration Address
To achieve high availability, you are required to set up an odd number of server plane nodes(runs etcd, the Kubernetes API, and other control plane services). The other server nodes and agent nodes need a URL they can use to register against. This is either an IP or domain name of any of the control nodes. This is mainly done to maintain quorum so that the cluster can afford to lose connection with one of the nodes without impacting the functionality cluster.
This can be achieved using the following:
- A layer 4 (TCP) load balancer
- Round-robin DNS
- Virtual or elastic IP addresses
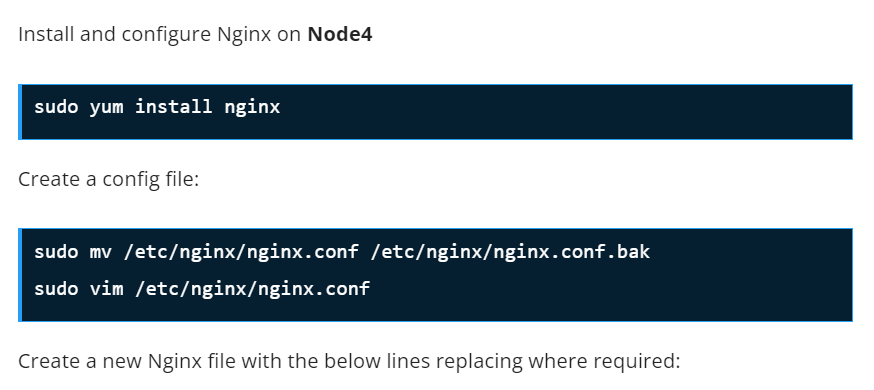
In this guide, we will configure NGINX as a layer 4 (TCP) load balancer to forward the connection to one of the RKE nodes.
user nginx;
worker_processes 4;
worker_rlimit_nofile 40000;
error_log /var/log/nginx/error.log;
pid /run/nginx.pid;

# Load dynamic modules. See /usr/share/doc/nginx/README.dynamic.
include /usr/share/nginx/modules/*.conf;

events {
    worker_connections 8192;
}

stream {
upstream backend {
        least_conn;
        server <IP_NODE_1>:9345 max_fails=3 fail_timeout=5s;
        server <IP_NODE_2>:9345 max_fails=3 fail_timeout=5s;
        server <IP_NODE_3>:9345 max_fails=3 fail_timeout=5s;
   }

   # This server accepts all traffic to port 9345 and passes it to the upstream.
   # Notice that the upstream name and the proxy_pass need to match.
   server {

      listen 9345;

          proxy_pass backend;
   }
    upstream rancher_api {
        least_conn;
        server <IP_NODE_1>:6443 max_fails=3 fail_timeout=5s;
        server <IP_NODE_2>:6443 max_fails=3 fail_timeout=5s;
        server <IP_NODE_3>:6443 max_fails=3 fail_timeout=5s;
    }
        server {
        listen     6443;
        proxy_pass rancher_api;
        }
    upstream rancher_http {
        least_conn;
        server 192.168.205.2:80 max_fails=3 fail_timeout=5s;
        server 192.168.205.3:80 max_fails=3 fail_timeout=5s;
        server 192.168.205.33:80 max_fails=3 fail_timeout=5s;
    }
        server {
        listen     80;
        proxy_pass rancher_http;
        }
    upstream rancher_https {
        least_conn;
        server 192.168.205.2:443 max_fails=3 fail_timeout=5s;
        server 192.168.205.3:443 max_fails=3 fail_timeout=5s;
        server 192.168.205.33:443 max_fails=3 fail_timeout=5s;
    }
        server {
        listen     443;
        proxy_pass rancher_https;
        }
}Code language: HTML, XML (xml)
Step 3 – Download installer script on Rocky Linux 8 Nodes
All the Rocky Linux 8 nodes intended for this use need to be configured with the RKE2 repositories that provide the required packages. Instal curl tool on your system:
sudo yum -y install curl vim wgetWith curl download the script used to install RKE2 server on your Rocky Linux 8 servers.
curl -sfL https://get.rke2.io --output install.shCode language: JavaScript (javascript)Make the script executable:
chmod +x install.shCode language: CSS (css)To see script usage options run:
less ./install.sh Once added, you can install and configure both the RKE2 server and agent on the desired nodes.
Step 4 – Set up the First Server Node (Master Node)
Install RKE2 server:
sudo INSTALL_RKE2_TYPE=server ./install.shExpected output:
[INFO]  finding release for channel stable
[INFO]  using 1.23 series from channel stable
Rocky Linux 8 - AppStream                                                                                                                                              19 kB/s | 4.8 kB     00:00
Rocky Linux 8 - AppStream                                                                                                                                              11 MB/s | 9.6 MB     00:00
Rocky Linux 8 - BaseOS                                                                                                                                                 18 kB/s | 4.3 kB     00:00
Rocky Linux 8 - BaseOS                                                                                                                                                 11 MB/s | 6.7 MB     00:00
Rocky Linux 8 - Extras                                                                                                                                                 13 kB/s | 3.5 kB     00:00
Rocky Linux 8 - Extras                                                                                                                                                 41 kB/s |  11 kB     00:00
Rancher RKE2 Common (stable)                                                                                                                                          1.7 kB/s | 1.7 kB     00:00
Rancher RKE2 1.23 (stable)                                                                                                                                            4.8 kB/s | 4.6 kB     00:00
Dependencies resolved.
======================================================================================================================================================================================================
.......

Transaction Summary
======================================================================================================================================================================================================
Install  5 Packages

Total download size: 34 M
Installed size: 166 M
Downloading Packages:
.....Code language: JavaScript (javascript)
Once installed, you need to create a config file manually. The config file contains the tls-sanparameter which avoids certificate errors with the fixed registration address.
The config file can be created with the command:
sudo vim /etc/rancher/rke2/config.yamlAdd the below lines to the file replacing where required.
write-kubeconfig-mode: "0644"
tls-san:
  - <mark>rke.computingforgeeks.com</mark>
  - <mark>192.168.205.9</mark>Code language: JavaScript (javascript)
Replace rke.computingforgeeks.com with your fixed registration address and 192.168.205.9 with its IP address.
Save the file and start the service;
sudo systemctl start rke2-server
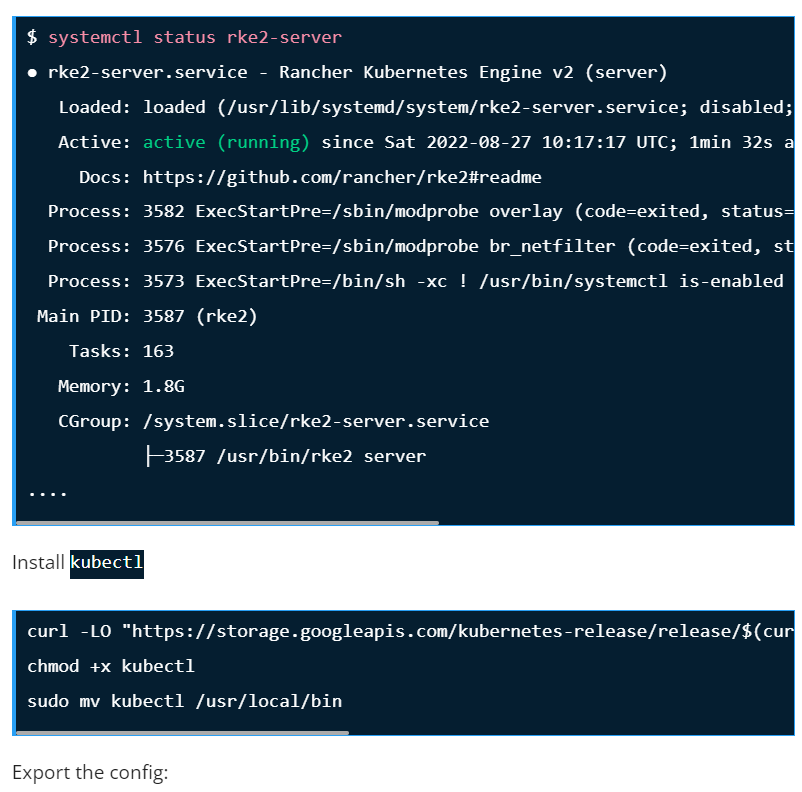
sudo systemctl enable rke2-serverConfirm status of the service after starting it:
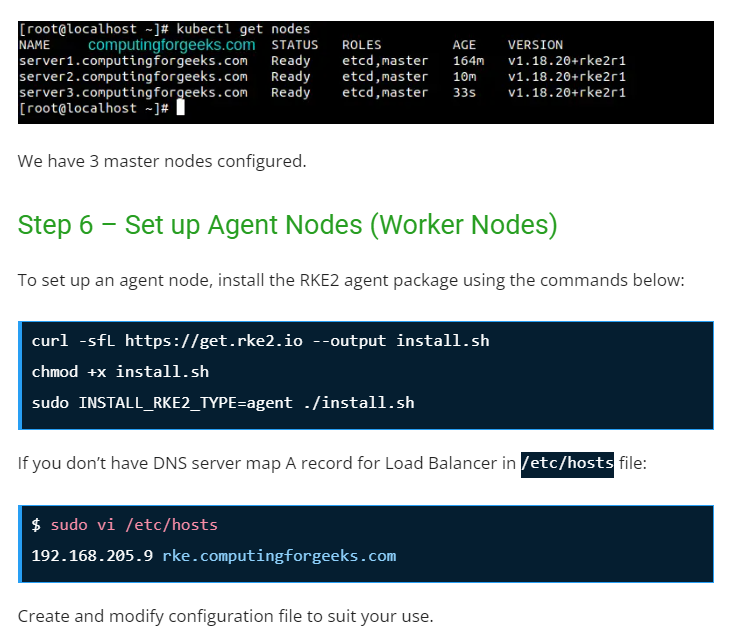
Step 7 – Deploy an Application.
Once the above configurations have been made, deploy and application on your cluster. For this guide, we will deploy a demo Nginx application.
kubectl apply -f - <<EOF
apiVersion: apps/v1
kind: Deployment
metadata:
name: nginx-deployment
spec:
selector:
matchLabels:
app: nginx
replicas: 2
template:
metadata:
labels:
app: nginx
spec:
containers:
- name: nginx
image: nginx:latest
ports:
- containerPort: 80
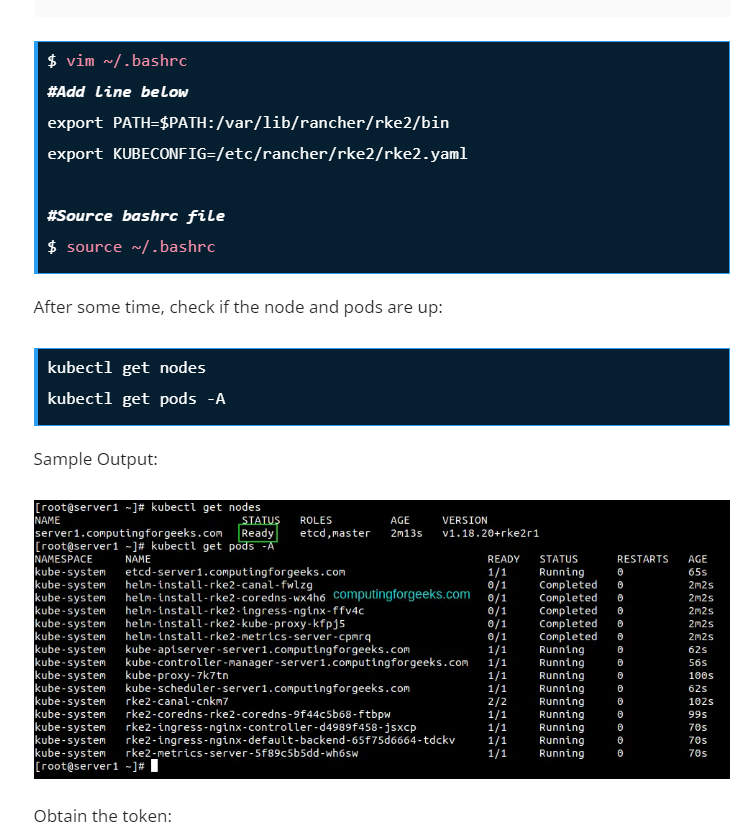
EOFCheck if the pod is up:
$ <mark>kubectl get pods</mark>
NAME                               READY   STATUS    RESTARTS   AGE
nginx-deployment-cc7df4f8f-frv65   1/1     Running   0          13s
nginx-deployment-cc7df4f8f-l9xdb   1/1     Running   0          13sCode language: HTML, XML (xml)
Now expose the service:
$ <mark>kubectl expose deployment nginx-deployment --type=NodePort --port=80</mark>
service/nginx-deployment exposedCode language: HTML, XML (xml)
Obtain the port to which the service has been exposed:
$ <mark>kubectl get svc</mark>
NAME               TYPE        CLUSTER-IP      EXTERNAL-IP   PORT(S)          AGE
kubernetes         ClusterIP   10.43.0.1       <none>        443/TCP          85m
nginx-deployment   NodePort    10.43.135.164   <none>        80:<mark>31042</mark>/TCP     2sCode language: HTML, XML (xml)
In my case, the service has been exposed to port 31042. Access the application using any controller or worker node IP address with the syntax http://IP_Address:31042
Reference
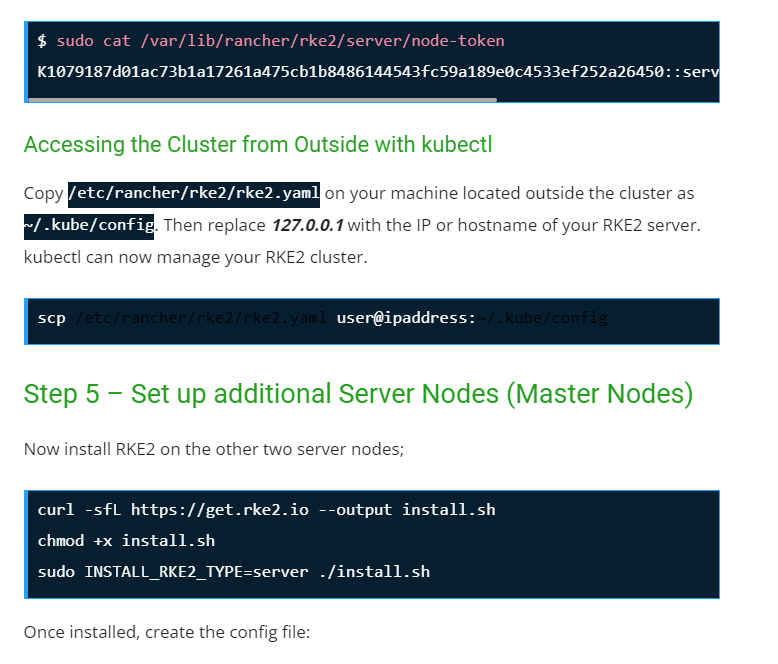
- https://ranchermanager.docs.rancher.com/how-to-guides/new-user-guides/kubernetes-cluster-setup/rke2-for-rancher
I’m Rajesh Kumar, a DevOps, SRE, DevSecOps, Cloud, and Platform Engineering expert passionate about sharing practical knowledge, real-world experiences, and industry best practices. I have worked at Cotocus and regularly write about technology, travel, investing, health, product reviews, and digital marketing through my various platforms.
I publish technical articles at DevOps School, travel stories at Holiday Landmark, stock market insights at Stocks Mantra, health and fitness guidance at My Medic Plus, product reviews at TrueReviewNow, and SEO and digital marketing strategies at Wizbrand.
Find Trusted Cardiac Hospitals
Compare heart hospitals by city and services — all in one place.
Explore Hospitals