Part 1 – Step by step guide on MINIKUBE installation on EC2 instance can be found here,
Folks in this tutorial we will try to learn how to expose a running pod from the kubernetes cluster on Ec2 instance to outside world.
Lets get started, we are continuing where we stopped in the first article.
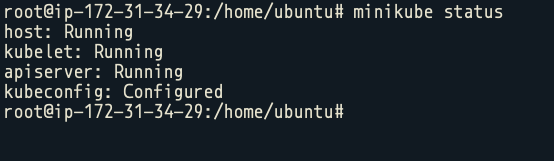
Step 1. Check the status of your minikube vm.
minikube status
Step 2. Lets start a node app from the official documentation of k8’s.
kubectl create deployment hello-node --image=gcr.io/hello-minikube-zero-install/hello-nodeThis will start, a node app which on hitting port 8080, will say – Hello worlds!!.
Index file for this :
var http = require('http');

var handleRequest = function(request, response) {
  console.log('Received request for URL: ' + request.url);
  response.writeHead(200);
  response.end('Hello World!');
};
var www = http.createServer(handleRequest);
www.listen(8080);Code language: JavaScript (javascript)
Dockerfile:
FROM node:6.14.2
EXPOSE 8080
COPY server.js .
CMD [ "node", "server.js" ] // you can type index.js file or rename above file as server.js both will workoutCode language: JavaScript (javascript)
Step 3. List out the running deployments, kubectl get deployments

Step 4. Now we should expose this service to outside internet, but before that we should expose this to host level as well.
kubectl expose deployment hello-node --type=LoadBalancer --port=8080
Step 5. So we can see that hello node is exposed on port number, 31170 of host machine which is being tunnelled to 8080 of the running pod.
try doing curl on localhost:31170 you will greeted properly!! 🙂
Step 6. Now lets goto EC2 console, open the SG for the instance and white list port 31170.
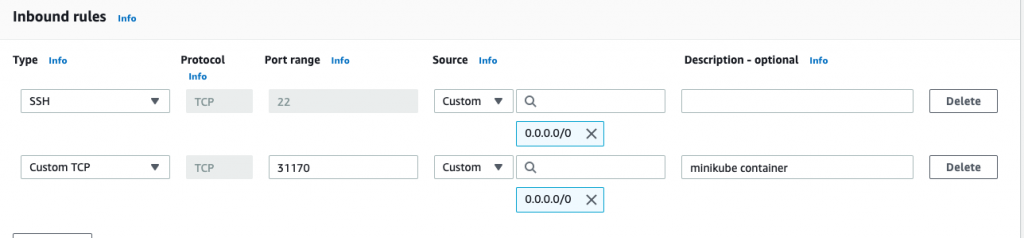
Hit save and goto : <ec2-public-ip>:31170 link
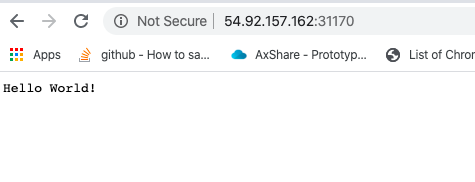
Voila !!! You have successfully expose a service from Kubernetes cluster to out side world, give yourself a pat on the back. Keep reading 🙂
Note: We are running classroom batches on all of the DevOps toolset, feel free to enquire about them ! locations covered Delhi, Hyderabad, Bangalore and Chennai.
MotoShare.in offers unparalleled convenience and affordability in bike rentals, allowing users to enjoy hassle-free rides for commuting, exploring, or leisure trips. With a wide range of bikes and scooters, it’s your trusted partner for all two-wheeler needs.
Find Trusted Cardiac Hospitals
Compare heart hospitals by city and services — all in one place.
Explore Hospitals