What is TIBCO Data Virtualization?
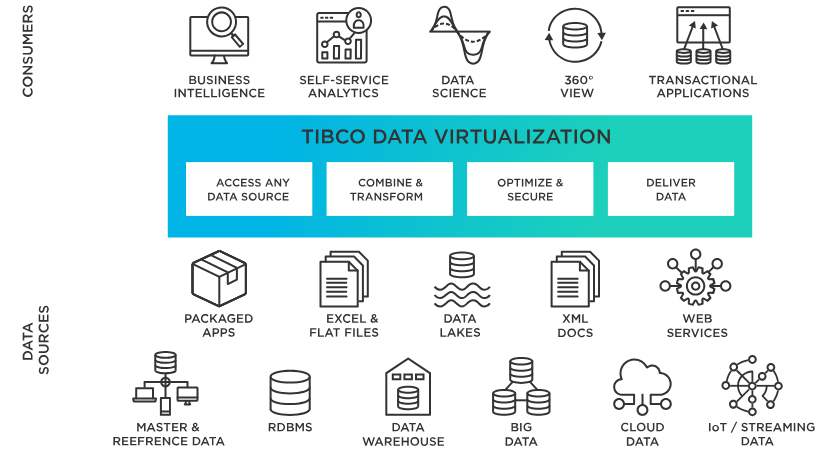
TIBCO Data Virtualization (formerly known as Composite Information Server) is a data virtualization platform offered by TIBCO Software. It enables organizations to integrate, federate, and access data from multiple sources in real-time, without the need for physical data movement or replication. Data virtualization allows users to create a logical, unified view of data from disparate sources, providing a single point of access for data consumers, applications, and analytics tools. TIBCO Data Virtualization improves data agility, simplifies data access, and accelerates data delivery for business intelligence and data-driven decision-making.
Top 10 use cases of TIBCO Data Virtualization:
- Data Integration: Integrating data from diverse sources, such as databases, cloud services, and APIs, into a unified view.
- Real-Time Analytics: Enabling real-time access to data from multiple sources for real-time analytics and insights.
- Data Federation: Federating data from different data stores to create a unified, virtual database.
- Data Services: Providing data services and APIs for application integration and data access.
- Self-Service BI: Empowering business users to access and analyze data independently without IT involvement.
- Data Virtualization for Big Data: Integrating and accessing data from big data platforms such as Hadoop and NoSQL databases.
- Data Governance: Centralizing data access controls and ensuring data security and compliance.
- Master Data Management (MDM): Creating a unified view of master data across the organization.
- Cloud Integration: Integrating data from cloud-based services and applications.
- Data Migration: Simplifying data migration between systems and cloud platforms.
What are the feature of TIBCO Data Virtualization?
- Data Virtualization: Provides a virtualization layer to access data from various sources without replication.
- Data Abstraction: Presents data in a unified, abstracted view to users and applications.
- Performance Optimization: Optimizes query performance through caching and query optimization.
- Data Services: Offers data services and APIs for application integration.
- Real-Time Data Access: Enables real-time data access and updates.
- Security and Governance: Implements data security and governance features.
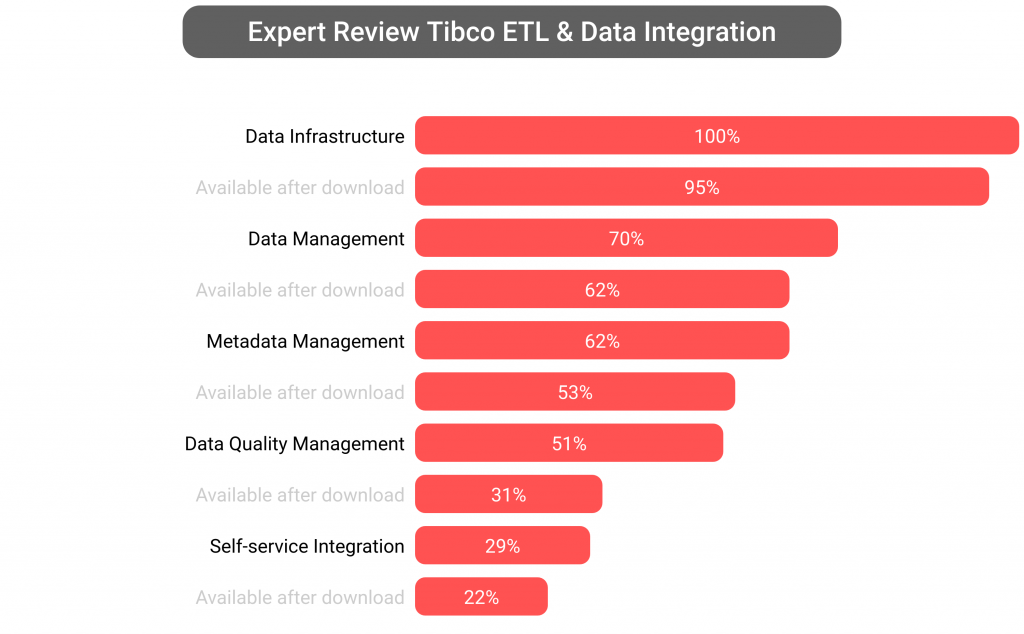
- Metadata Management: Manages metadata to track data lineage and dependencies.
- Query Federation: Distributes queries across data sources to enhance performance.
- Scalability: Scales to handle large volumes of data and concurrent users.
How TIBCO Data Virtualization works and Architecture?
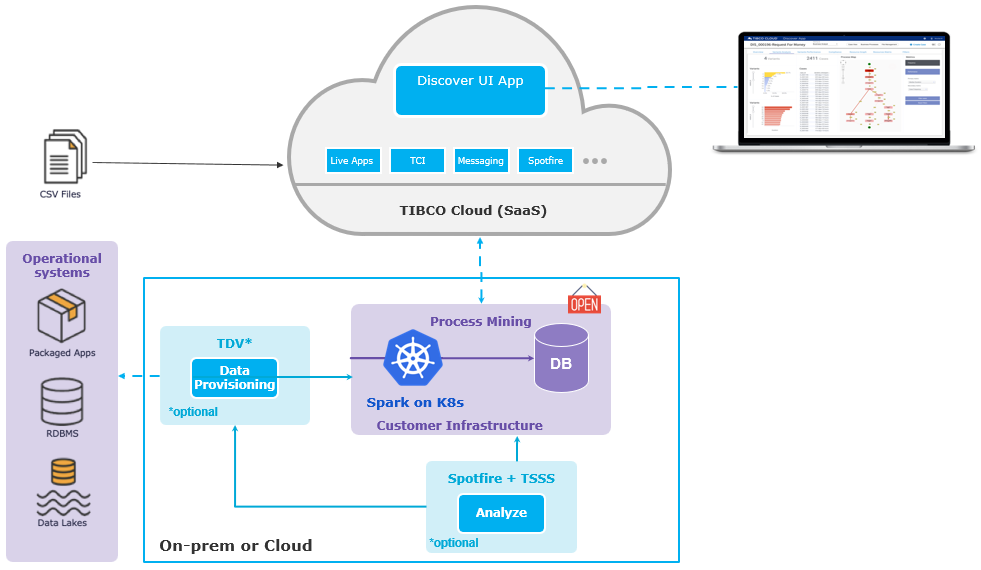
TIBCO Data Virtualization works as an abstraction layer between data consumers and various data sources. Its architecture includes the following components:
- Data Sources: TIBCO Data Virtualization connects to various data sources, including databases, cloud services, and web services.
- Data Virtualization Server: The server processes queries and data integration tasks, optimizing query execution and caching.
- Metadata Catalog: The metadata catalog stores information about data sources, virtual views, and their mappings.
- Query Processing Engine: The query processing engine parses and optimizes queries to generate a unified query plan.
- Query Optimization and Caching: TIBCO Data Virtualization optimizes queries and caches frequently accessed data for faster performance.
How to Install TIBCO Data Virtualization?
To install TIBCO Data Virtualization, you need access to the installation files and a valid license. The installation process has some following steps:
- Obtain Installation Files: Obtain the TIBCO Data Virtualization installation files from TIBCO or their authorized partners.
- System Requirements: Review the system requirements to ensure that your environment meets the necessary prerequisites.
- Run the Installer: Launch the installation wizard and follow the on-screen instructions to install TIBCO Data Virtualization.
- Configure Licensing: During the installation process, you will be prompted to enter your TIBCO Data Virtualization license details.
- Start TIBCO Data Virtualization: Once the installation is complete, start the TIBCO Data Virtualization server.
The installation steps may vary based on the specific version and configuration you are using. It is recommended to refer to the official TIBCO Data Virtualization documentation and support resources for detailed installation instructions and best practices.
Basic Tutorials of TIBCO Data Virtualization: Getting Started
Let’s have a look at a step-by-step guide to get started with TIBCO Data Virtualization:
Step 1: Obtain TIBCO Data Virtualization
- Visit the TIBCO website or contact their sales team to obtain TIBCO Data Virtualization software and licensing.
Step 2: System Requirements
- Review the system requirements for TIBCO Data Virtualization to ensure your environment meets the necessary prerequisites.
Step 3: Install TIBCO Data Virtualization
- Run the TIBCO Data Virtualization installer on your server or machine.
- Follow the installation wizard to set up TIBCO Data Virtualization. You may need to specify installation directories, ports, and other configuration settings.
Step 4: Configure Licensing
- During the installation process, you will be prompted to enter your TIBCO Data Virtualization license details.
- To activate the license, follow the instructions precisely.
Step 5: Start TIBCO Data Virtualization Server
- Once the installation is complete, start the TIBCO Data Virtualization server.
- Check that the server is up and working.
Step 6: Access TIBCO Data Virtualization Console
- Open the TIBCO Data Virtualization Console, which is a web-based interface for managing TIBCO Data Virtualization.
- Connect to the TIBCO Data Virtualization server using appropriate credentials.
Step 7: Define Data Sources
- Define data sources that TIBCO Data Virtualization will connect to, such as databases, cloud services, and APIs.
- Set up connection parameters and authentication details for each data source.
Step 8: Create Virtual Views
- Design virtual views in TIBCO Data Virtualization. These are logical representations of your data sources.
- Define the necessary transformations and mappings to create unified views of the data.
Step 9: Create Derived Views
- Build derived views by combining and enriching data from multiple virtual views.
- Apply filters, calculations, and other operations as needed.
Step 10: Publish Virtual Databases
- Publish virtual databases that contain the derived views.
- These virtual databases act as a data abstraction layer for your applications and users.
Step 11: Access Data
- Access data from the TIBCO Data Virtualization virtual databases using TIBCO clients, JDBC/ODBC connectors, or web services.
Step 12: Monitor and Optimize
- Monitor query performance and resource usage in TIBCO Data Virtualization.
- Optimize your virtualization layer for better performance and efficiency.
Please note that this is a general outline, and the specific steps and options may vary based on the version and configuration of TIBCO Data Virtualization you are using. For detailed instructions and best practices, refer to the official TIBCO Data Virtualization documentation, tutorials, and support resources provided by TIBCO.

👤 About the Author
Ashwani is passionate about DevOps, DevSecOps, SRE, MLOps, and AiOps, with a strong drive to simplify and scale modern IT operations. Through continuous learning and sharing, Ashwani helps organizations and engineers adopt best practices for automation, security, reliability, and AI-driven operations.
🌐 Connect & Follow:
Website: WizBrand.com
Facebook: facebook.com/DevOpsSchool
X (Twitter): x.com/DevOpsSchools
LinkedIn: linkedin.com/company/devopsschool
YouTube: youtube.com/@TheDevOpsSchool
Instagram: instagram.com/devopsschool
Quora: devopsschool.quora.com
Email– contact@devopsschool.com
Find Trusted Cardiac Hospitals
Compare heart hospitals by city and services — all in one place.
Explore Hospitals