What is Kubeadm?
Kubeadm helps you bootstrap a minimum viable Kubernetes cluster that conforms to best practices. Kubeadm is a tool built to provide kubeadm init and kubeadm join as best-practice “fast paths” for creating Kubernetes clusters.
Goal
- To Install a single master Kubernetes cluster
- To Install a high availability master Kubernetes cluster
- To Install a Pod network on the cluster so that your Pods can talk to each other.
kubeadm’s simplicity means it can serve a wide range of use cases:
- New users can start with kubeadm to try Kubernetes out for the first time.
- Users familiar with Kubernetes can spin up clusters with kubeadm and test their applications.
- Larger projects can include kubeadm as a building block in a more complex system that can also include other installer tools.
Pre-requisite
- One or more machines running a deb/rpm-compatible OS, for example Ubuntu or CentOS
- 2 GB or more of RAM per machine. Any less leaves little room for your apps.
- 2 CPUs or more on the master
- Full network connectivity among all machines in the cluster. A public or private network is fine
As part of the installation, every node (master and minions) needs:
- Docker
- Kubelet
- Kubeadm
- Kubectl
- CNI
Step 1 – Update Ubuntu and install apt-transport-https
$ apt-get update && apt-get install -y apt-transport-https
$ curl -s https://packages.cloud.google.com/apt/doc/apt-key.gpg | apt-key add -Code language: JavaScript (javascript)
Step 2 – Add Ubuntu apt repo for docker kubeadm kubectl kubelet kubernetes-cni
$ cat <<EOF >/etc/apt/sources.list.d/kubernetes.list
deb http://apt.kubernetes.io/ kubernetes-xenial main
EOFCode language: PHP (php)
Step 3 – Install docker kubeadm kubectl kubelet kubernetes-cni
$ apt-get update
$ apt-get install -y docker.io kubeadm kubectl kubelet kubernetes-cni
$ apt-get install -y docker.io kubeadm kubectl kubelet kubernetes-cniCode language: JavaScript (javascript)
Step 4 – Finally, initialize a kubernetes clusters
$ kubeadm initStep 5 – Output
To start using your cluster, you need to run the following as a regular user:

  mkdir -p $HOME/.kube
  sudo cp -i /etc/kubernetes/admin.conf $HOME/.kube/config
  sudo chown $(id -u):$(id -g) $HOME/.kube/config

You should now deploy a pod network to the cluster.
Run "kubectl apply -f [podnetwork].yaml" with one of the options listed at:
  https://kubernetes.io/docs/concepts/cluster-administration/addons/

Then you can join any number of worker nodes by running the following on each as root:

kubeadm join 172.31.25.244:6443 --token 1j1lj9.bw6nb02omjv92owd \
    --discovery-token-ca-cert-hash sha256:caca50bf253855d96133c6fdde763629a6fba07d8c57b6b52eacece83f88b4b9Code language: JavaScript (javascript)
Step 6 – Setup Workstation in the Master node only. You can be regular user for it.
$ mkdir -p $HOME/.kube
$ sudo cp -i /etc/kubernetes/admin.conf $HOME/.kube/config
$ sudo chown $(id -u):$(id -g) $HOME/.kube/configCode language: PHP (php)
Step 7 – Verify Clustors
$ kubectl get nodes
$ kubectl get pods --all-namespacesCode language: JavaScript (javascript)
Step 8 – Install Kubernetes pod networking
Weave Net provides networking and network policy, will carry on working on both sides of a network partition, and does not require an external database. Kubernetes versions 1.6 and above:
$ kubectl apply -f "https://cloud.weave.works/k8s/net?k8s-version=$(kubectl version | base64 | tr -d '\n')"
$ kubectl get nodes
$ kubectl get pods --all-namespaces
$ kubectl get nodesCode language: JavaScript (javascript)
Step 9 – Setup nodes [ In the node aka worker ]
# Follow Step 1
# Follow Step 2
# Follow Step 3
# Run following commands which we got from kubeadm init
$ kubeadm join 172.31.31.106:6443 --token pdn6in.r0dzhpx1ucrs69au --discovery-token-ca-cert-hash sha256:a9385951e659a3c67f55ccfbdc1169b1f660ba09aaf8cc6d5cc96d71b71900d2Code language: PHP (php)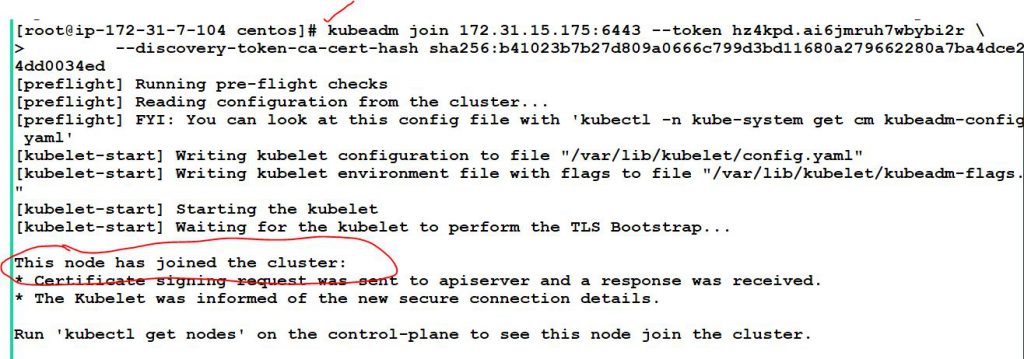
I’m Rajesh Kumar, a DevOps, SRE, DevSecOps, Cloud, and Platform Engineering expert passionate about sharing practical knowledge, real-world experiences, and industry best practices. I have worked at Cotocus and regularly write about technology, travel, investing, health, product reviews, and digital marketing through my various platforms.
I publish technical articles at DevOps School, travel stories at Holiday Landmark, stock market insights at Stocks Mantra, health and fitness guidance at My Medic Plus, product reviews at TrueReviewNow, and SEO and digital marketing strategies at Wizbrand.
Find Trusted Cardiac Hospitals
Compare heart hospitals by city and services — all in one place.
Explore Hospitals