Here is the latest step-by-step guide (as of May 2026) to install and configure OpenShift using Azure Red Hat OpenShift (ARO) directly from the Azure Portal.
☁️ What is Azure Red Hat OpenShift (ARO)?
| Feature | Description |
|---|---|
| Name | Azure Red Hat OpenShift (ARO) |
| Provider | Jointly managed by Microsoft Azure + Red Hat |
| Type | Fully managed OpenShift 4.x cluster (no need to manage VMs or OS) |
| Billing | Pay-as-you-go via Azure subscription |
| Best Use Case | Enterprises needing production-ready OpenShift on Azure |
| Latest Version (2026) | OpenShift 4.14+ |
🧰 Prerequisites
✅ Azure Requirements:
- Azure subscription (with sufficient quota)
- Azure AD permissions to create resources
- Resource group and virtual network (or permission to create them)
✅ Permissions:
- Role: Owner or Contributor for the subscription
- Network Contributor role for VNet, if using an existing VNet
✅ Location:
- ARO is supported in many Azure regions (e.g., East US, West Europe)
🚀 Step-by-Step Guide to Deploy ARO via Azure Portal
🔹 Step 1: Sign In to Azure Portal
- Go to: https://portal.azure.com/
- Log in with your Azure credentials.
🔹 Step 2: Search for Azure Red Hat OpenShift
- In the top search bar, type: Azure Red Hat OpenShift
- Click the Azure Red Hat OpenShift service from the results.
- Click Create.
🔹 Step 3: Fill in the Basics
| Field | Example / Notes |
|---|---|
| Subscription | Choose your Azure subscription |
| Resource Group | Create new or use existing (e.g., aro-rg) |
| Cluster Name | E.g., my-arocluster |
| Region | Choose supported region (e.g., East US) |
| Domain | Custom domain prefix (e.g., myapps) |
The FQDN will become:
myapps.<region>.aroapp.io
🔹 Step 4: Configure Networking
- You can choose to:
- Use an existing virtual network
- Or let Azure create one for you (recommended for beginners)
- If you use an existing VNet:
- Ensure two empty subnets: one for Master nodes and one for Worker nodes
- Both subnets must have service endpoints enabled for Microsoft.ContainerService
🔹 Step 5: Select Cluster Size
| Node Type | Recommended |
|---|---|
| Master | 3 nodes (default, fixed) |
| Worker | Minimum 3 (can scale up later) |
| VM Size | e.g., Standard_D8s_v3 for workers |
🔹 Step 6: Authentication Configuration
- Use Azure Active Directory (AAD) or configure local users.
- You’ll be asked to configure:
- Cluster admin group
- Cluster user group
These are AAD security groups used for OpenShift access control.
🔹 Step 7: Review + Create
- Azure will validate your settings.
- Click Create.
🚀 It takes 30–45 minutes to provision the full cluster.
✅ After Deployment: Accessing the ARO Cluster
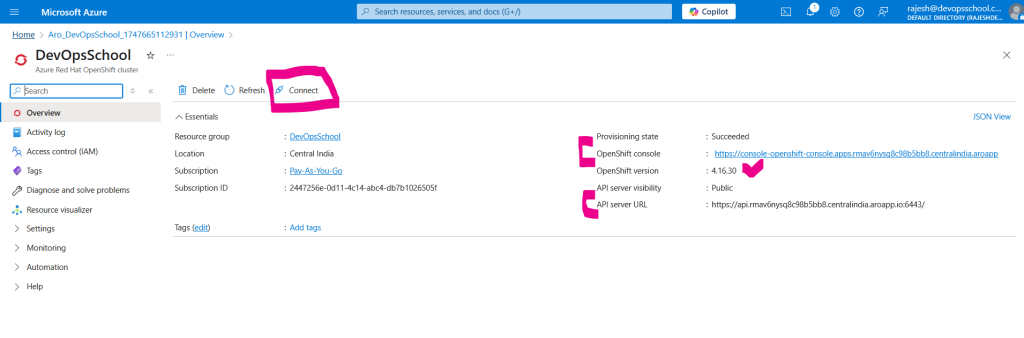
1. Web Console
- Once deployment completes, go to ARO resource in the Azure Portal.
- Click OpenShift web console link.
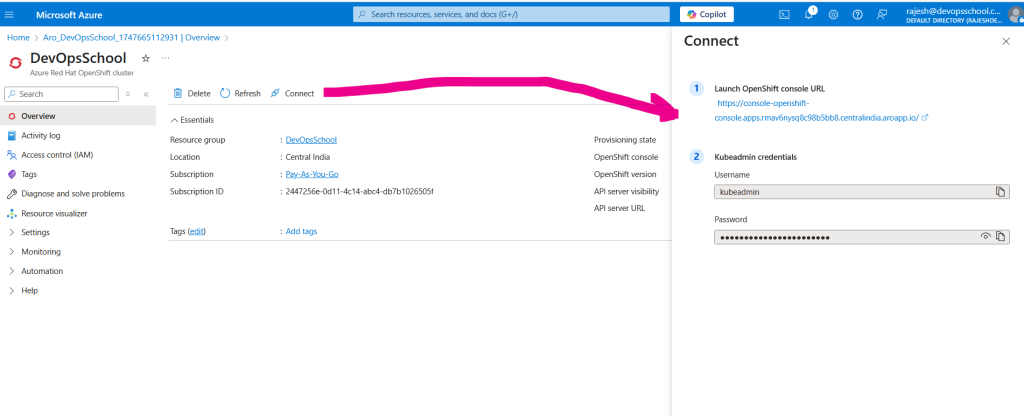
2. Log in as Cluster Admin
- Use Azure AD credentials for admin group members.
3. Access via oc CLI
- Install
ocCLI from:
👉 https://mirror.openshift.com/pub/openshift-v4/clients/oc/latest/ - Log in using the command:
oc login https://api.<domain>.aroapp.io:6443 --token=<your-token>
Code language: HTML, XML (xml)
Token can be obtained from the web console under Copy Login Command.
🔁 Day 2 Operations (Post-Install)
| Task | How-To |
|---|---|
| Scale worker nodes | Use Azure Portal or CLI |
| Install Operators | From OpenShift OperatorHub |
| Manage Projects/Apps | OpenShift Console → Developer view |
| Monitor Health | Console → Observe tab (Prometheus, Grafana) |
| RBAC & Permissions | Manage via OpenShift Console or CLI |
📌 Tips & Best Practices
| Tip | Description |
|---|---|
| Use Azure AD for RBAC | Simplifies user and group management |
| Avoid editing master nodes | They’re managed by Azure/Red Hat |
| Set up autoscaling (optional) | For cost-efficient cluster scaling |
| Tag your Azure resources | Helps with billing and cost management |
📚 References
I’m a DevOps/SRE/DevSecOps/Cloud Expert passionate about sharing knowledge and experiences. I have worked at Cotocus. I share tech blog at DevOps School, travel stories at Holiday Landmark, stock market tips at Stocks Mantra, health and fitness guidance at My Medic Plus, product reviews at TrueReviewNow , and SEO strategies at Wizbrand.
Do you want to learn Quantum Computing?
Please find my social handles as below;
Rajesh Kumar Personal Website
Rajesh Kumar at YOUTUBE
Rajesh Kumar at INSTAGRAM
Rajesh Kumar at X
Rajesh Kumar at FACEBOOK
Rajesh Kumar at LINKEDIN
Rajesh Kumar at WIZBRAND
Find Trusted Cardiac Hospitals
Compare heart hospitals by city and services — all in one place.
Explore Hospitals