👉 What ImageStream really gives you
👉 Why OpenShift uses it
👉 How it’s better (in some cases) than just pulling a normal image
🧠 First, imagine two situations:
🔵 Situation 1: Without ImageStream (Normal Kubernetes)
- You deploy an app with a direct Docker image URL:
image: nginx:latest - Kubernetes will never track changes in
nginx:latest. - If someone updates the
latestimage, your running pods stay the same unless you manually trigger an update (like delete the pod, rollout new version). - There’s no history, no auto-notifications, and no internal record of what “latest” pointed to when you deployed it.
- No control, no tracking, no automatic trigger.
✅ Simple but very dumb way.
✅ Works when you fully control your CI/CD pipeline.
🟠 Situation 2: With OpenShift ImageStream
- Instead of pulling images directly, OpenShift tracks them through an ImageStream.
- When
nginx:latestis updated on DockerHub, OpenShift automatically imports the new image metadata into ImageStream. - You can:
- Automatically redeploy apps when the image changes (without touching anything).
- View history of all previous images that ever existed for that tag.
- Tag images manually between environments (example: promote dev image → staging → prod by just changing a tag).
- Control access to images inside OpenShift’s internal registry.
- Pin exact images by digest to avoid accidental breakage.
✅ Smart, controlled, observable, CI/CD friendly.
✨ So, in simple words:
| Normal Images (Kubernetes) | ImageStream (OpenShift) |
|---|---|
| Pull and forget. No update tracking. | Tracks external and internal images in OpenShift. |
| No automatic redeploy when images change. | Can auto-trigger deployment when new image arrives. |
| No history of what version you pulled. | Maintains history of images for every tag. |
| Cannot promote images safely between environments. | Can tag/promote images easily between dev → staging → prod. |
| No OpenShift access control for images. | Full OpenShift permission control for pull, tag, promote. |
| You manage everything outside cluster. | OpenShift manages image lifecycle inside cluster. |
📸 Example to make it even more practical
✅ Without ImageStream:
- You push a new app build to DockerHub (
myapp:latestupdated). - Your Kubernetes app still uses old container unless you manually trigger a deployment.
✅ With ImageStream:
- You push a new app build to DockerHub (
myapp:latestupdated). - OpenShift automatically imports the new version into ImageStream.
- If a Deployment (with image trigger) is linked to that ImageStream:
- ➔ OpenShift triggers redeployment automatically!
- ➔ Zero manual work.
- ➔ New app version is live safely.
Final Summary (Easy Language)
Normal images are like pulling files from the internet manually every time.
ImageStreams are like having a smart librarian inside your OpenShift cluster who:
- Tracks when your images change.
- Keeps history of all versions.
- Alerts your applications and triggers updates.
- Controls who can pull what.
Practical Advantages of ImageStreams
| Benefit | Why it matters |
|---|---|
| Auto-updates | No need to manually redeploy when a new version is available. |
| History tracking | Rollback to any old image version easily. |
| Environment promotion | Promote builds from Dev → QA → Prod by tagging. |
| Pull secrets and control | Manage access securely for private registries. |
| Cluster registry integration | OpenShift can manage images internally without external dependency. |
Real Example
If you’re running CI/CD pipelines in OpenShift (Jenkins, Tekton, GitOps ArgoCD):
- Build finishes ➔ ImageStream updated ➔ New Deployment triggered ➔ App upgraded automatically.
✅ No downtime.
✅ No manual intervention.
✅ Full visibility on which image you are using.
Very Short Answer
| If you want | Use |
|---|---|
| Simple “set and forget” deploys | Normal Kubernetes image reference. |
| Smart, auto-tracked, secure, history-managed image lifecycle | OpenShift ImageStreams. |
🧠 What Are We Building?
You have three projects (namespaces):
| Environment | OpenShift Project |
|---|---|
| Development (Dev) | app-dev |
| Staging | app-staging |
| Production | app-prod |
We will:
- Build or Import an Image into
app-dev - Promote (copy) the image to
app-staging - Finally promote it to
app-prod - All using ImageStreams without rebuilding the app again
✅ No re-building needed!
✅ Full traceability!
✅ Full security control!
🛠 Prerequisites:
- OpenShift CLI (
oc) installed - Access to an OpenShift 4.x+ cluster
adminor sufficient permissions on projects
🚀 Step-by-Step Tutorial
1️⃣ Create Three OpenShift Projects
oc new-project app-dev
oc new-project app-staging
oc new-project app-prod
Code language: JavaScript (javascript)
2️⃣ Create ImageStreams in Each Project
Create an ImageStream named myapp in each project.
# myapp-imagestream.yaml
apiVersion: image.openshift.io/v1
kind: ImageStream
metadata:
  name: myapp
Code language: PHP (php)
Apply in all three projects:
oc project app-dev
oc apply -f myapp-imagestream.yaml

oc project app-staging
oc apply -f myapp-imagestream.yaml

oc project app-prod
oc apply -f myapp-imagestream.yaml
Code language: CSS (css)
✅ Now, each project has an empty myapp ImageStream.
3️⃣ Import or Build Image into Dev (First Deployment)
For simplicity, let’s just import a public image (you could also BuildConfig if needed).
oc project app-dev

oc import-image myapp:latest --from=nginx:latest --confirm
Code language: JavaScript (javascript)
✅ Now, the app-dev project myapp:latest points to the latest nginx image!
You can check:
oc describe is myapp
4️⃣ Create Deployment that Uses ImageStream (optional but recommended)
In Dev, create a Deployment that uses the ImageStream:
# myapp-deployment.yaml
apiVersion: apps/v1
kind: Deployment
metadata:
  name: myapp-deployment
spec:
  replicas: 1
  selector:
    matchLabels:
      app: myapp
  template:
    metadata:
      labels:
        app: myapp
    spec:
      containers:
      - name: myapp
        image: image-registry.openshift-image-registry.svc:5000/app-dev/myapp:latest
        ports:
        - containerPort: 80
Code language: PHP (php)
Apply:
oc apply -f myapp-deployment.yaml
Code language: CSS (css)
✅ Dev environment is now running your image!
5️⃣ Promote Image from Dev ➔ Staging
Now the magic: Tagging from one project’s ImageStream to another project’s ImageStream.
oc tag app-dev/myapp:latest app-staging/myapp:latest
✅ This command copies the image reference into app-staging‘s ImageStream.
Important:
- No rebuild.
- No re-pulling from DockerHub.
- Full OpenShift internal secured movement.
You can verify:
oc project app-staging
oc describe is myapp
You will see that it points to the image from Dev.
6️⃣ Deploy in Staging
Create a Deployment in app-staging, pointing to:
image: image-registry.openshift-image-registry.svc:5000/app-staging/myapp:latest
Code language: HTTP (http)
Now staging runs the exact same image!
7️⃣ Promote Image from Staging ➔ Production
Same simple command:
oc tag app-staging/myapp:latest app-prod/myapp:latest
✅ Now your Production ImageStream is updated with the exact tested image.
Create a Deployment in app-prod using:
image: image-registry.openshift-image-registry.svc:5000/app-prod/myapp:latest
Code language: HTTP (http)
✅ Production environment runs only after successful promotion from staging!
🔥 Auto-Promotion Pipeline Idea (Optional)
You can fully automate this using Tekton Pipelines, Jenkins, GitHub Actions, or GitOps (ArgoCD):
- After tests pass in Dev ➔ automatically tag to Staging.
- After staging approval ➔ automatically tag to Production.
✅ Fully secure.
✅ CI/CD friendly.
✅ Traceable images across all stages.
🏆 Final Architecture Diagram
DockerHub or Build --> app-dev/myapp:latest
                              |
                       oc tag
                              ↓
                     app-staging/myapp:latest
                              |
                       oc tag
                              ↓
                      app-prod/myapp:latest
Each environment runs exactly the promoted image, NOT a rebuilt one. 🚀
📋 Quick Commands Cheat Sheet
| Command | Purpose |
|---|---|
oc import-image myapp:latest --from=<external-image> --confirm | Import image from external registry |
oc tag app-dev/myapp:latest app-staging/myapp:latest | Promote image from Dev to Staging |
oc tag app-staging/myapp:latest app-prod/myapp:latest | Promote image from Staging to Prod |
oc describe is myapp | View ImageStream details |
oc get istag | List image tags |
🎯 Real-World Benefits of This Method
| Benefit | Why It Matters |
|---|---|
| No Rebuilding | Promotes the same built image — ensures consistency |
| Fast and Secure | No need to pull externally again — internal registry handles it |
| Full Traceability | You can always check where an image came from |
| Automation Friendly | Easily integrate with pipelines and GitOps |
| Safe Rollbacks | Previous tags/history available if you want to revert |
🚀 Conclusion
✅ ImageStreams make Dev ➔ Staging ➔ Prod promotions super clean and safe!
✅ Tagging avoids risks of “it works on my machine but fails on prod” issues.
✅ Production-ready method in OpenShift CI/CD workflows!
Lab with Existing
Here’s a short and clear tutorial on how to check and deploy ImageStreams in OpenShift, using the example where you added httpd via the Developer Catalog UI and then used oc commands to deploy and expose it.
Deploy ImageStreams in OpenShift (ARO)
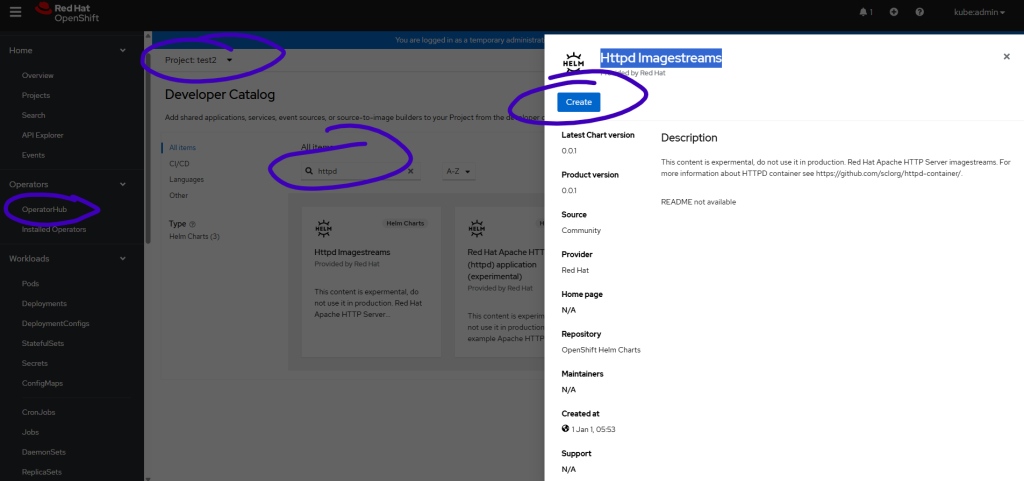
✅ Step 1: Add ImageStream via Developer Catalog (UI)
- In OpenShift Web Console:
- Go to Developer → +Add → Container Image
- Search for
httpdand add it - This will create an ImageStream but not a running application
✅ Step 2: Check What Was Created
Use the CLI:
oc get all -n test2
Code language: JavaScript (javascript)
You’ll see only:
imagestream.image.openshift.io/httpd
✅ Step 3: Deploy an App Using the ImageStream
To deploy a pod from the ImageStream you created:
oc new-app httpd -n test2
Code language: JavaScript (javascript)
This automatically creates:
- DeploymentConfig
- Pod
- Service
✅ Step 4: Verify Deployment
oc get all -n test2
Code language: JavaScript (javascript)
You’ll now see:
deploymentconfig.apps.openshift.io/httpdpod/httpd-xxxxxsvc/httpd
✅ Step 5: Expose the Service to Create a Public Route
oc expose svc/httpd -n test2
✅ Step 6: Get the Route URL
oc get route httpd -n test2
Code language: JavaScript (javascript)
Open the displayed URL in a browser to see the httpd default page.
🧪 Command History You Used
512  oc get all -n test2
513  oc new-app jenkins              # (unrelated, probably test)
514  oc new-app httpd -n test2       # ✅ deploy httpd app
515  oc get all -n test2
516  oc expose svc/httpd -n test2    # ✅ expose the service
Code language: PHP (php)
✅ Summary
| Task | Command |
|---|---|
| Check what exists | oc get all -n test2 |
| Deploy app from ImageStream | oc new-app httpd -n test2 |
| Expose service | oc expose svc/httpd -n test2 |
| Access app | oc get route httpd -n test2 |
I’m a DevOps/SRE/DevSecOps/Cloud Expert passionate about sharing knowledge and experiences. I have worked at Cotocus. I share tech blog at DevOps School, travel stories at Holiday Landmark, stock market tips at Stocks Mantra, health and fitness guidance at My Medic Plus, product reviews at TrueReviewNow , and SEO strategies at Wizbrand.
Do you want to learn Quantum Computing?
Please find my social handles as below;
Rajesh Kumar Personal Website
Rajesh Kumar at YOUTUBE
Rajesh Kumar at INSTAGRAM
Rajesh Kumar at X
Rajesh Kumar at FACEBOOK
Rajesh Kumar at LINKEDIN
Rajesh Kumar at WIZBRAND
Find Trusted Cardiac Hospitals
Compare heart hospitals by city and services — all in one place.
Explore Hospitals