Prerequisites
- Access to the OpenShift dashboard
- Access to the Developer Sandbox
What you will learn
In this learning path, you will:
- Deploy a MySQL database with configured environment variables
- Deploy the Spring Pet Clinic application from source code with configured environment variables
How long will this learning path take?
- About 30-45 minutes
In this lesson, you will:
- Create a deployment of an ephemeral instance of MySQL
- Set the environment variables for credentials and database name
Creating the deployment
The Pet Clinic application uses a MySQL database to store data, and this lesson creates that MySQL installation and the necessary database (petclinic) in the same OpenShift project as the Pet Clinic app.
Info alert:While this lesson is specific to the Pet Clinic application, the same steps are used for any application for which you wish to use a MySQL database in OpenShift.
- Begin by logging into the Developer Sandbox. The dashboard will appear in your browser.
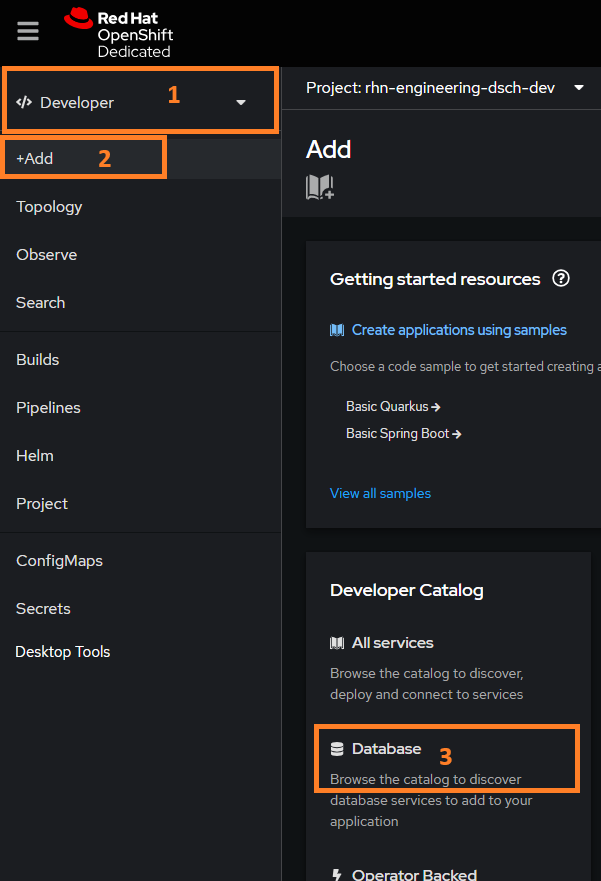
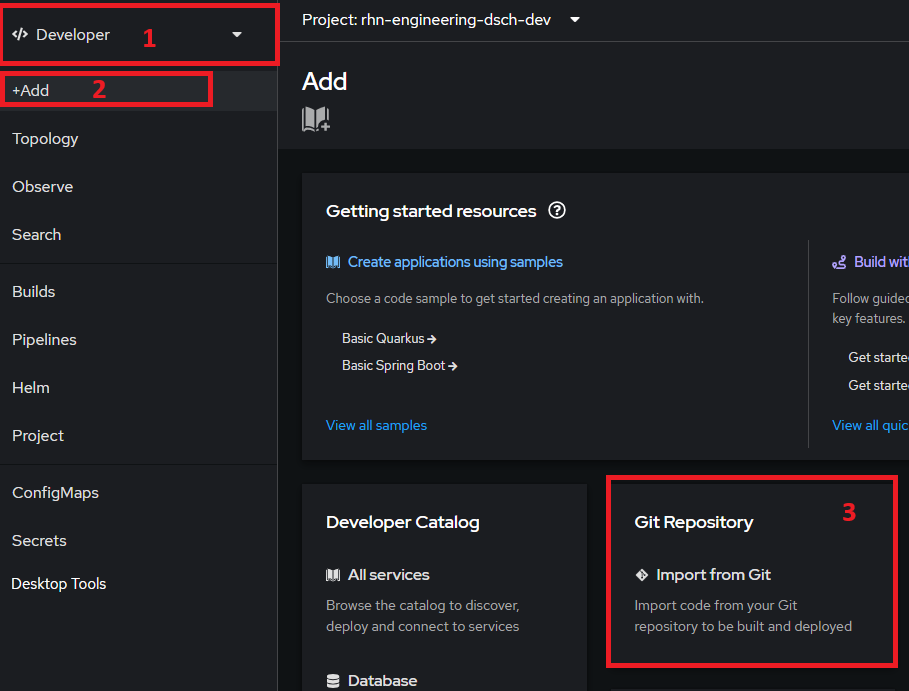
- Select the Developer perspective (Figure 1, Callout 1), then click the +Add option (Figure 1, Callout 2), then click the Database panel (Figure 1, Callout 3).Figure 1: Prepare to install the database using the web-based dashboard.
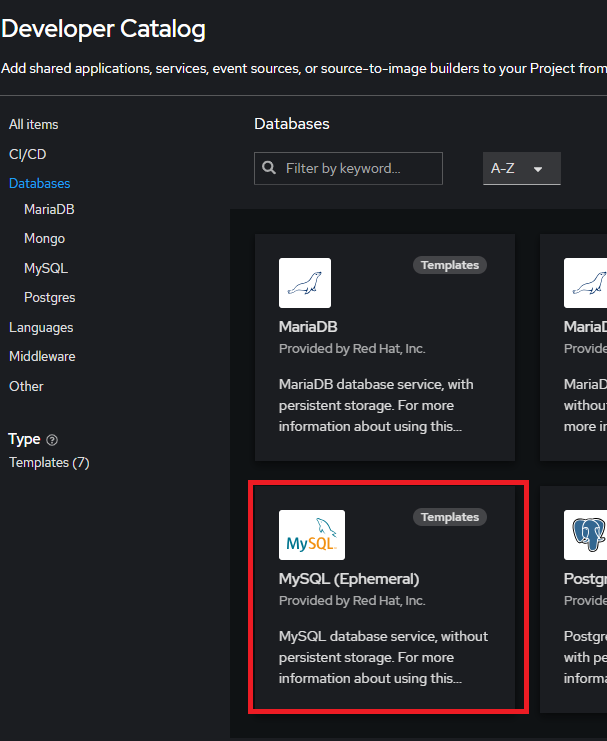
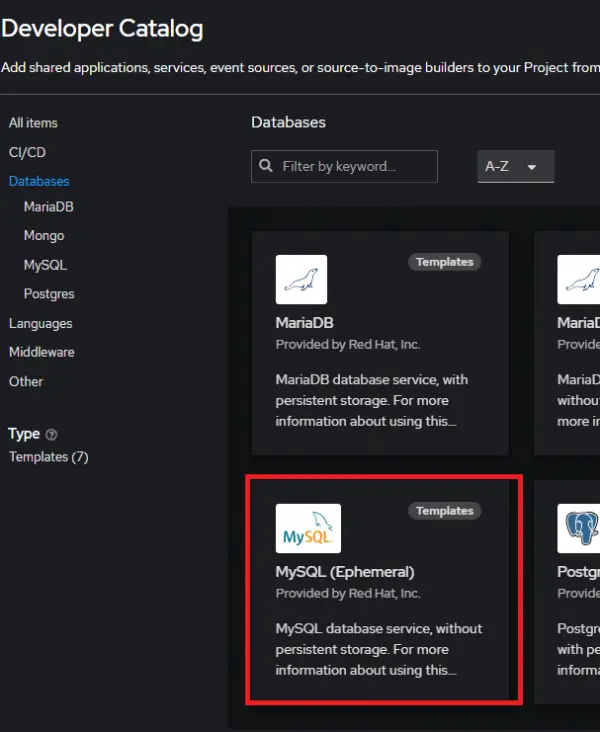
- The Databases section of the Developer Catalog is displayed. Click on the MySQL (Ephemeral) panel (Figure 2).Figure 2: Selecting the MySQL Ephemeral database.
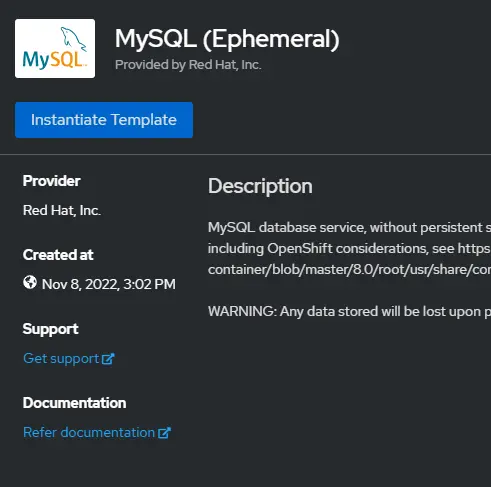
- The description of the MySQL Ephemeral database is displayed. Click the Instantiate Template button to continue (Figure 3).Figure 3: Brief description of MySQL Ephemeral database instance.
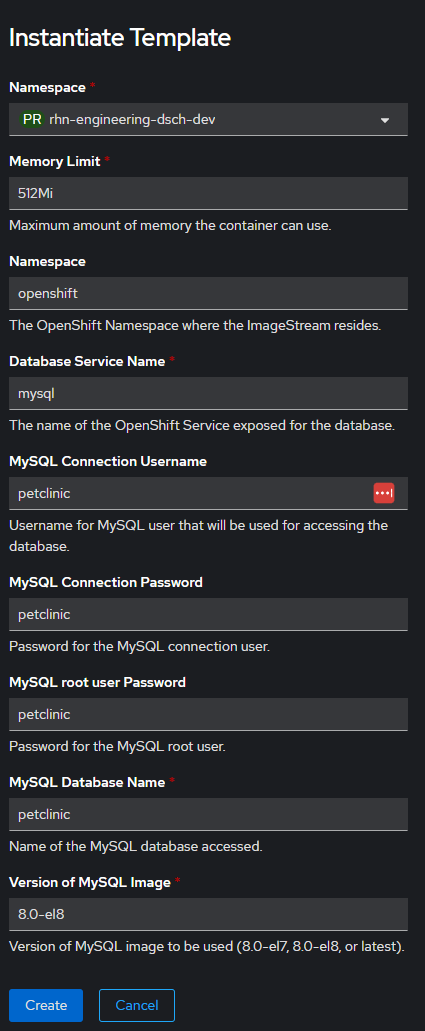
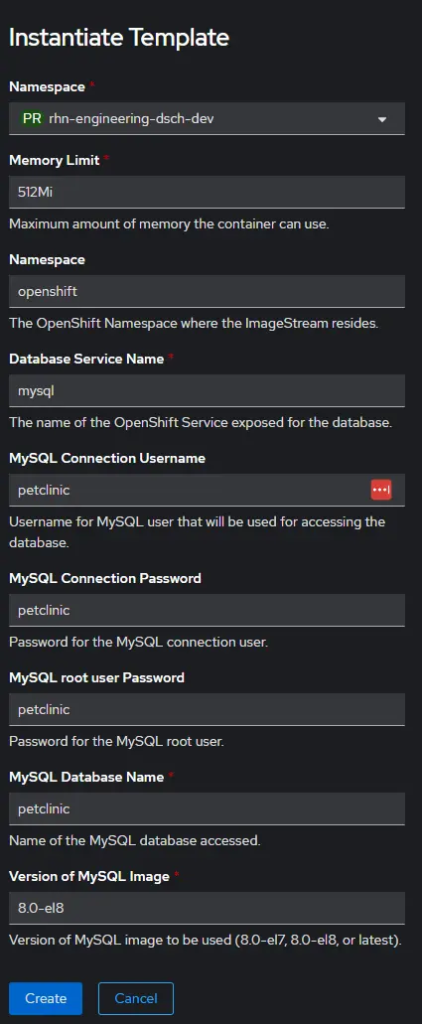
- The Instantiate Template panel is displayed. There are several options.
- Supply the following four values (Figure 4):
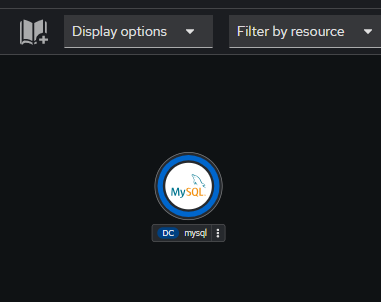
- Click Create and the installation will happen. You will see the icon in your dashboard (Figure 5).Figure 5: MySQL is up and running.
That’s it. The ephemeral instance of MySQL is up and running as an OpenShift service (named mysql). In the next lesson, you will create the Spring Pet Clinic application that uses this database.


Deploy the Spring Pet Clinic application with configured environment variables
Camels, pythons, and cats — oh my! In this scenario, the line of animals and their owners has surrounded the building, and the employees at the Pet Clinic can’t keep up with demand. The clinic needs an application to help them run the clinic more efficiently. Management wants to keep track of the pets, their owners, and the veterinarians that work at the Pet Clinic. You’ll need to create a set of microservices that lets employees view the list of veterinarians and their specialties, add new pets and owners, plus update information about existing pets and owners, and manage their visits. Of course, the application needs to be delivered yesterday.
In order to get full benefit from taking this lesson, you need to:
- Have access to the OpenShift dashboard
- Have the MySQL database service available
In this lesson, you will:
- Create a deployment of the Spring Pet Clinic application with the necessary environment variables
Deploy from source using S2I
One of the ways to create an application is by using the Source-To-Image (S2I) feature. The S2I feature allows you to import source code from a git repository and let OpenShift automatically build and start an image. In this lesson, you will create the Spring Pet Clinic app from source.
Begin by logging into your sandbox; the dashboard will appear in your browser.
Select the Developer perspective (Figure 1, Callout 1), then click the +Add option (Figure 1, Callout 2), then click the Git Repository panel (Figure 1, Callout 3).
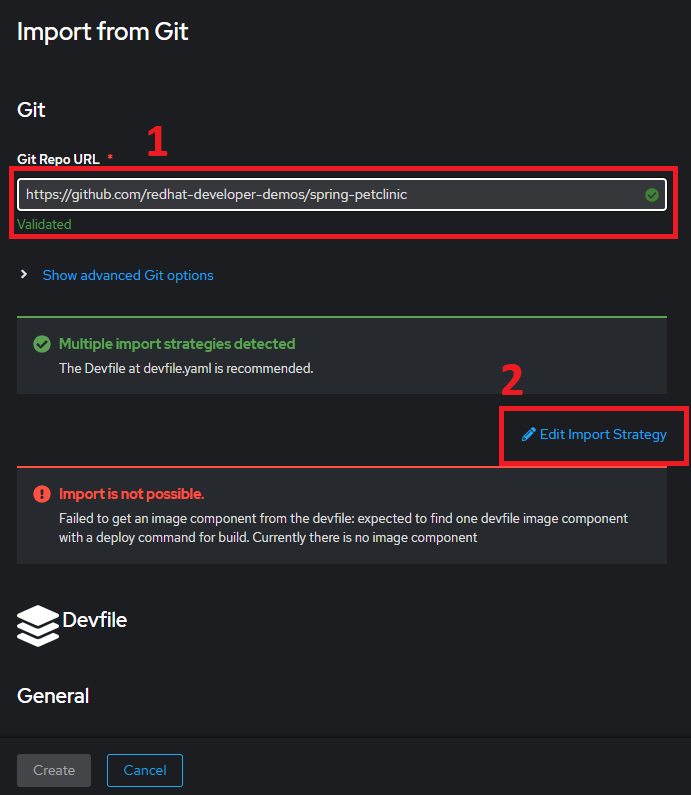
When the Import from Git panel is displayed, enter the following value for the git repo (Figure 2, Callout 1): https://github.com/redhat-developer-demos/spring-petclinic
You will see the Import is not possible error message. When you specify a Git repo, OpenShift will inspect it and try to determine the best way to build the source code.
The three options are:
- Build from source as-is using a build image for the programming language, e.g. Java
- Use any Dockerfile in the source code to build the app
- Use any development configuration file (
devfile) to build the app
In this case, the source code contains a development configuration file (devfile) that is outdated, causing the error. You need to override this by clicking on the Edit Import Strategy link (Figure 2, Callout 2).
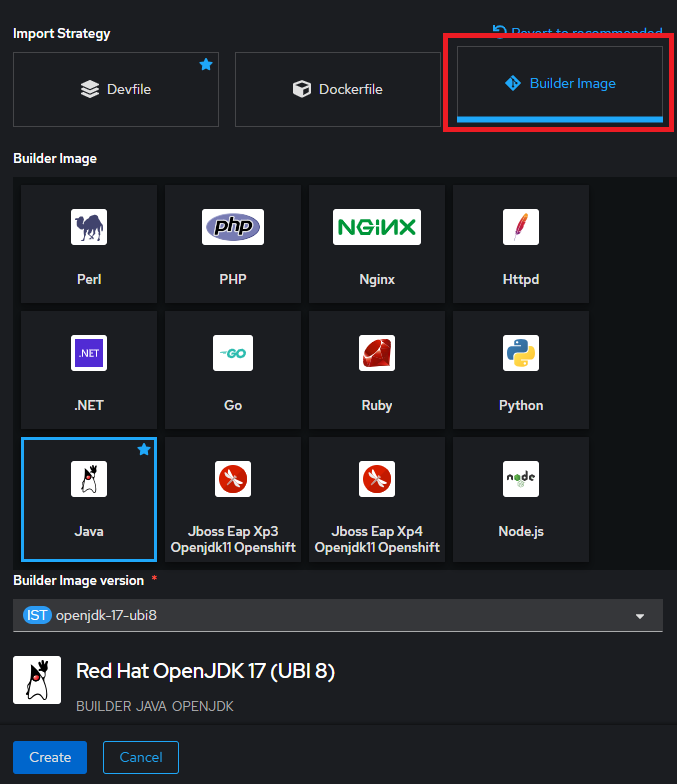
After selecting the Edit Import Strategy link, choose the Builder Image option (Figure 3).
Scroll down and open the Resource type dropdown list. Select the Deployment option (Figure 4).

Select the link to access the advanced options for the Build configuration (Figure 5).
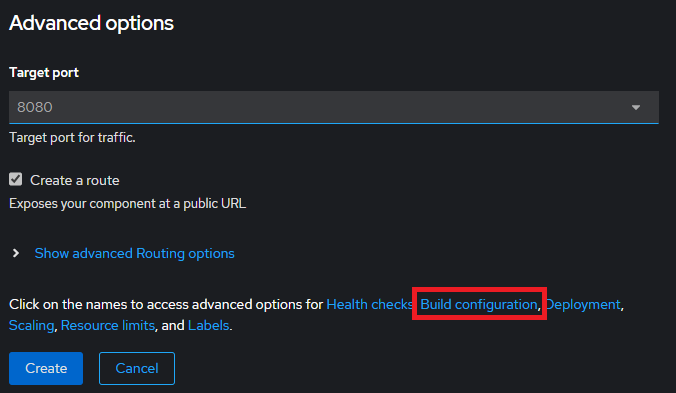
Enter the two necessary Environment variables:
- SPRING_PROFILES_ACTIVE mysql
- MYSQL_URL jdbc:mysql://mysql:3306/petclinic
Click Create to build the application (Figure 6).

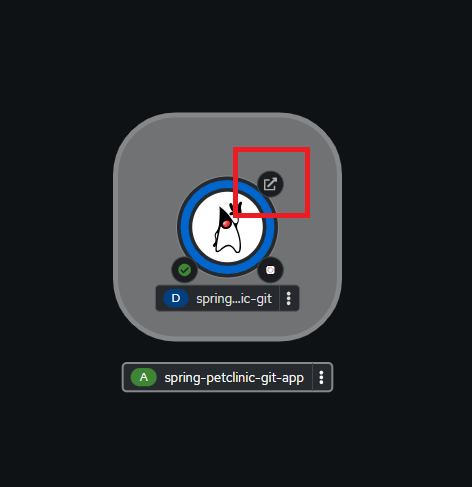
The build will begin. After a few minutes, you will see the app icon showing the completed build. You will know the build is complete when the outer ring turns dark blue. When it’s complete, click the Open URL link to display the app (Figure 7).
Your browser will open to the Spring Petclinic app (Figure 8).
Summary
Congratulations. You’ve done it. We have walked you through a simplistic example that demonstrates the power of OpenShift S2I. This lesson has walked you through entering required parameters and creating the Spring Petclinic app from source code..
I’m a DevOps/SRE/DevSecOps/Cloud Expert passionate about sharing knowledge and experiences. I have worked at Cotocus. I share tech blog at DevOps School, travel stories at Holiday Landmark, stock market tips at Stocks Mantra, health and fitness guidance at My Medic Plus, product reviews at TrueReviewNow , and SEO strategies at Wizbrand.
Do you want to learn Quantum Computing?
Please find my social handles as below;
Rajesh Kumar Personal Website
Rajesh Kumar at YOUTUBE
Rajesh Kumar at INSTAGRAM
Rajesh Kumar at X
Rajesh Kumar at FACEBOOK
Rajesh Kumar at LINKEDIN
Rajesh Kumar at WIZBRAND
Find Trusted Cardiac Hospitals
Compare heart hospitals by city and services — all in one place.
Explore Hospitals